Guide Organization
This guide covers all modules of the SFPL Logistics Park — Customer Portal. It will help you understand each module in detail, including step-by-step instructions for common operations.
Getting Started
Welcome to the SFPL Logistics Park — Customer Portal help documentation. This portal is your single window for KYC onboarding, digital cargo & container tracking, documentation management, and business reports & analytics.
The Customer Portal is designed with a strong focus on customer convenience — providing verified customer access, simple KYC onboarding, and faster portal readiness. Whether you are a new customer registering for the first time or an existing user managing your shipments, this guide will help you navigate every module with ease.
Who is this for? This guide is intended for all customers of Saurashtra Freight Pvt. Ltd. who use the Logistics Park Customer Portal for import/export cargo management, container tracking, and documentation.
Portal Features at a Glance
Port to CFS OperationEnd-to-end visibility from port to CFS operations
Real Time VisibilityLive tracking of container and cargo status
Business Reports & AnalyticsTEUs summary, weighment data, movement reports
Simple KYC OnboardingQuick GST-based KYC verification for new customers
Verified Customer AccessSecure login with email verification
Faster Portal ReadinessStreamlined registration and onboarding process
Landing Page
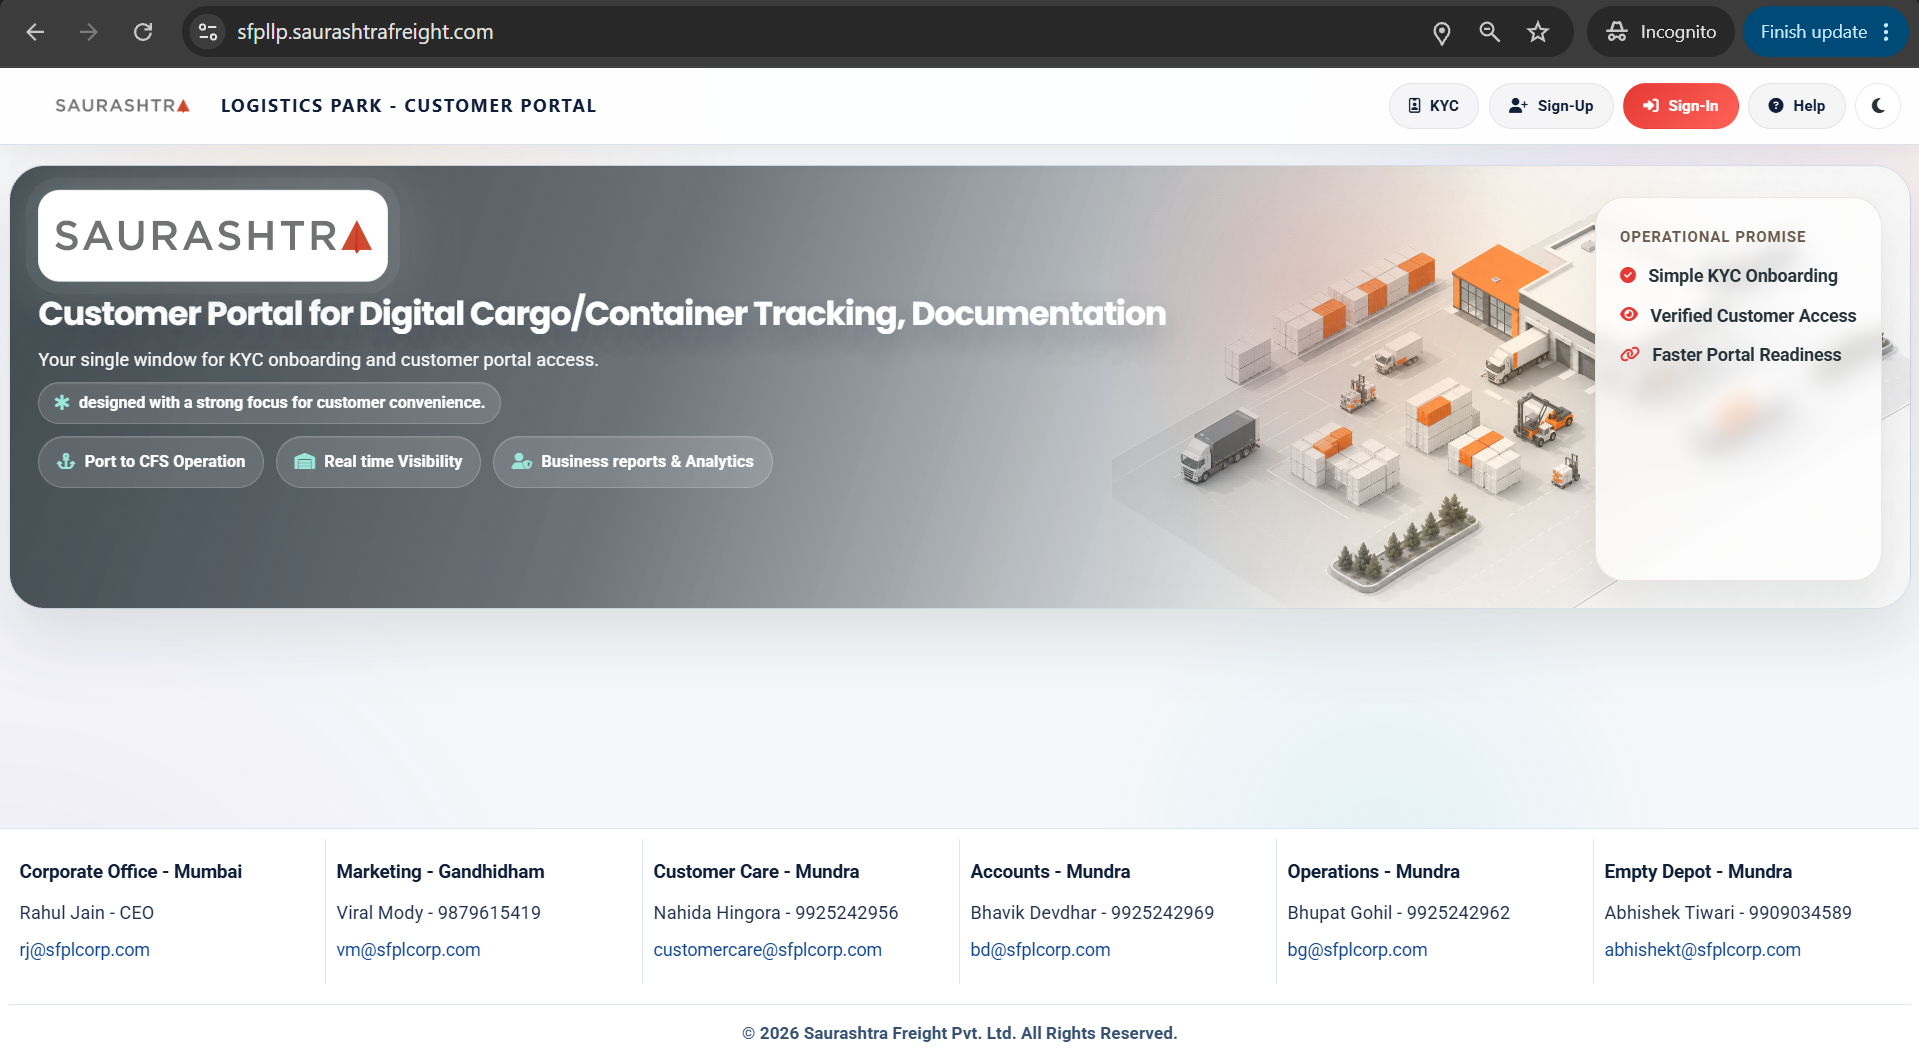
The landing page is the first page you see when you visit the Customer Portal. It provides an overview of the portal's capabilities and quick access to key actions like KYC, Sign-Up, and Sign-In.
Click image to view full size
Key Elements
- Navigation Bar — Contains links to KYC, Sign-Up, Sign-In, Help Documentation, and a theme toggle (light/dark mode).
- Hero Section — Displays the Saurashtra Freight logo, a tagline about digital cargo/container tracking, and key feature badges (Port to CFS Operation, Real Time Visibility, Business Reports & Analytics).
- Operational Promise — A card highlighting Simple KYC Onboarding, Verified Customer Access, and Faster Portal Readiness.
- Footer — Contact details for Corporate Office (Mumbai), Marketing (Gandhidham), Customer Care (Mundra), Accounts (Mundra), Operations (Mundra), and Empty Depot (Mundra).
KYC Module
Public
The KYC (Know Your Customer) module allows new customers to verify their identity using their GST number. This is the first step in the onboarding process before you can access the full portal features.
KYC Screens & Process
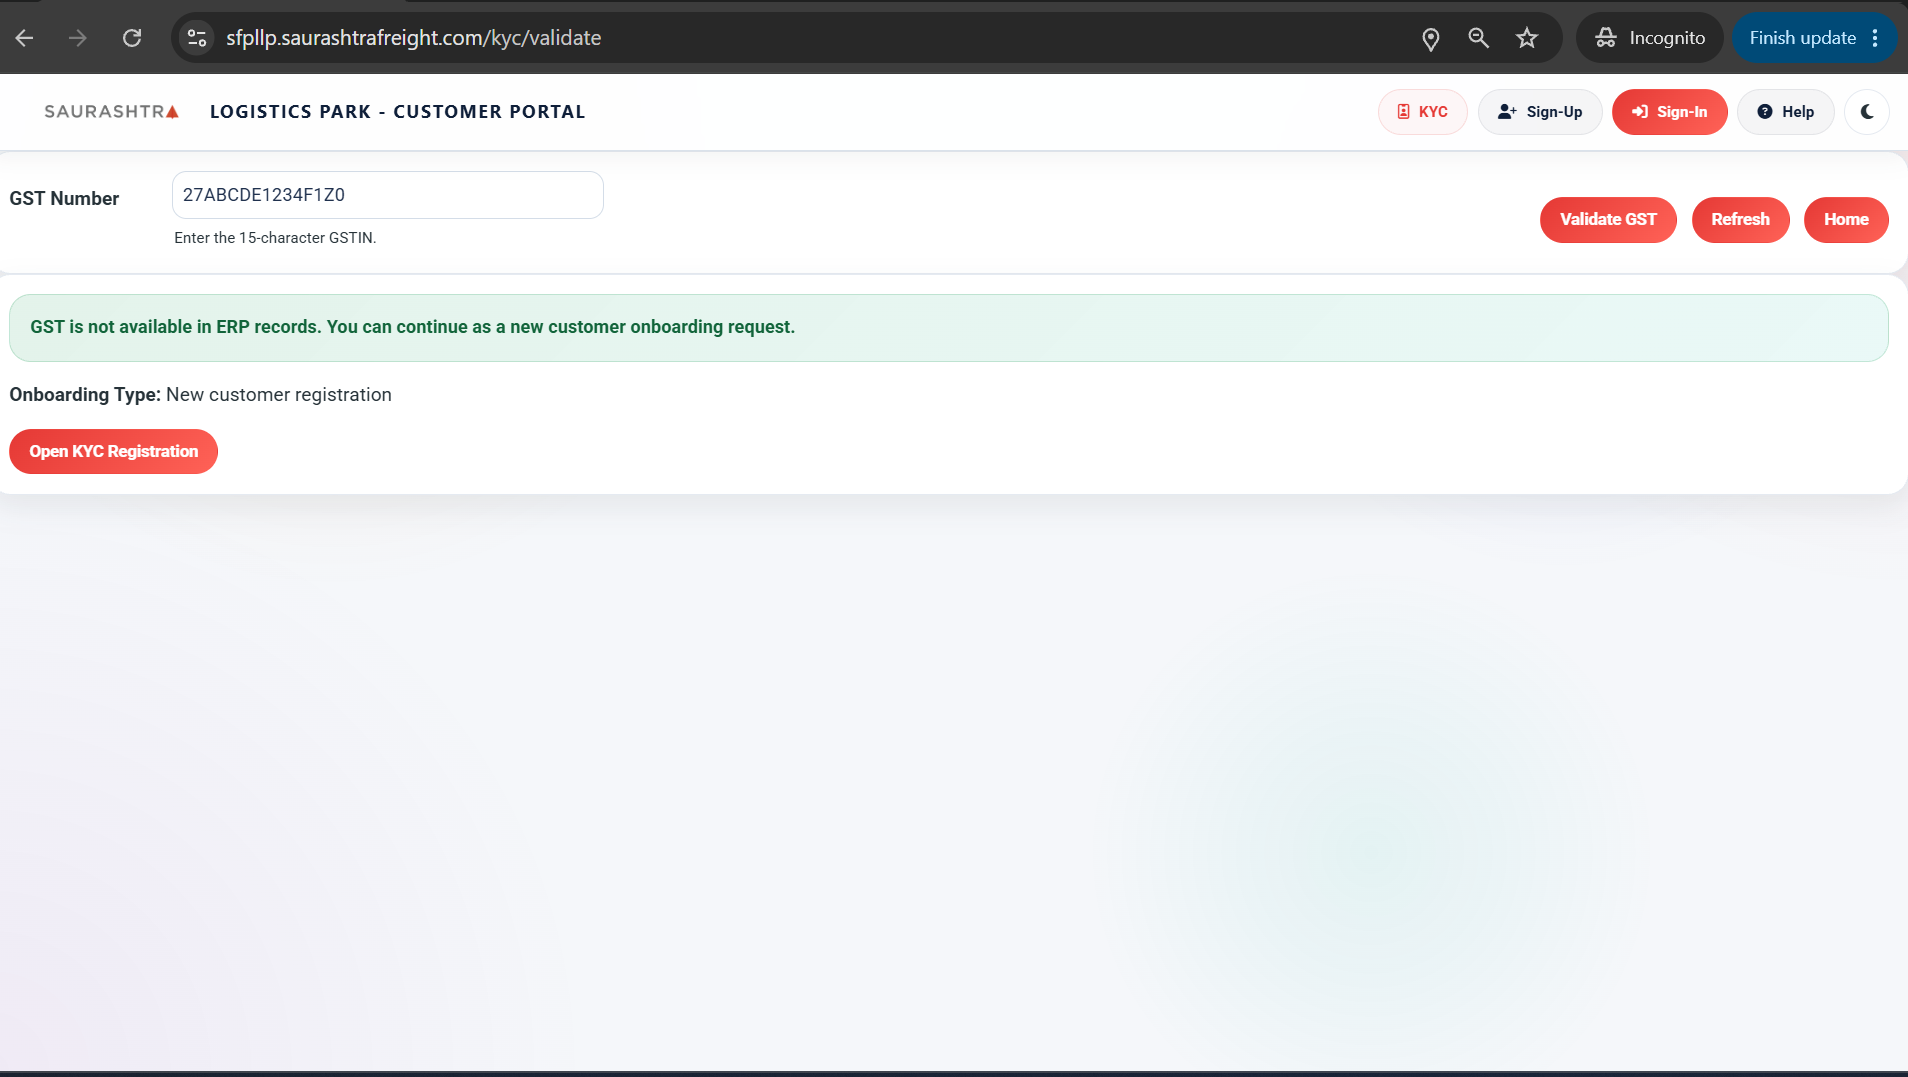
Step 1: GST Validation Form
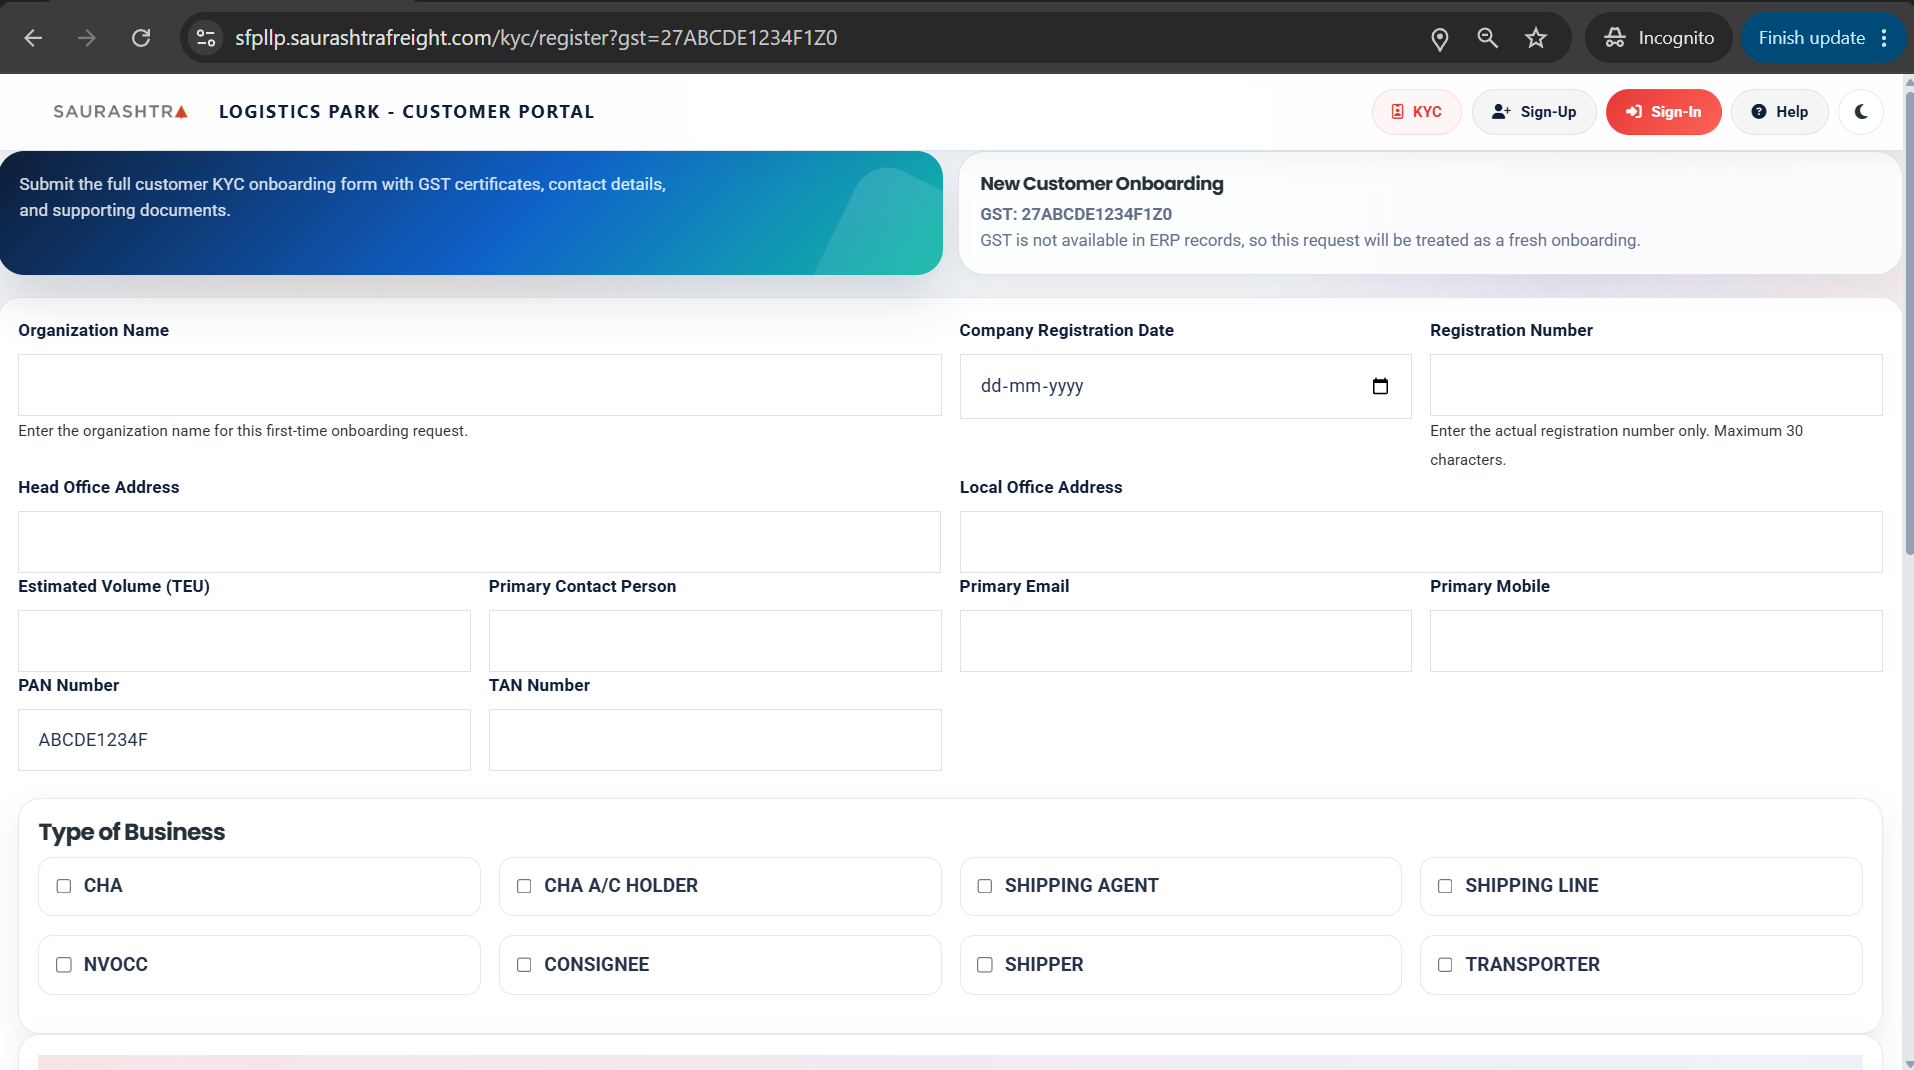
Step 2: KYC Registration Form
How to Complete KYC
- Navigate to KYC — Click on the KYC button in the top navigation bar or sidebar.
- Enter GST Number — Type your 15-digit GST number in the input field (Step 1).
- Validate GST — Click the Validate GST button. The system will verify your GST number against the ERP customer master database.
- Fill KYC Registration Form — If your GST is valid, you will be presented with the registration form (Step 2). Fill in the required details including contact information and department selection.
- Submit KYC — Click the Submit KYC button to complete the KYC registration.
- Email Verification — A verification email will be sent to your registered email address. Click the verification link to activate your KYC record.
KYC is a one-time process. Once your KYC is verified, you can proceed to register and access the full portal.
Sign-Up (Registration)
Public
The Sign-Up module allows new customers to create their portal account. Registration requires a valid GST number and goes through an email verification process to ensure secure access.
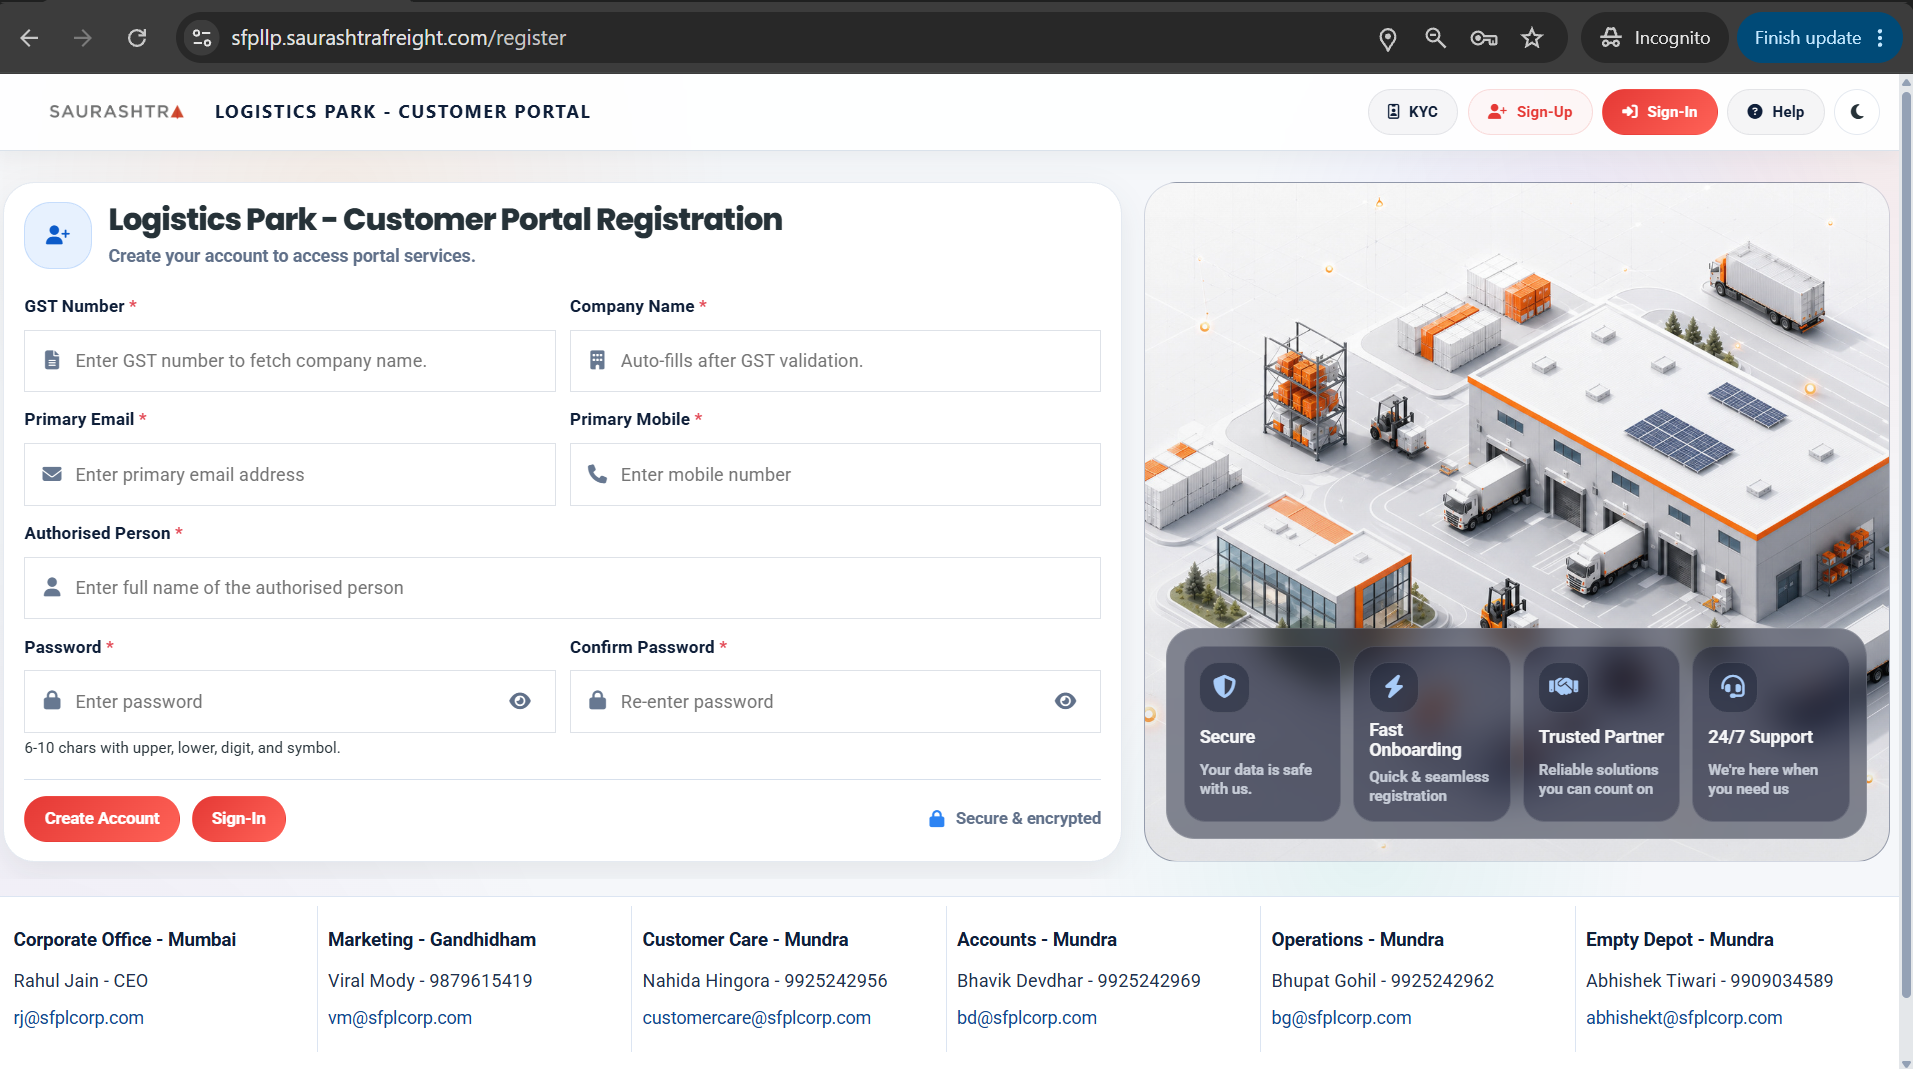
Click image to view full size
How to Register
- Click Sign-Up — From the landing page, click the Sign-Up button in the navigation bar.
- Enter GST Number — Provide your 15-digit GST number. The system checks if the GST exists in the ERP customer master.
- Fill Registration Details — Enter company name, email address, mobile number, authorised person and set a password.
- Submit Registration — Click Create Account to submit your application.
- Email Verification — You will receive a verification email. Click the link inside the email to verify your account.
- Account Activated — Once verified, you can use your credentials to sign in to the portal.
Your GST number must be registered in the SFPL ERP system. If your GST is not recognized, please contact Customer Care at customercare@sfplcorp.com.
Sign-In (Login)
Public
The Sign-In page allows registered customers to access their portal workspace. Use the credentials you set during registration to log in.
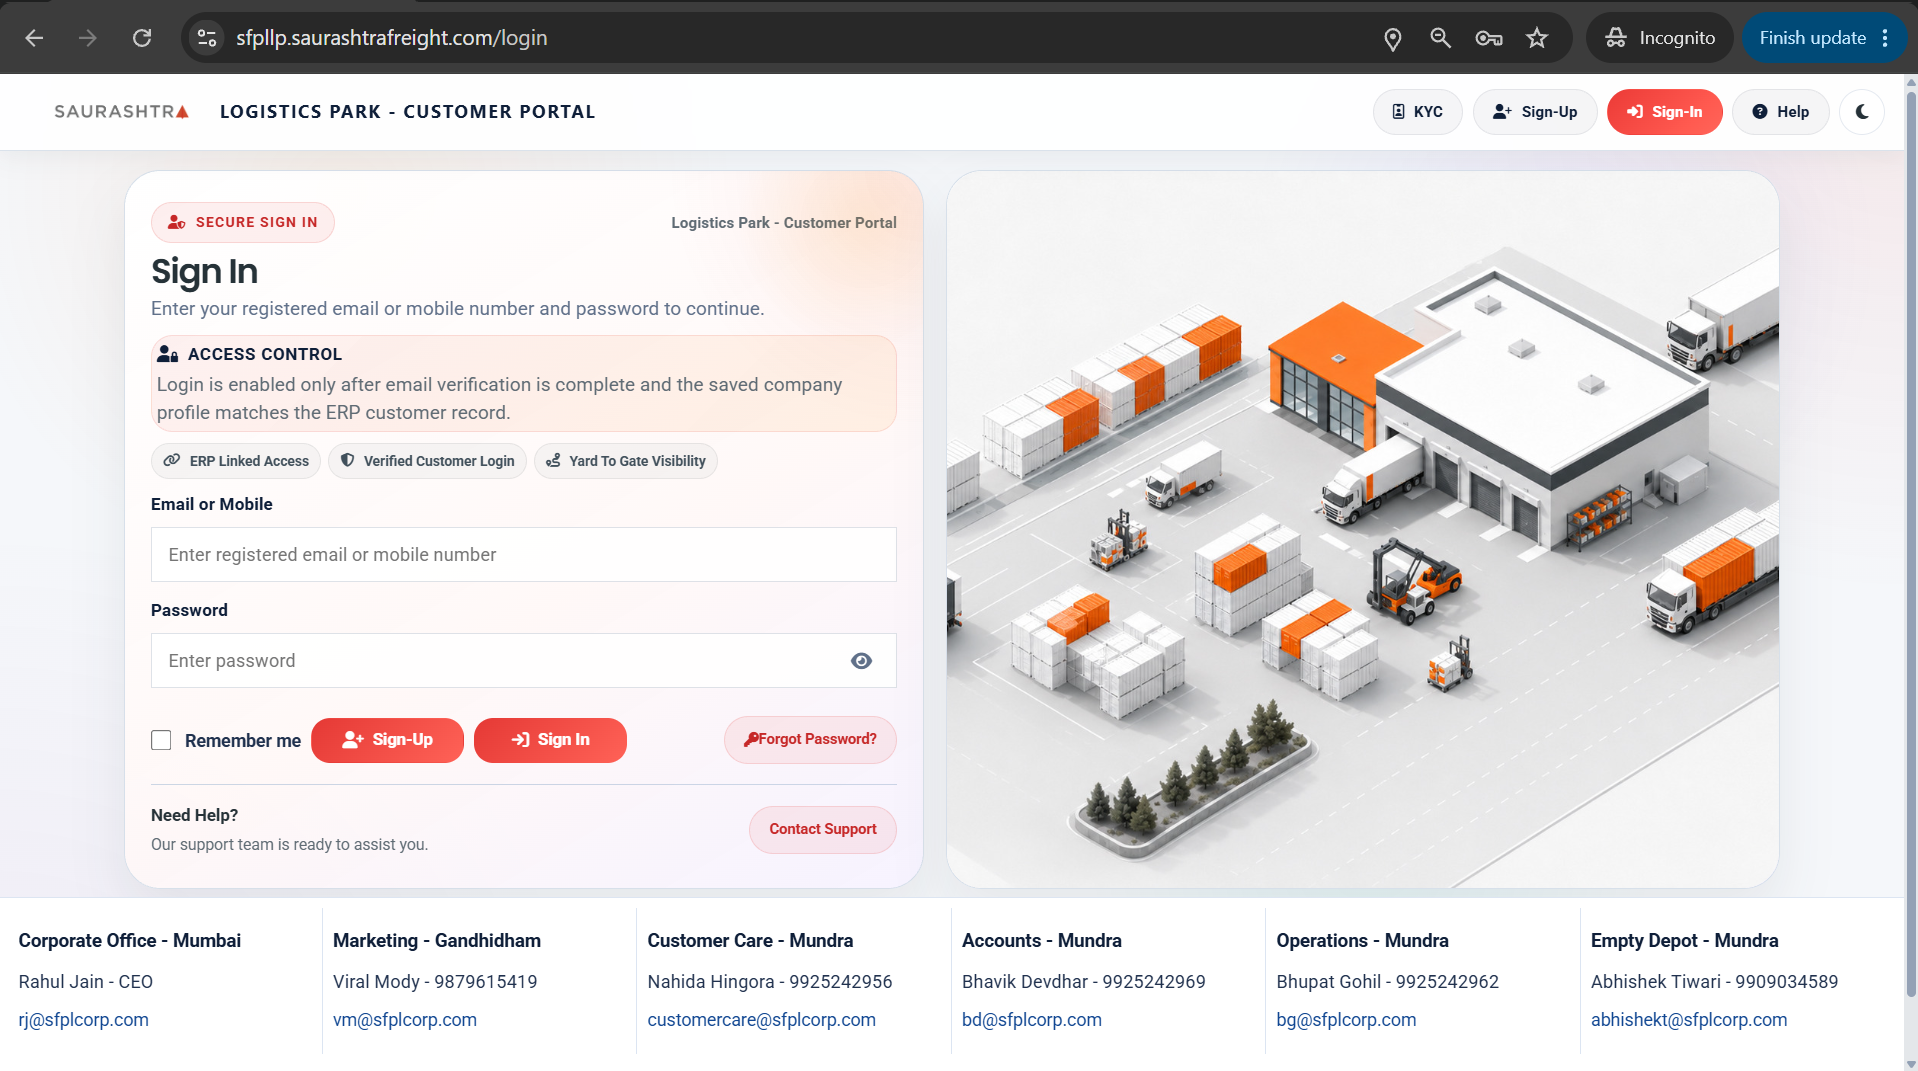
Click image to view full size
How to Sign In
- Navigate to Sign-In — Click the Sign-In button on the landing page.
- Enter Credentials — Type your registered email/mobile and password.
- Click Sign In — Press the Sign In button to access your dashboard.
- Dashboard Access — On successful login, you will be redirected to your personalized dashboard showing shipment summary, TEU statistics, and recent activity.
Forgot Password
Public
If you have forgotten your login password, you can reset it using the email-based verification code process. A 6-digit code will be sent to your registered email address.
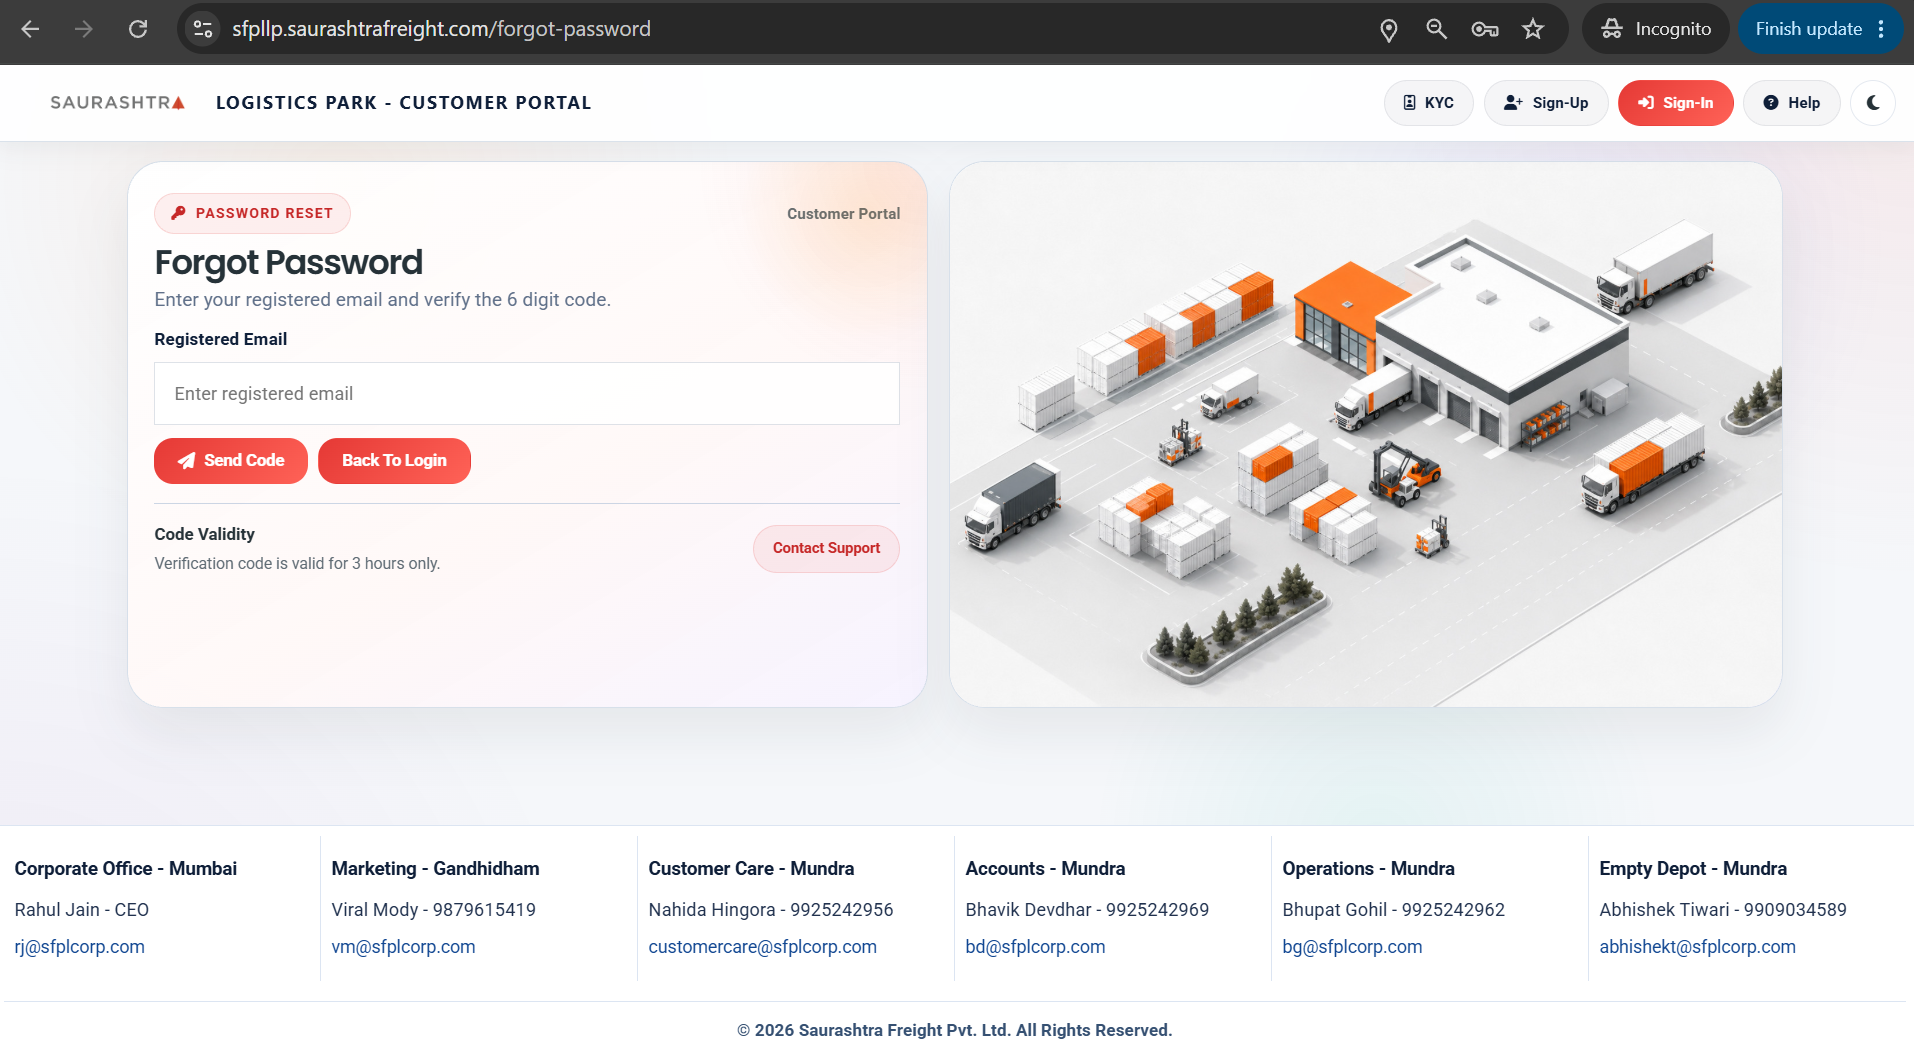
Click image to view full size
How to Reset Password
- Click Forgot Password — On the Sign-In page, click the Forgot Password link.
- Enter Email — Provide your registered email address.
- Send Verification Code — Click Send Code. A 6-digit verification code will be emailed to you.
- Enter Code — Type the 6-digit code you received in your email.
- Set New Password — Enter and confirm your new password.
- Submit — Click Reset Password to save your new password. You can now sign in with the new credentials.
The verification code is valid for 3 hours only. If it expires, you can request a new code by clicking Resend.
Change Password
Authenticated
Logged-in customers can update their account password anytime from the user profile dropdown. Changing password requires email-based OTP verification for security.
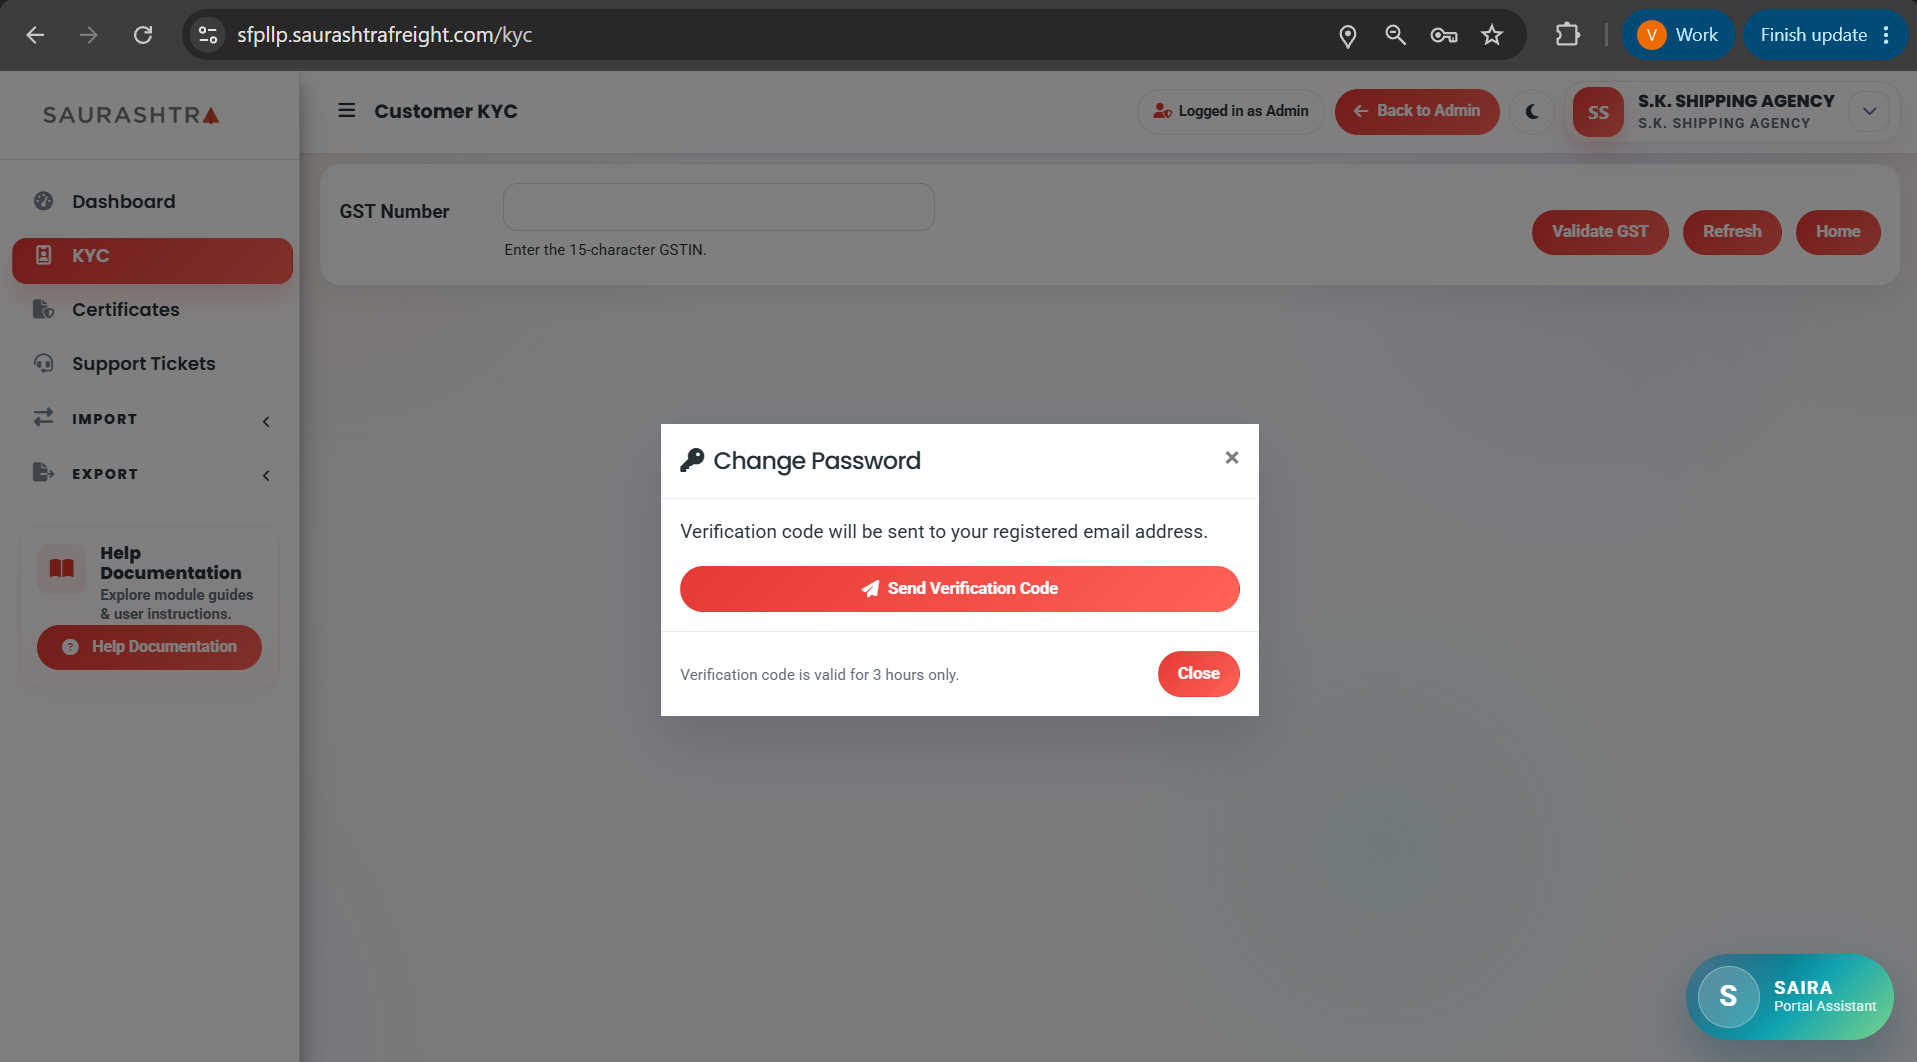
Click image to view full size
How to Change Password
- Open Profile Menu — Click your initials/name avatar in the top-right corner of the header.
- Select Change Password — Click Change Password from the dropdown menu.
- Request Verification Code — Click Send Verification Code to receive a 6-digit OTP on your primary email address.
- Enter New Password & OTP — Type your current password, your new password, and the 6-digit email code.
- Save Changes — Click Update Password to complete the password update.
New passwords must be 6–10 characters long and contain a mix of uppercase, lowercase, digit, and symbol.
Dashboard
Authenticated
The Dashboard is your personalized operational command center that appears immediately upon logging into the portal. It provides real-time visibility into your business activity, including annual and monthly TEU metrics, live container counts, pending export movements, one-click quick actions, and a unified tabbed Activity Center for managing Vehicle Gate In Requests and Export Movement Processes without unnecessary scrolling.
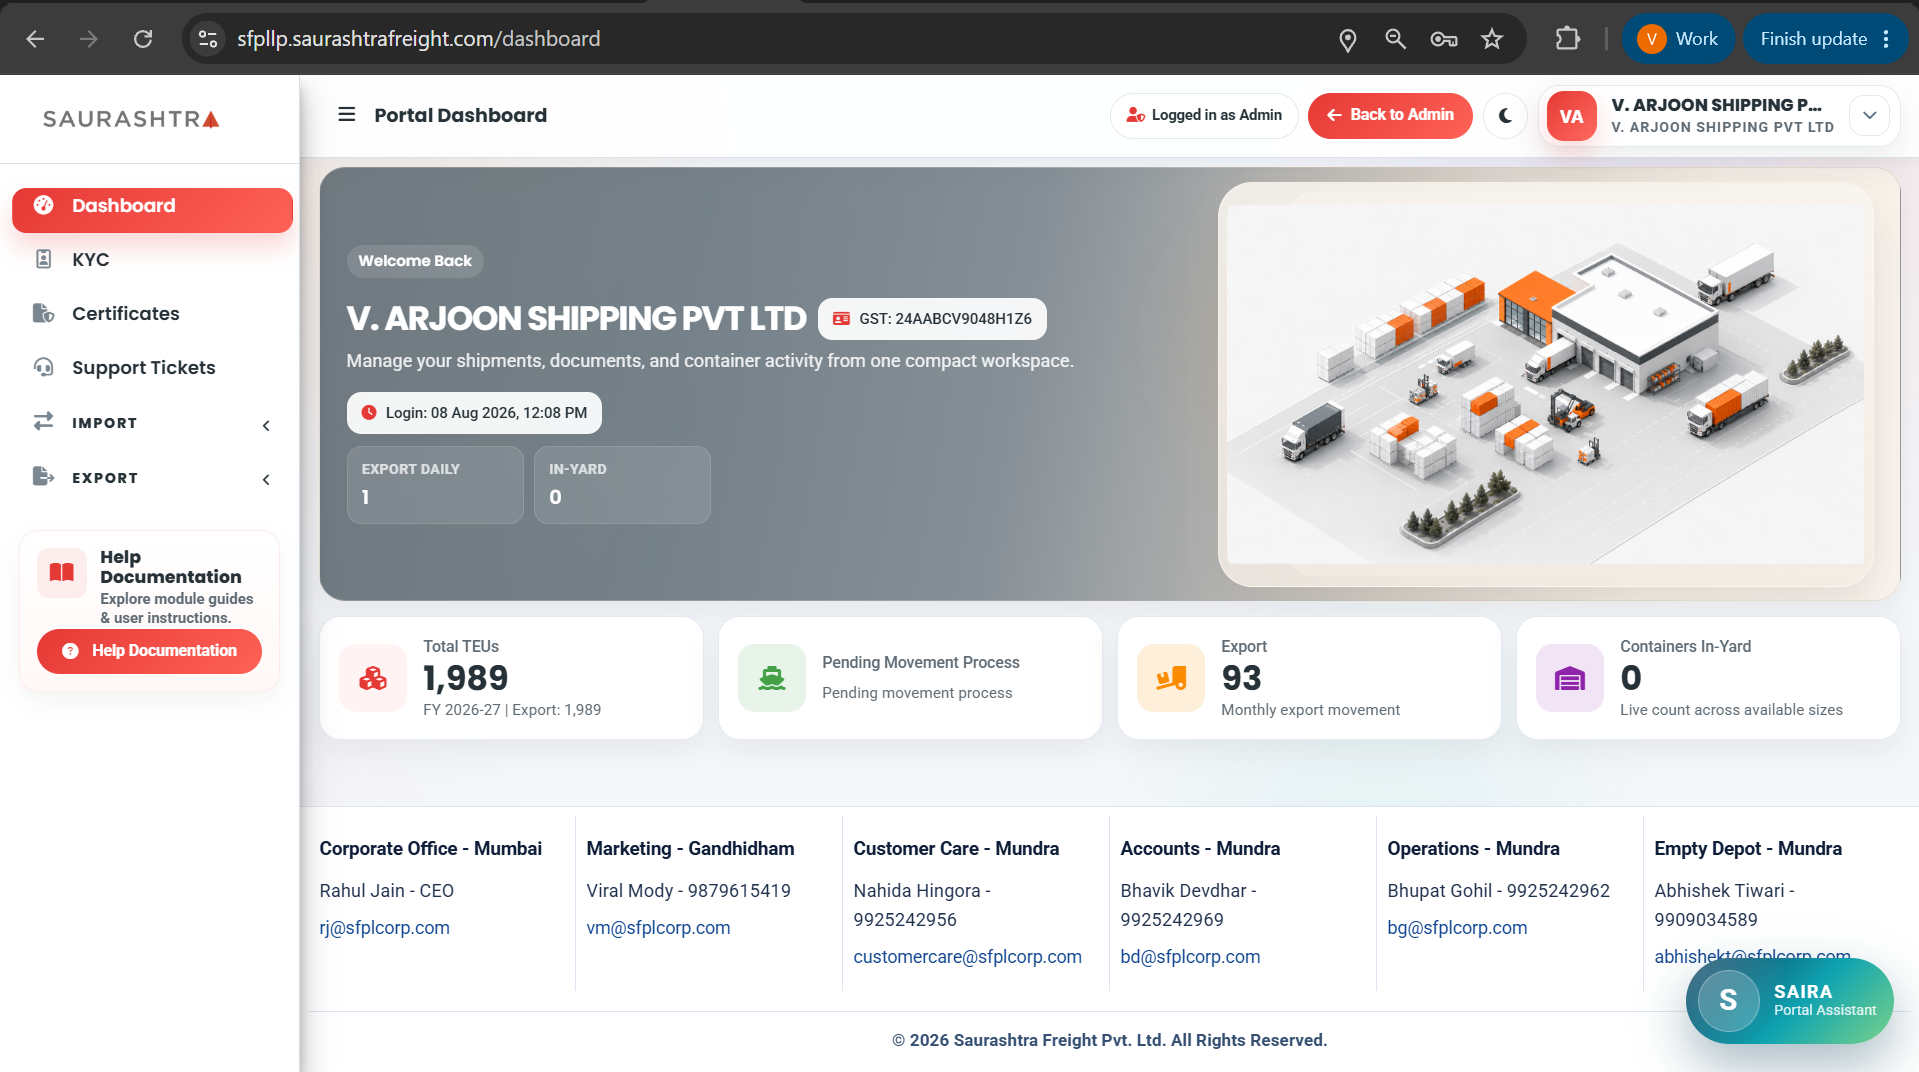
Click image to view full size
1. Hero Banner & Key Performance Metrics
The top section provides an instant overview of your verified profile and high-level throughput statistics for your account:
Account & GSTIN VerificationDisplays your authenticated workspace name, registered GST number, and secure login timestamp
Live Glance CountersInstant at-a-glance figures for Export Daily TEUs and total In-Yard containers
Total TEUs (Annual)Combined yearly export and import TEUs for the active financial year with monthly volume tags
Pending Movement ProcessLive counter of pending export movement containers and batches with direct workflow link
Export MonthlyTotal export container volume processed in the current calendar month
Container Inventory (In-Yard)Real-time container breakdown across 20ft and 40ft units currently positioned inside the CFS yard
2. Quick Action Shortcuts
Four one-click shortcut cards allow you to immediately jump to key operational workflows without navigating through sidebar menus:
New Gate-In RequestInitiate a new export vehicle gate-in request form for factory or warehouse stuffing
Movement ProcessOpen the export gate-out movement workspace to map containers, verify seals, and track trailers
Upload BOEQuickly upload statutory import Bill of Entry (BOE) PDFs and supporting clearance documents
Container InventoryTrack live stock, shipping line allocations, dwell days, and container locations
Activity Center: Vehicle Gate In Request
The Vehicle Gate In Request tab displays your active and historical export gate-in document requests in real time. It features two sub-status tabs: Pending (displaying the top 10 pending requests with a live count badge and full registry link) and Gate-in (displaying the latest completed gate-in records).
Vehicle Gate In Request Screens
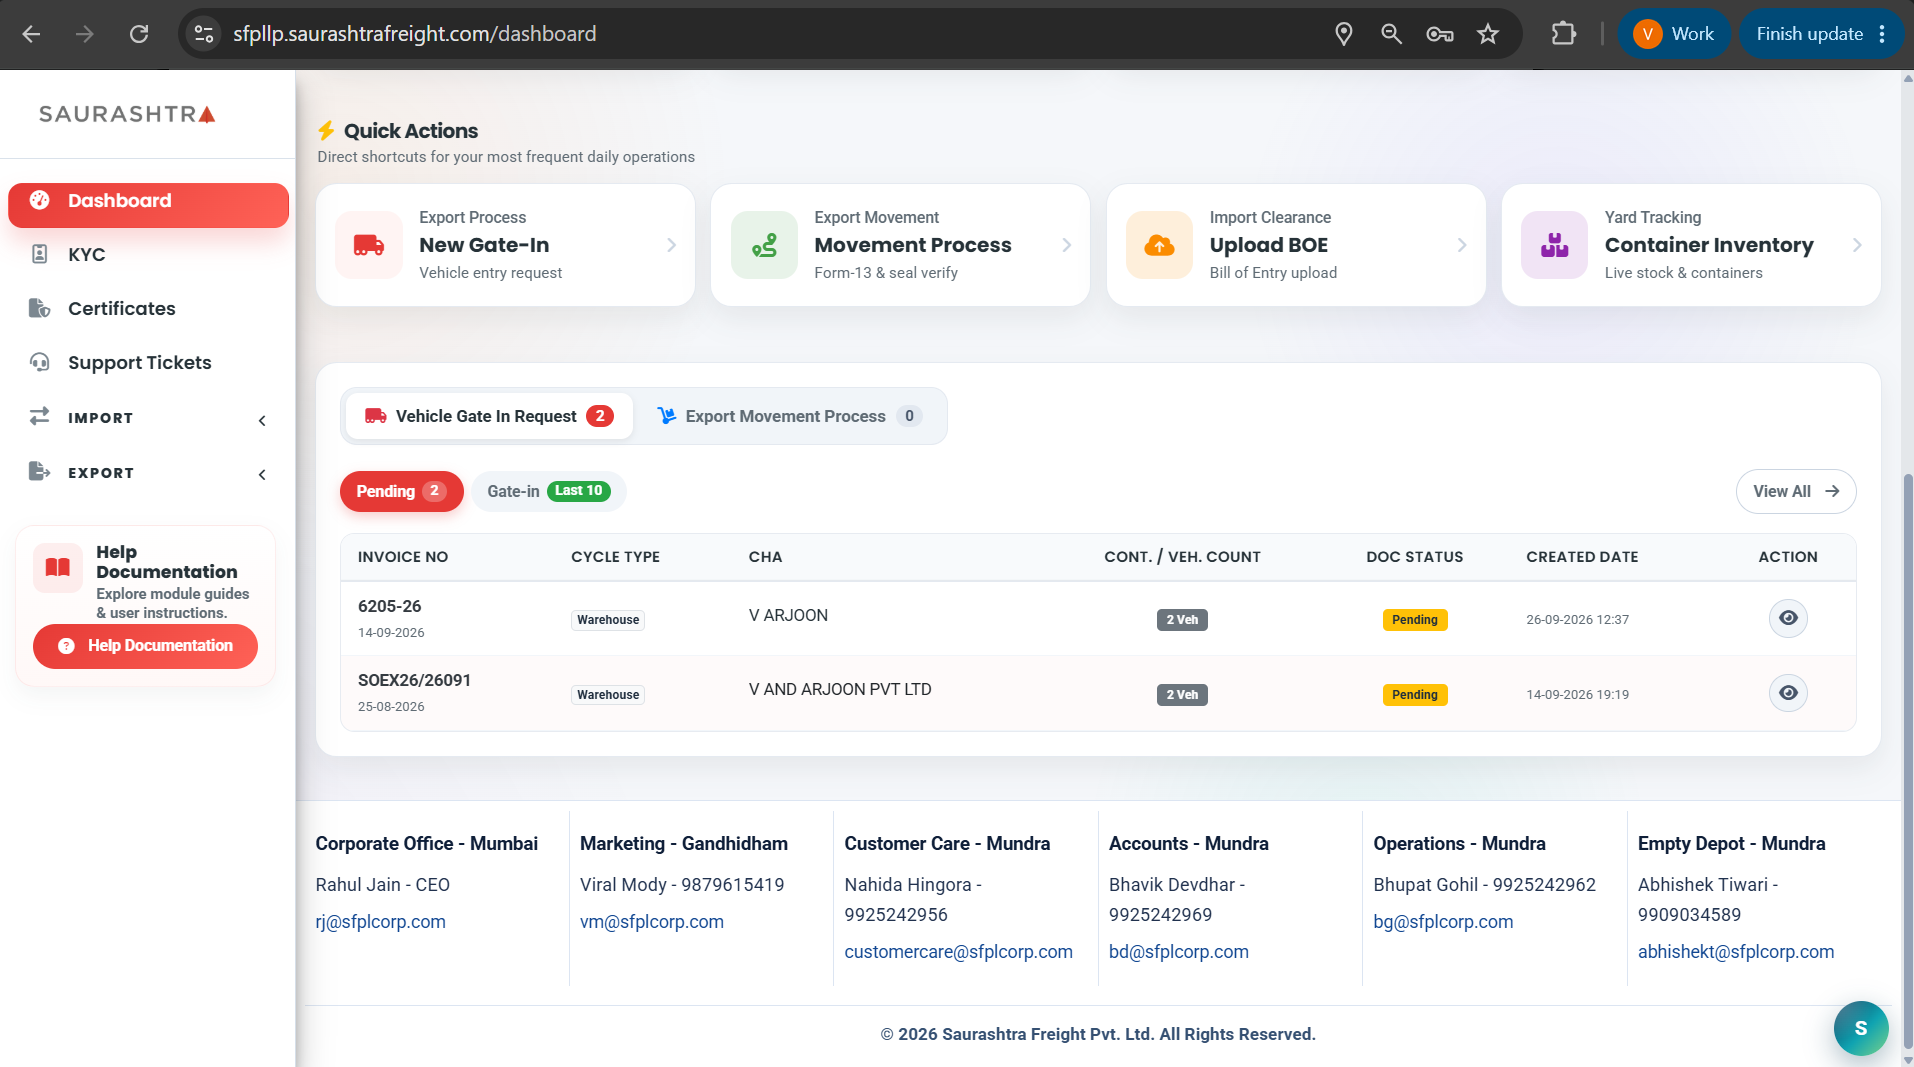
1. Pending Gate-In Requests
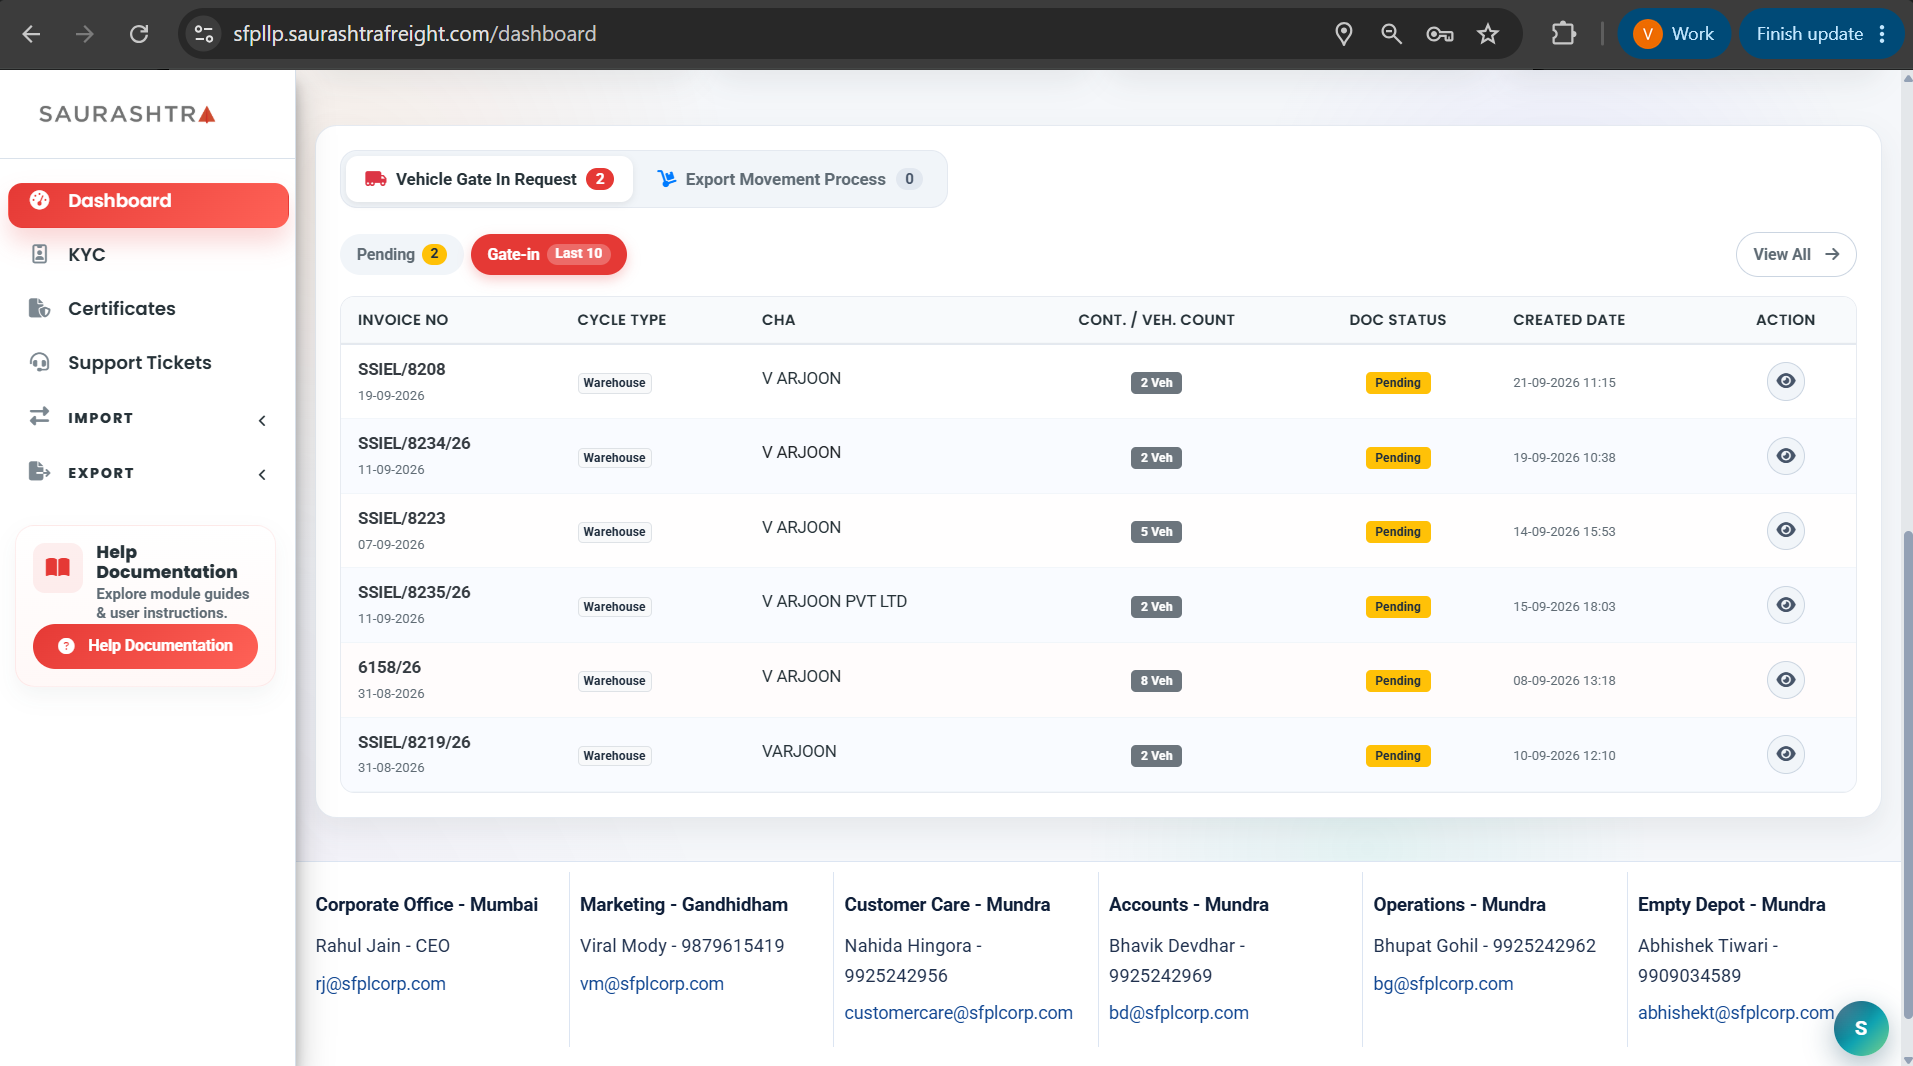
2. Gate-in / Completed Records
Key Columns & Actions
- Invoice No & Date — Commercial invoice reference and date associated with the cargo.
- Cycle Type — Identifies stuffing type (e.g.
FactoryorWarehouse). - CHA — Name of the Custom House Agent executing clearance.
- Cont. / Veh. Count — Displays declared
Containers (Cont)for Factory stuffing or incomingVehicles (Veh)for Warehouse cargo stuffing. - Doc Status — Status badge showing
PendingorCompleted. - Created Date — Timestamp when the request was registered in the portal.
- Action (View Details) — Circular eye button () to view the complete vehicle gate-in request, container details, and uploaded document attachments.
- View All Button & Pagination Footer — Top-right "View All" button and bottom pagination link allow one-click access to the complete Vehicle Gate In Request registry.
Activity Center: Export Movement Process
The Export Movement Process tab allows you to monitor export gate-out batches moving from the CFS to the port terminal. You can toggle between Pending batches (awaiting vehicle assignment, Form-13 mapping, or seal verification) and Completed batches (fully seal verified and gated out).
Export Movement Process Screens
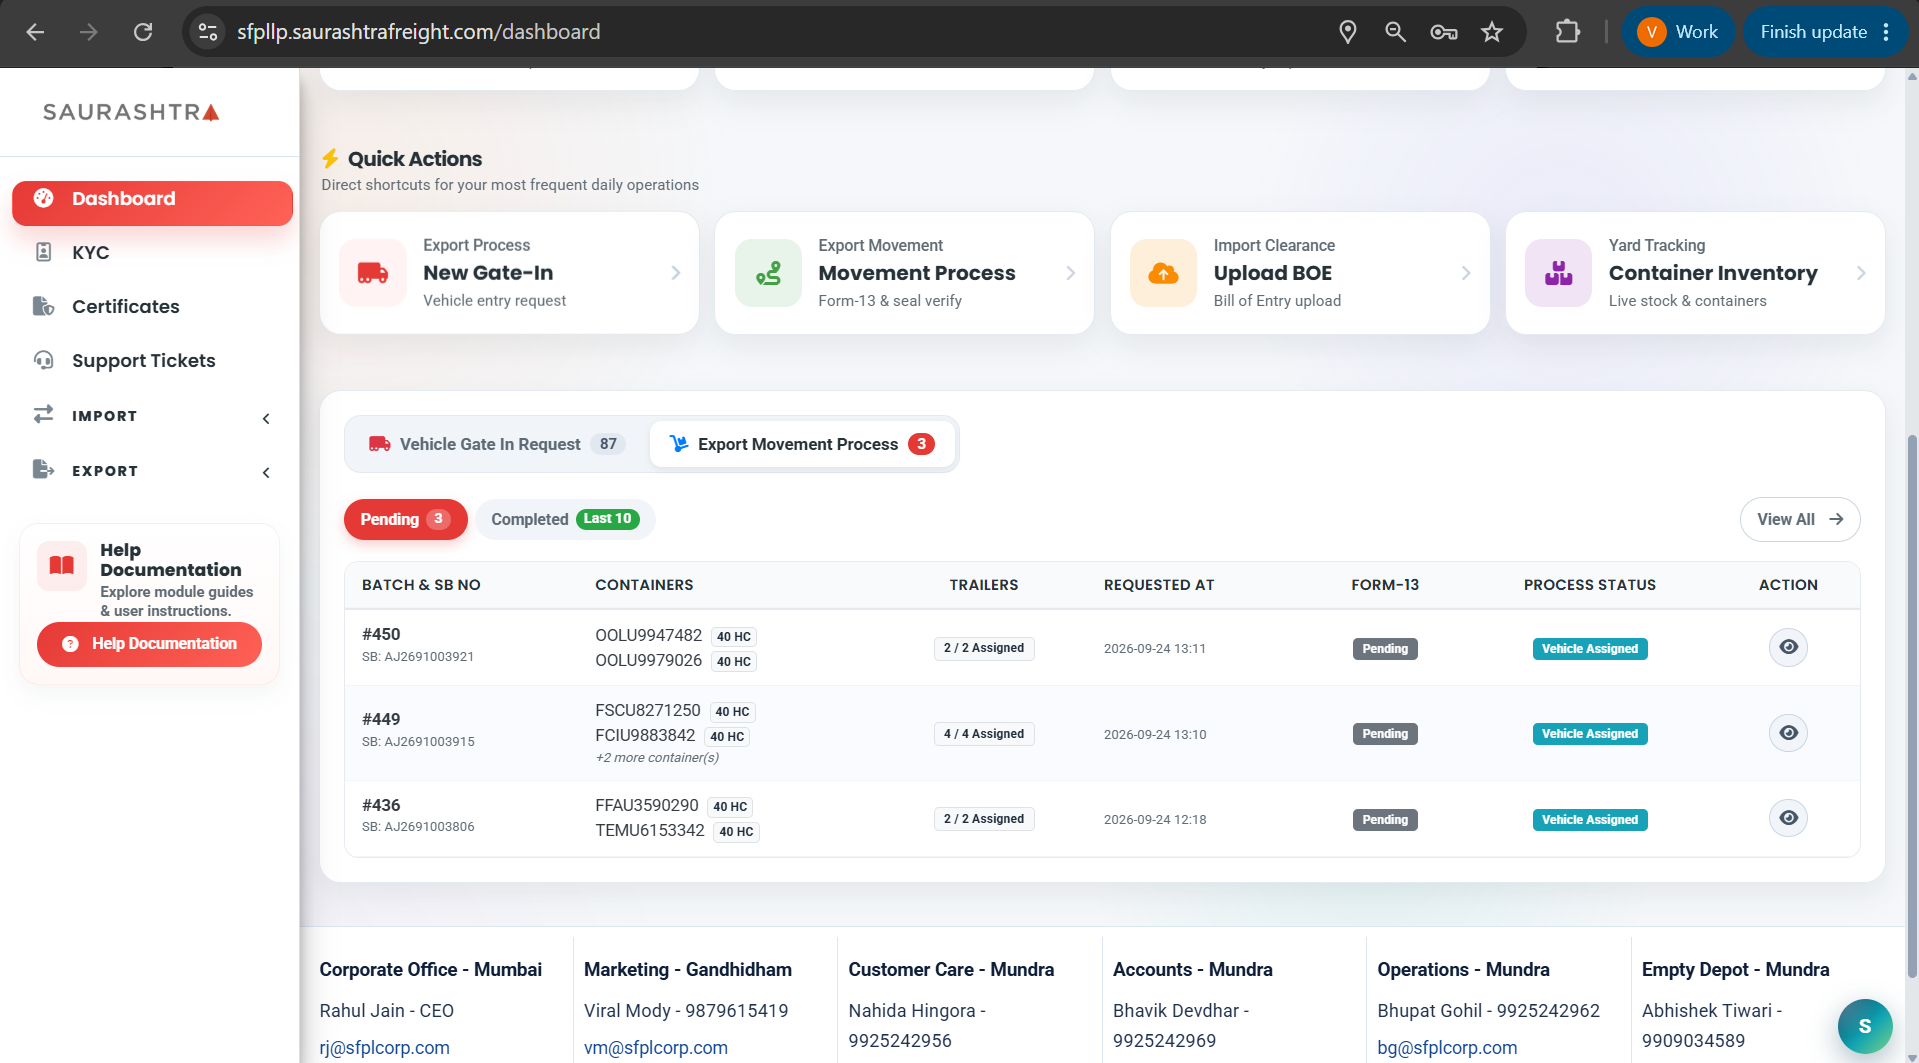
1. Pending Movement Batches
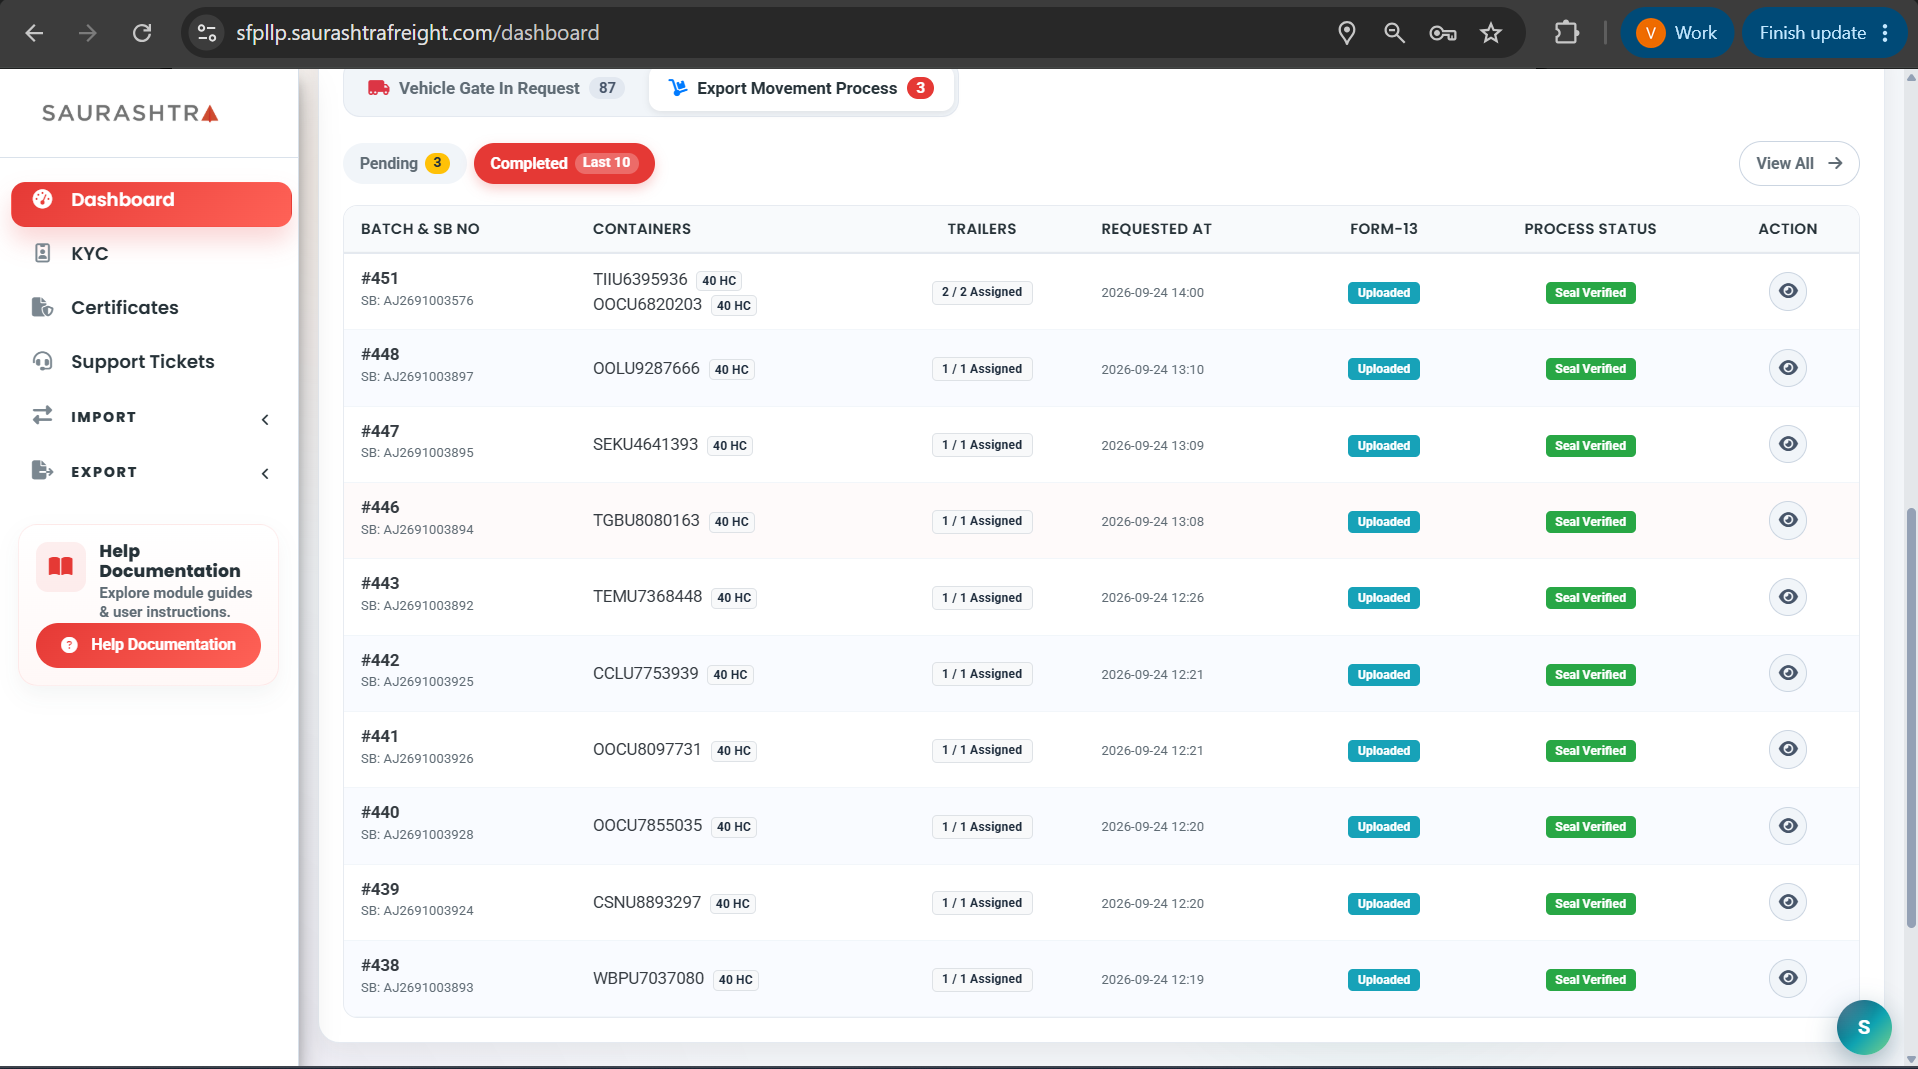
2. Completed Movement Batches
Key Columns & Workflow Tracking
- Batch & SB No — Unique Batch ID (e.g.
#123) and Shipping Bill (SB) number. - Containers & Sizes — Lists container numbers with size badges (e.g.
20 HC,40 HC). - Trailers — Live trailer assignment counter (e.g.
1 / 1 Assigned). - Requested At — Timestamp when movement was initiated.
- Form-13 Status — Badge indicating whether Form-13 PDF has been
Uploadedor isPending. - Process Status — Current workflow progression stage:
Pending Vehicle,Vehicle Assigned,Mapping Done, orSeal Verified. - Action (View Details) — Circular eye button () opens the batch workspace for Form-13 upload, container-to-vehicle mapping, and seal verification.
How to Use the Dashboard Efficiently
- Review Live Metrics — Check your total annual TEUs, pending movements, and in-yard container counts directly from the top metric cards.
- Use Quick Actions — Click any of the 4 quick action shortcut cards to immediately create a gate-in request, manage movements, upload BOE documents, or inspect container inventory.
- Switch Activity Modules — Click the top-level Vehicle Gate In Request or Export Movement Process pill tabs to switch views instantly with zero vertical scrolling.
- Filter by Status — Click the Pending or Gate-in / Completed sub-tabs inside each module to view active items or historical records.
- Inspect Request Details — Click the circular eye icon () in the Action column on any table row to inspect full request or batch details.
- Access Full Registries — Click View All → at the top right of the active activity panel or use the bottom footer link to browse the complete list of records with comprehensive search and filtering options.
No Scrolling Needed: The unified Activity Center keeps all pending gate-in requests and movement batches easily accessible on a single screen without long page scrolling.
Certificates
Authenticated
The Certificates module allows customer users to view, verify, and download official company certificates, compliance documents, and CFS authorizations.
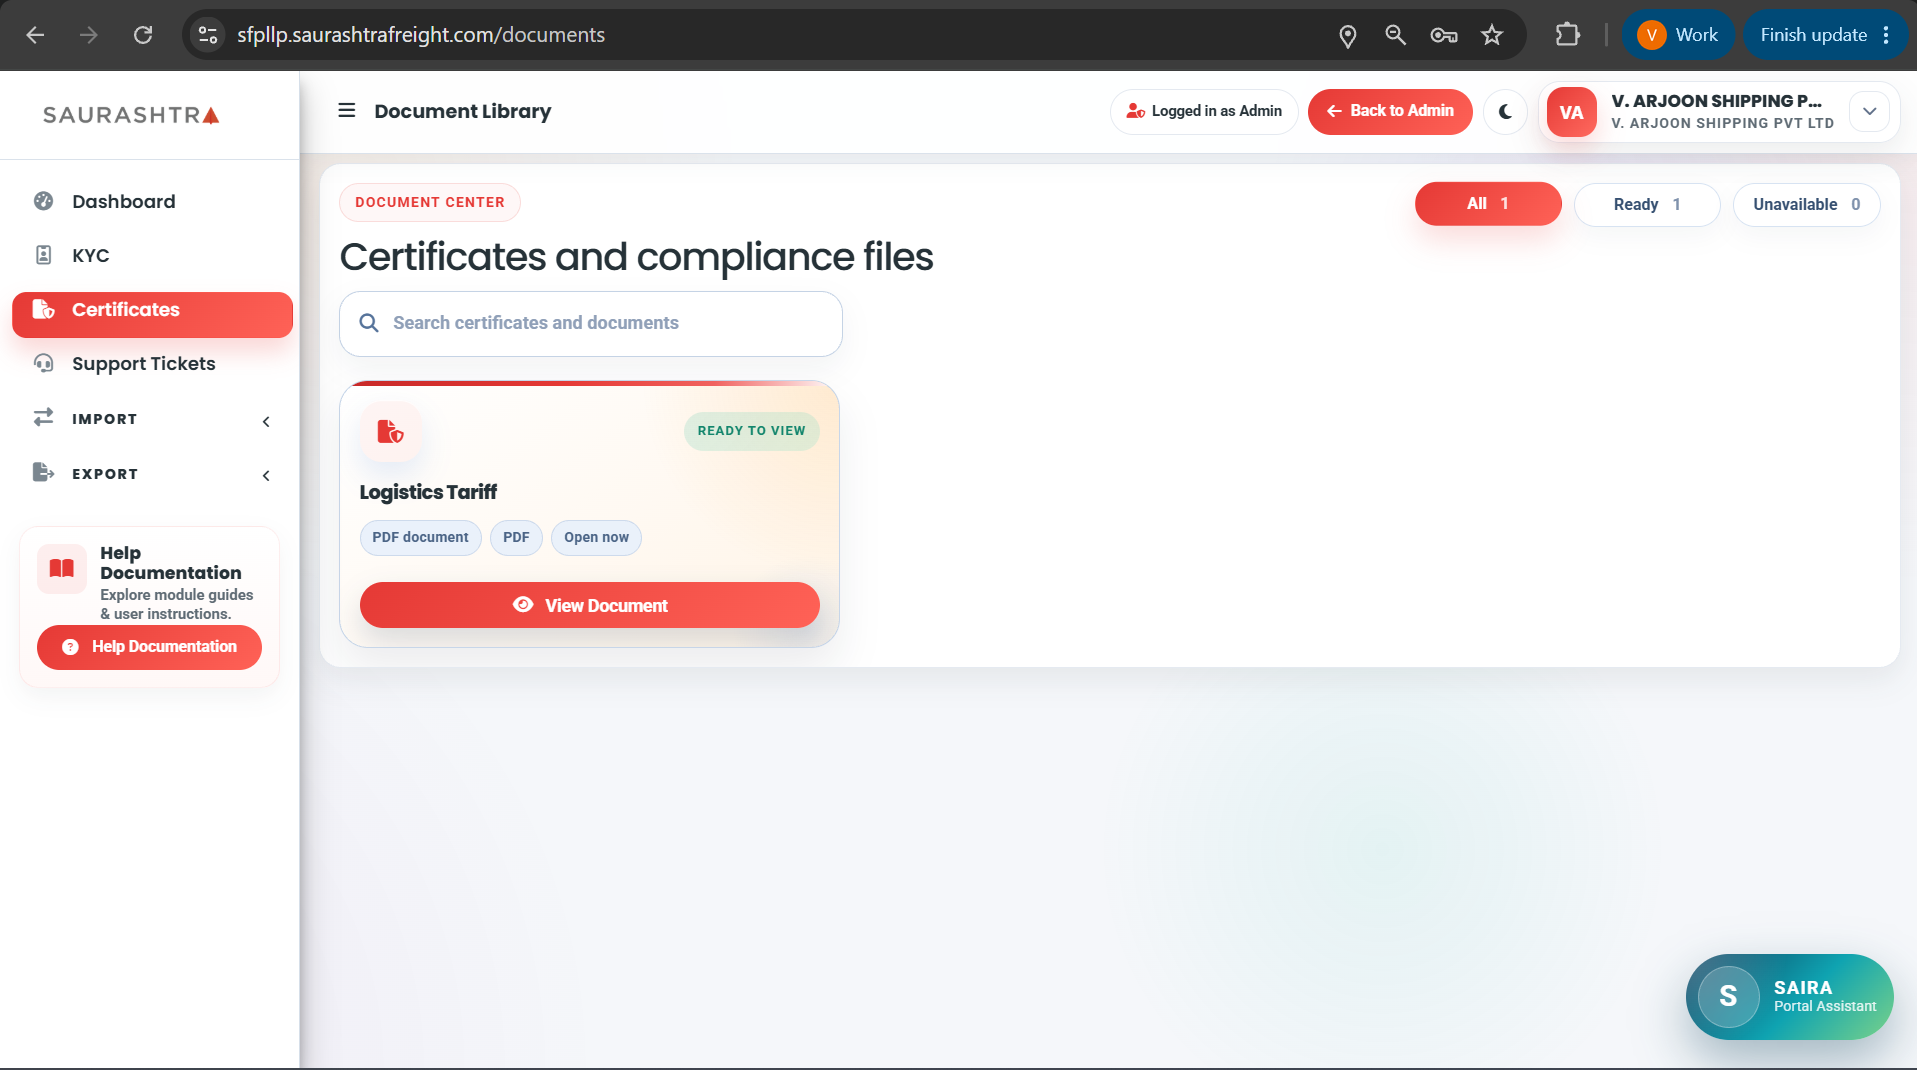
Click image to view full size
How to View & Download Certificates
- Navigate to Certificates — Click Certificates in the left sidebar menu.
- Browse Documents — The page displays a data table with all your available documents, including document name, type, and date.
- Open/Download — Click the View Document button next to any document to view or download it.
Support Tickets
Authenticated
The Support Tickets module allows customer users to raise tickets for queries, operational requests, or issues, and track their resolution status in real-time.
Support Ticket Screen
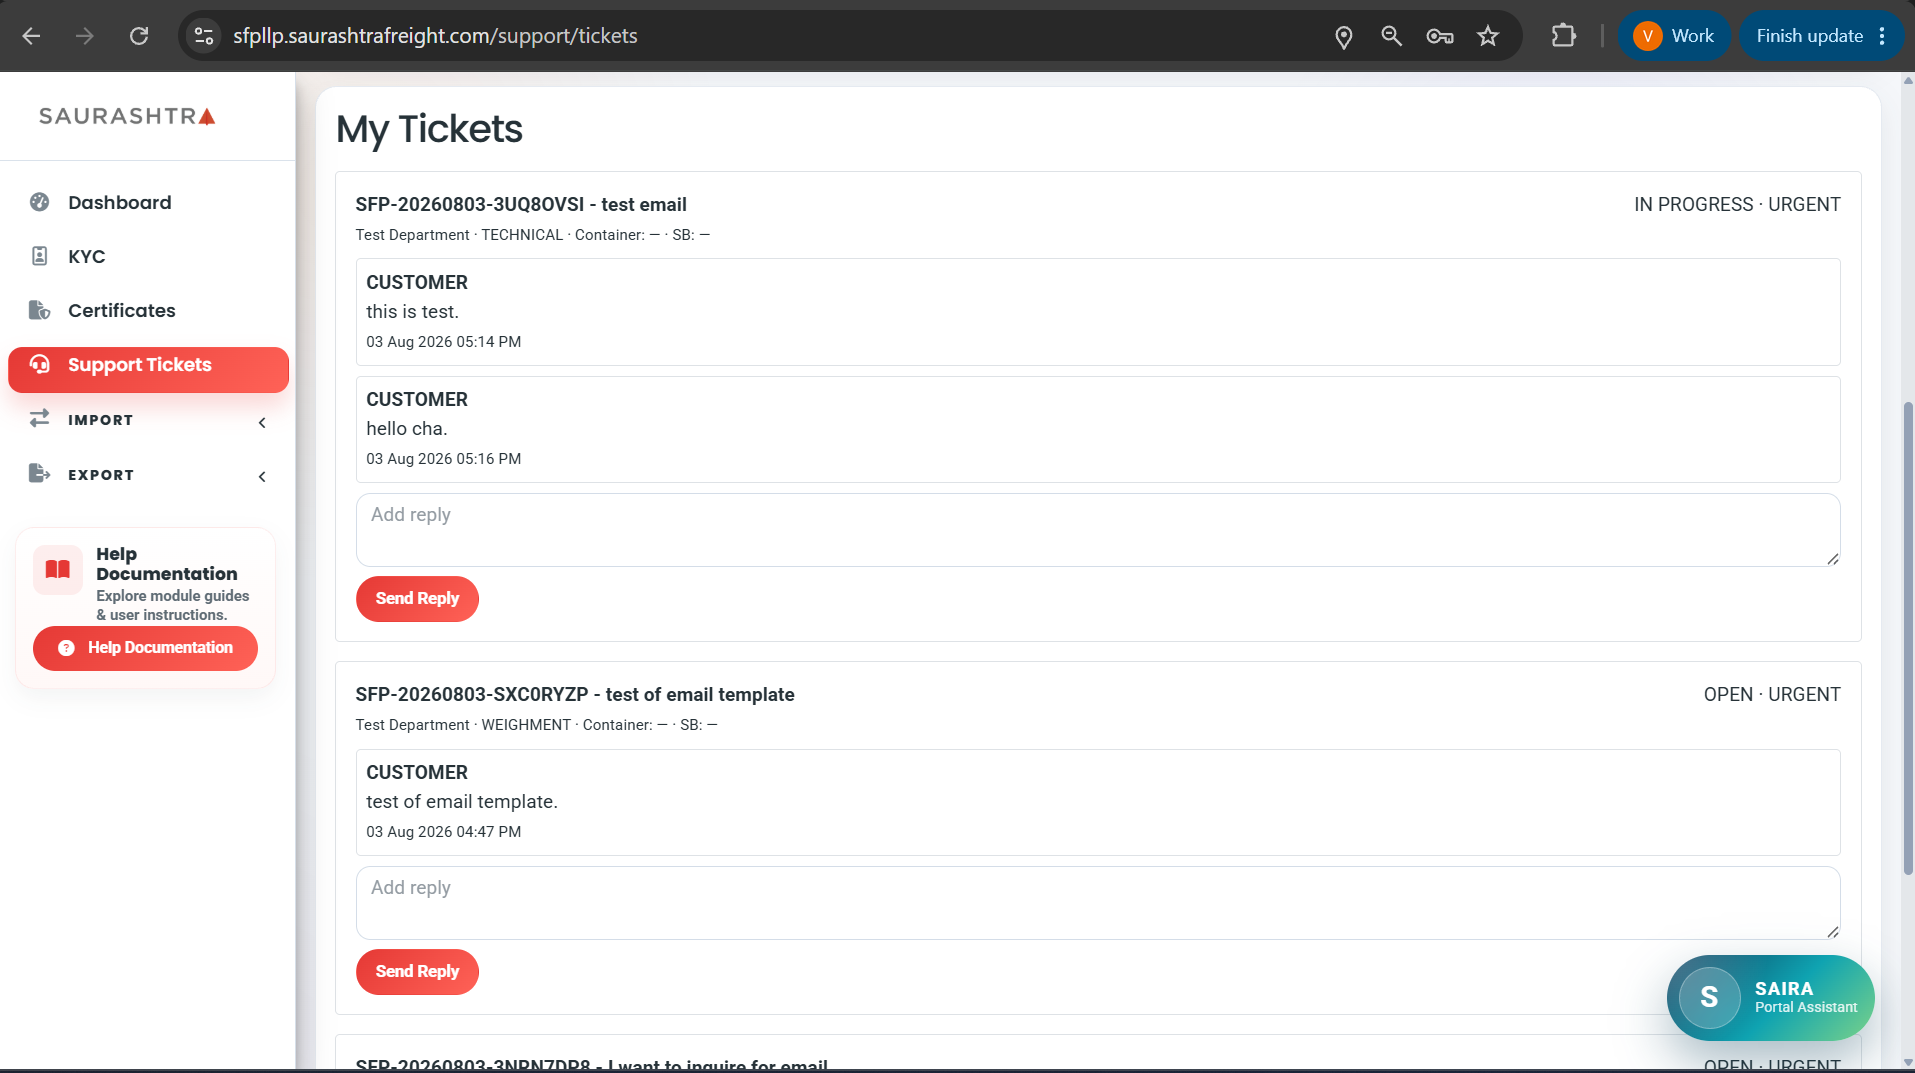
Raise Support Ticket & My Tickets
How to Use Support Tickets
- Navigate to Support Tickets — Click Support Tickets in the left sidebar menu. The page displays the Raise Support Ticket form at the top and My Tickets listing below.
- Fill Ticket Details — Select a Department, enter a Subject, choose a Category and Priority. Optionally provide a Container No. and Shipping Bill No. for reference.
- Describe the Issue — Enter a detailed description of your query or issue in the Describe the Issue text area.
- Submit Ticket — Click the Create Ticket button to send your request to the support team.
- Track Status — Scroll down to the My Tickets section to view your existing tickets and their current status (Open, In Progress, Resolved).
- Reply — Click on a ticket in the listing to view the conversation thread and add replies.
Import Module
Authenticated
The Import module contains sub-modules for managing import operations and supporting document uploads to streamline the import documentation workflow.
Upload Document
The Upload Document sub-module streamlines the import document submission workflow. From the Upload Documents Listing page, click the Add Documents button to begin uploading documents for a new Bill of Entry (BOE). First upload the BOE Summary PDF to extract and register import details, followed by other supporting documents (such as Delivery Order, Commercial Invoice, Packing List, and Bill of Lading). Click Review & Save All Documents to save and complete the submission. To inspect, view, or manage existing uploaded documents for any BOE record, click the Manage Documents button directly on the listing page.
Upload Document Screens & Workflow
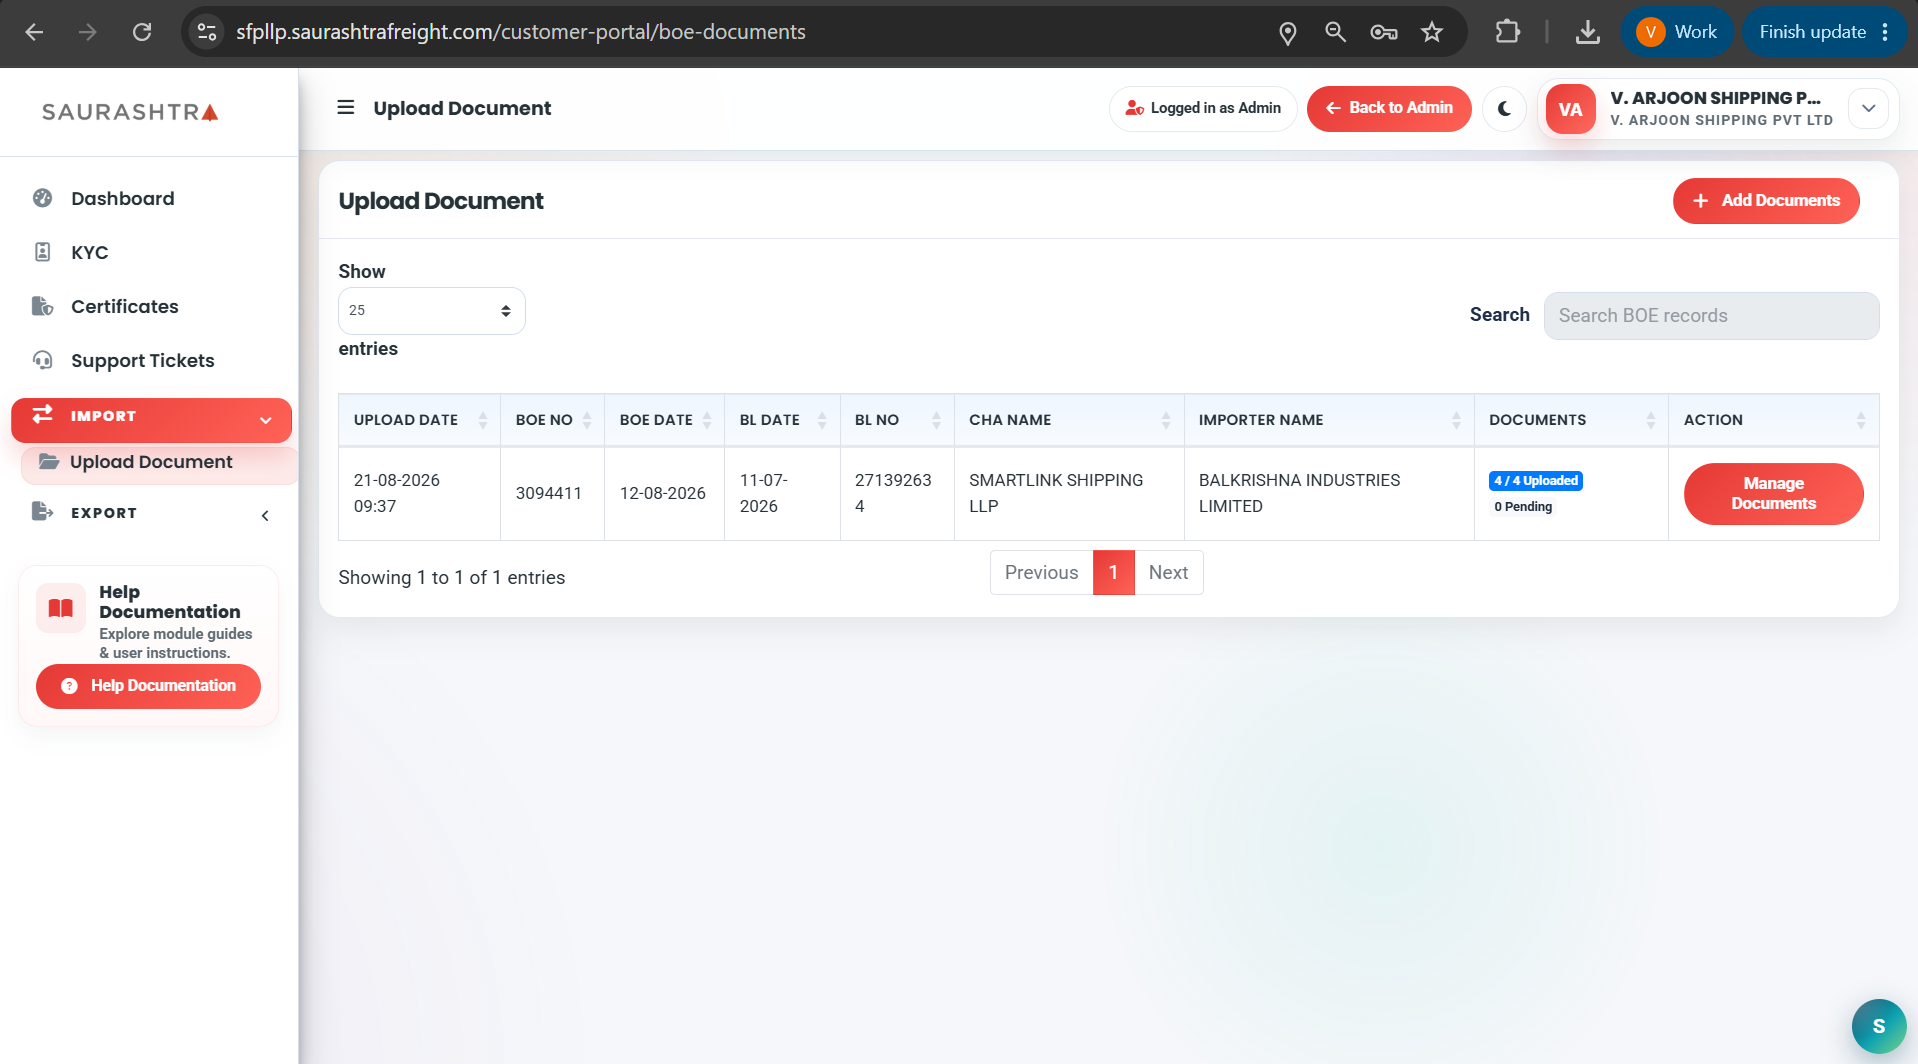
Step 1: Documents Listing
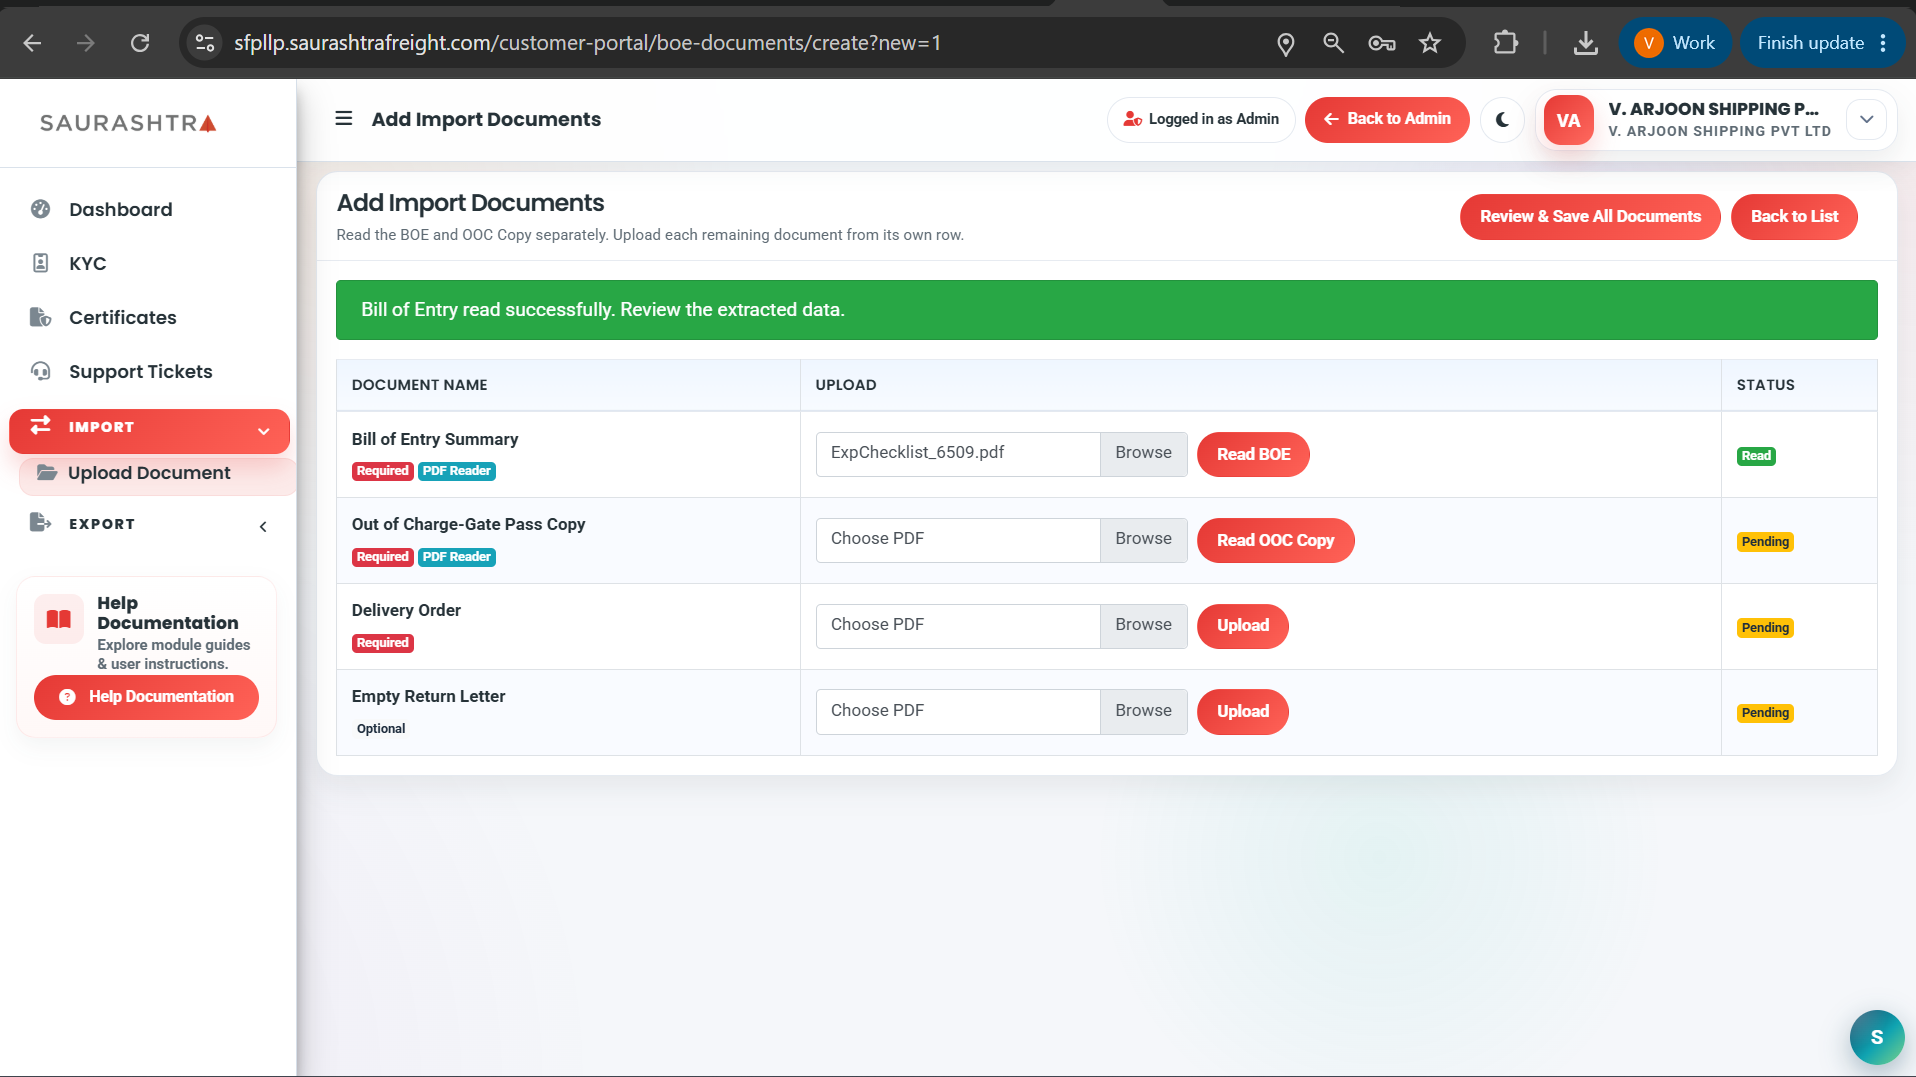
Step 2: Upload BOE Summary
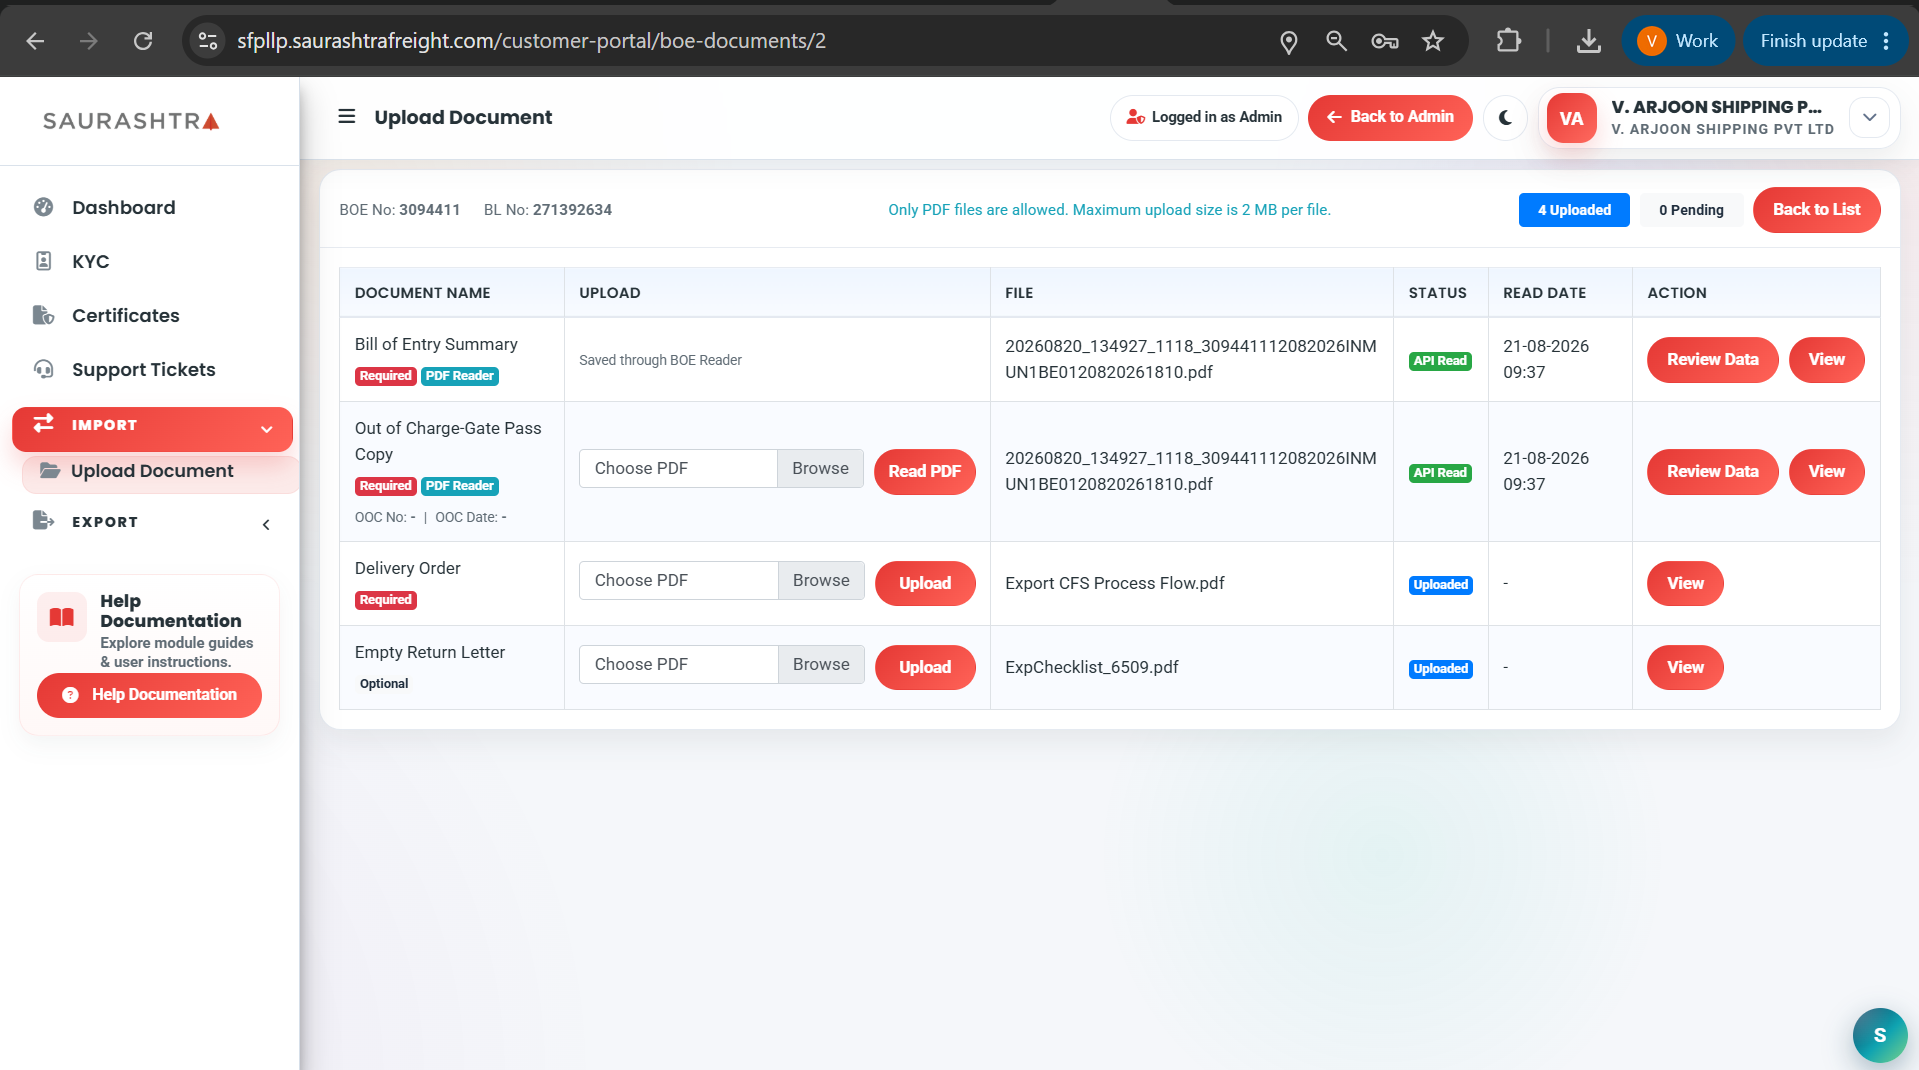
Step 3: Supporting Documents & Review
How to Upload & Manage Import Documents
- Navigate to Upload Document — In the left sidebar under IMPORT, click Upload Document to open the Upload Documents Listing page (Step 1).
- Click "Add Documents" — Click the Add Documents button at the top of the listing page to initiate a new import document submission.
- Upload BOE Summary First — Select the account holder and upload the Bill of Entry (BOE) Summary PDF (Step 2). The system automatically parses the BOE summary and populates the BOE record.
- Upload Other Supporting Documents — Attach all relevant supporting documents (such as Delivery Order, Commercial Invoice, Packing List, and Bill of Lading) against the BOE record.
- Click "Review & Save All Documents" — Preview the uploaded files and click the Review & Save All Documents button to finalize and save the submission.
- Check Documents via "Manage Documents" — On the listing page, click the Manage Documents button next to any BOE record to check, inspect, update, or download all uploaded documents for that particular BOE.
Gate-In Weighment
The Import Gate-In Weighment sub-module provides real-time visibility into container weighment records and vehicle gate-in events for import consignments. Users can track gross, vehicle tare, container tare, and net weights, identify import cycle types (DPD-IMPORT / ENBLOCK-IMPORT), and print official Weighment Receipts with embedded verification QR codes.
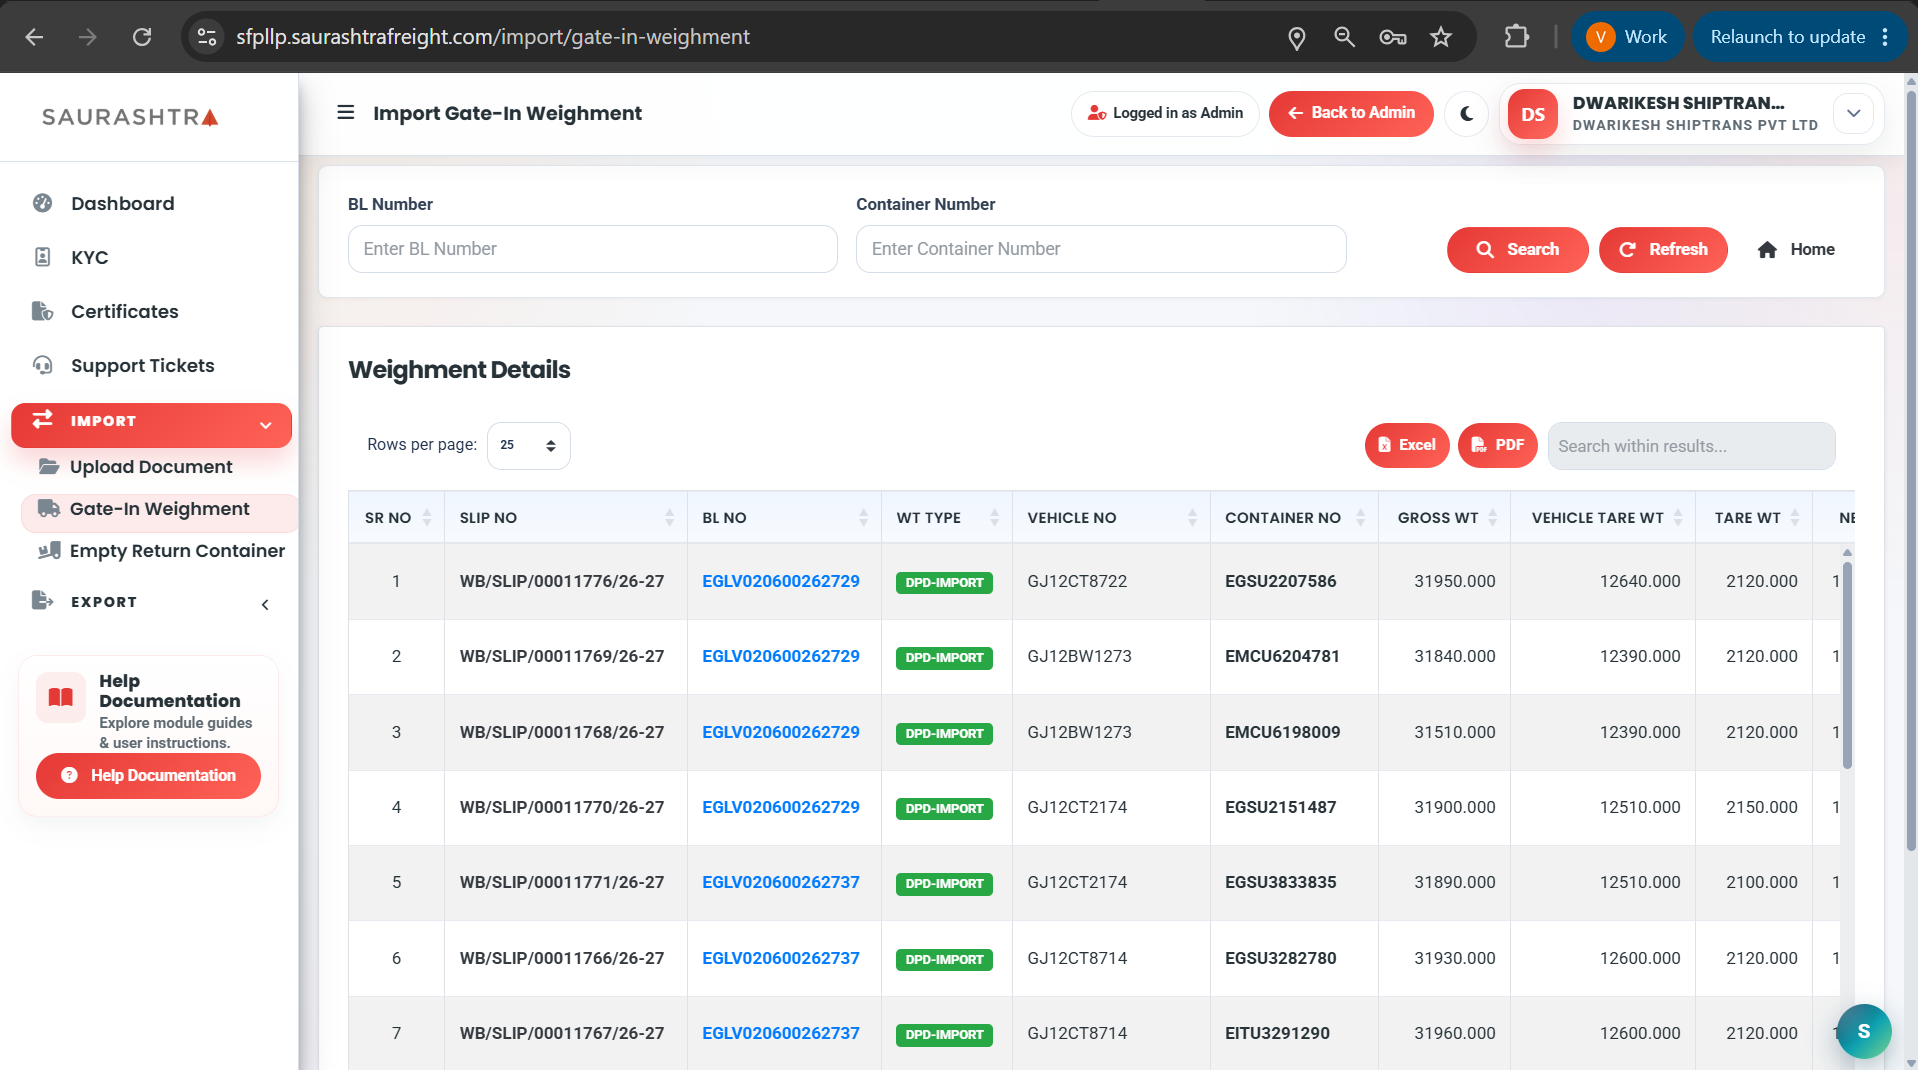
Click image to view full size
Key Features & Capabilities
- Automatic Initial Load — Displays all gate-in records for your account immediately upon opening the page without requiring a manual search.
- Flexible Search Filters — Easily search records by BL Number, Container Number, or use the quick table search to instantly find specific records.
- Comprehensive Weight Details — View detailed weight breakdowns including Gross Weight, Vehicle Tare Weight, Container Tare Weight, and Net Weight.
- Import Cycle Identification — Automatically categorizes containers as DPD-IMPORT or ENBLOCK-IMPORT.
- One-Click PDF Receipt Printing — Click the printer icon in the Action column to generate and view the official Weighment Slip / Receipt PDF in a new browser tab, complete with company branding and a verification QR code.
- Report Exports — Export filtered or complete weighment data into Excel and PDF formats directly from the table controls.
How to Use Import Gate-In Weighment
- Navigate — In the left sidebar, expand the IMPORT dropdown and click Gate-In Weighment.
- View Records — Browse the table displaying all gate-in containers with Slip No, BL No, Cycle Type, Vehicle No, Container No, Weights, and Gate-In/Out dates.
- Filter by BL or Container — Enter a BL Number or Container Number in the top search card and click Search to narrow down records. Click Refresh to reset filters.
- Quick Table Search — Use the search box located at the top-right of the table to perform instant client-side filtering across any displayed field.
- Print Weighment Receipt — In the table's Action column, click the printer icon button on any available record to open the printable PDF receipt in a new tab.
- Export Data — Click the Excel or PDF buttons above the table to download full weighment reports.
Empty Return Container
The Empty Return Container sub-module allows customers to assign and manage empty return drop locations for import containers after destuffing. Customers can search containers by BOE Number or Container Number, select approved CFS empty yards/drop locations via autocomplete search, and submit single container location updates or bulk update multiple containers simultaneously with automated email notifications.
Empty Return Container Screens & Workflow
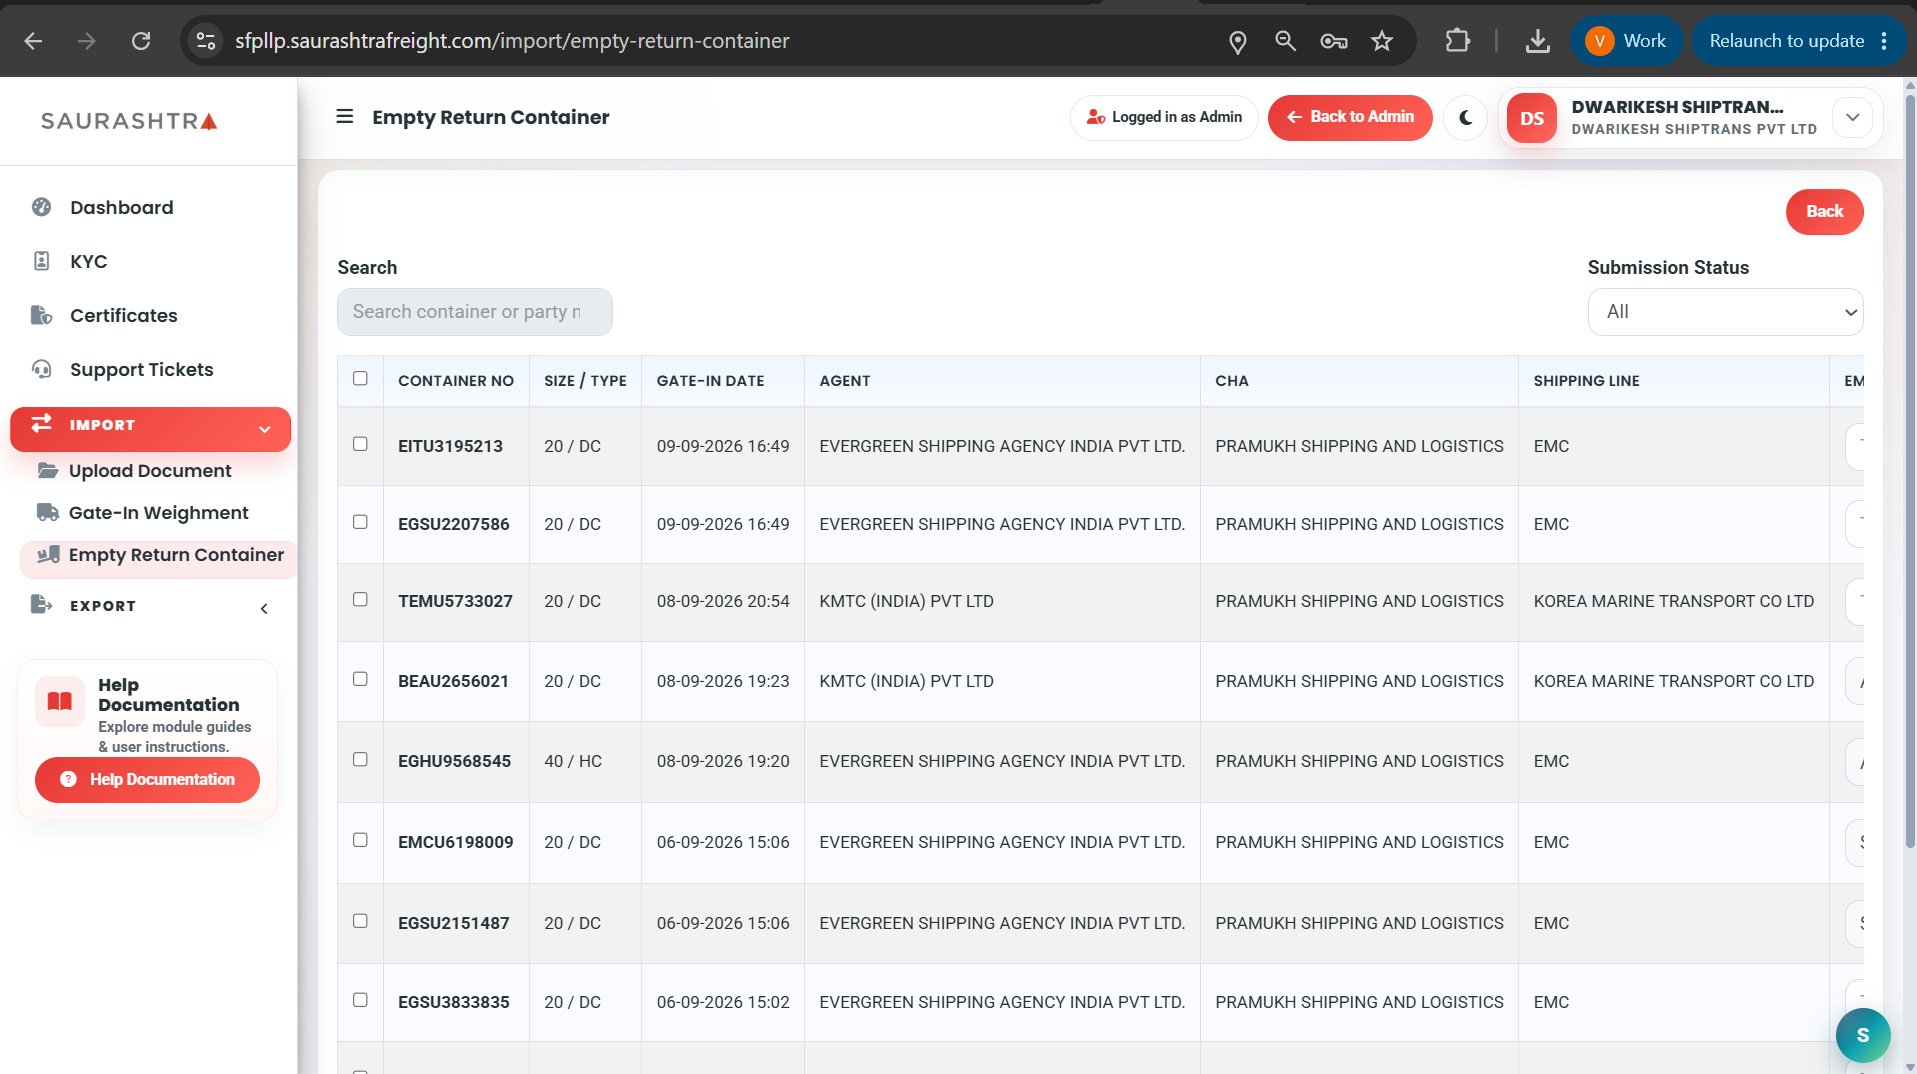
Screen 1: Container Listing & Inline Update
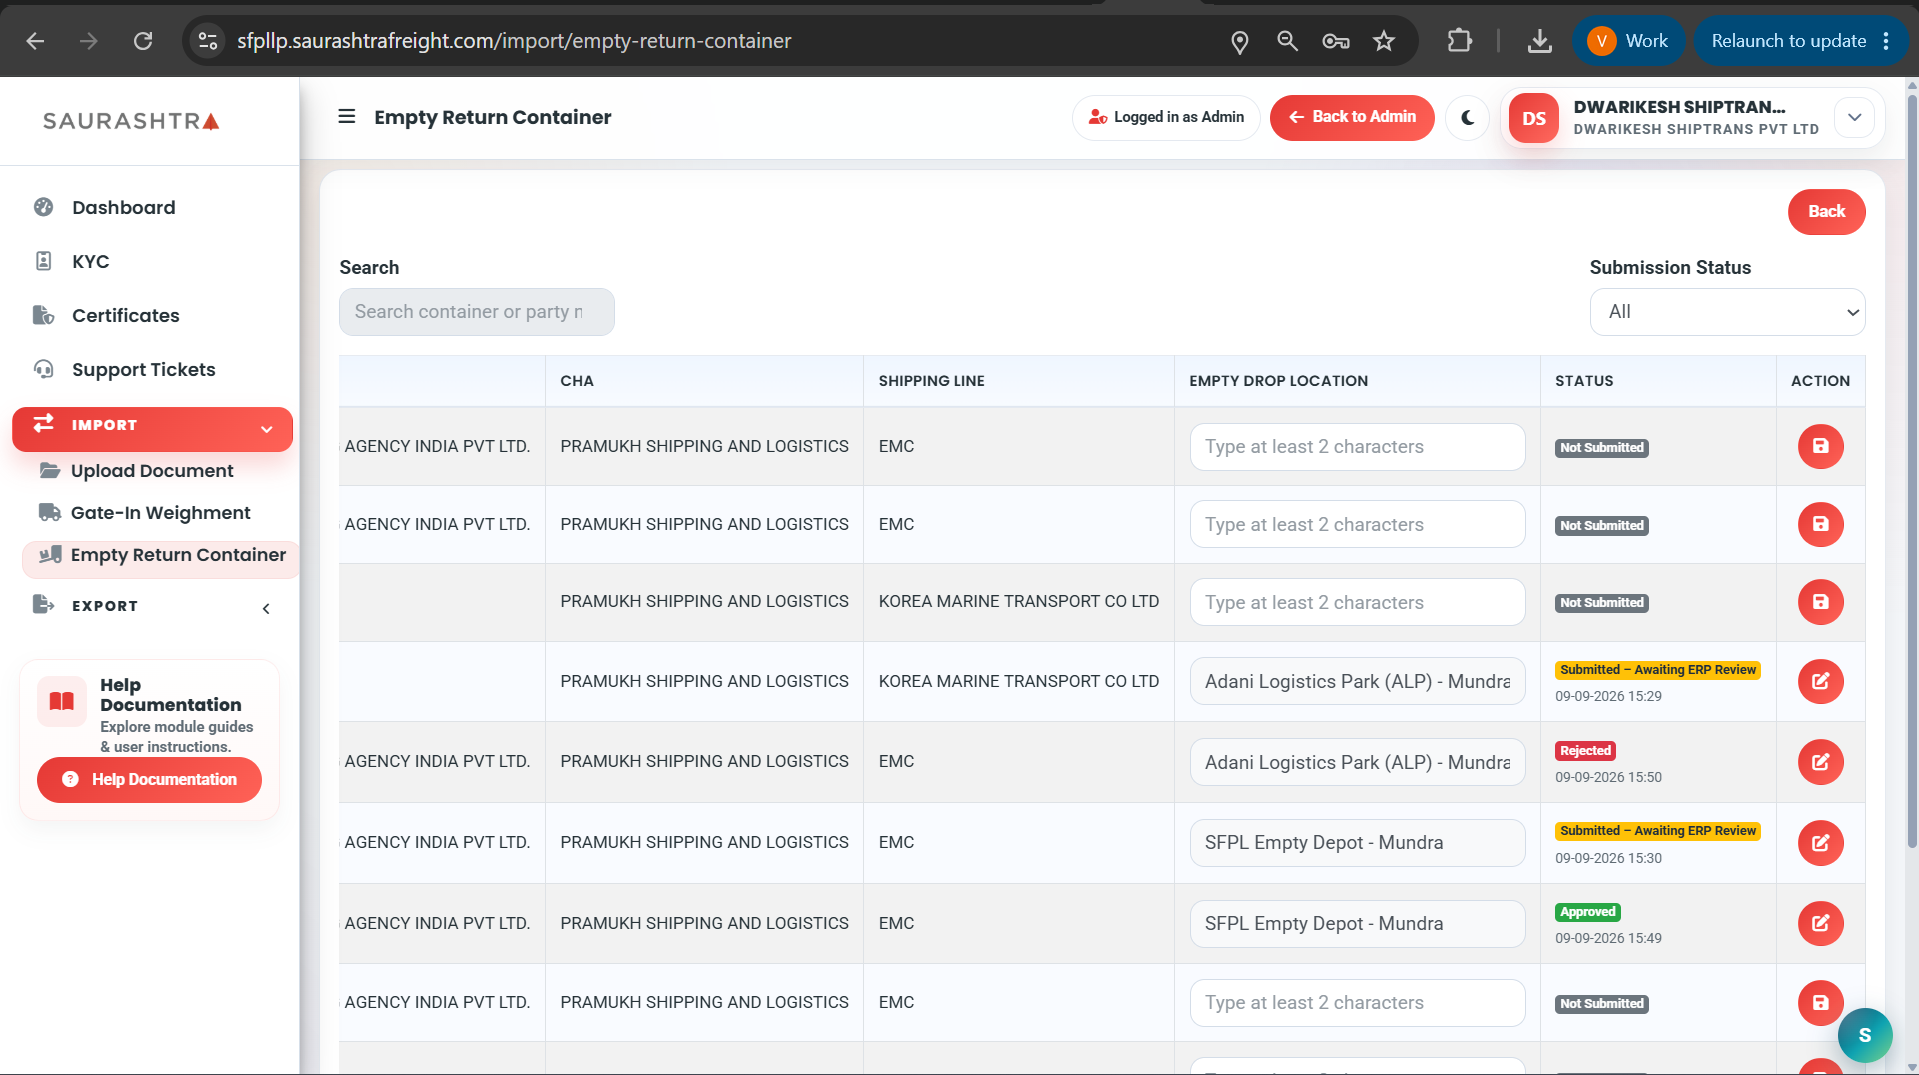
Screen 2: Multi-Select Bulk Update
Key Features & Capabilities
- Autocomplete Location Search — Type a location name to quickly search and select valid Empty Drop Locations from the master list.
- Single Container Inline Update — Assign or edit the drop location for an individual container row and click the Save icon.
- Multi-Select Bulk Assignment — Select multiple container rows using checkboxes to reveal the Bulk Action Bar, choose a destination location, apply to selected containers, and save in one click.
- Status Tracking & Badges — Easily track containers with status badges (All, Not Submitted, or Submitted).
- Instant Filter & Search — Filter the table dynamically by keyword, container number, BOE number, or submission status (All, Not Submitted, Submitted).
- Automated Notifications — Automatically triggers email confirmation notifications with formatted container details and assigned drop locations to all stakeholders upon submission.
How to Assign & Update Empty Return Locations
- Navigate — In the left sidebar, expand IMPORT and click Empty Return Container.
- Find Containers — Browse the table or use the Search and Status filter dropdown to locate specific containers.
- Option A: Single Container Update:
- In the Empty Drop Location column of the container row, type and select the required yard location from the dropdown suggestions.
- Click the Save () button to submit the location.
- To modify a previously submitted location, click the Edit () button.
- Option B: Bulk Multi-Container Update:
- Select the checkboxes next to the containers you wish to update (or use the header checkbox to Select All).
- In the Bulk Action Bar that appears at the top (Screen 2), type and choose the common Empty Drop Location.
- Click Apply to Selected to populate the location across all checked containers.
- Click Save Selected Containers to submit the batch update.
Tip: You can edit a previously submitted location at any time by clicking the Edit button. The system will log the update and send revised confirmation notifications.
Export Module
Authenticated
The Export module contains comprehensive sub-modules for managing export cargo operations — from vehicle gate-in requests and container inventory tracking to cargo arrival, weighment, and movement status monitoring. Each sub-module is detailed below.
Vehicle Gate In Request
The Vehicle Gate In Request sub-module allows customers to create, manage, and track vehicle gate-in permissions for export operations. The request workflow supports two distinct Cycle Types (Factory Stuffing & Warehouse Stuffing) and enforces mandatory document attachments.
Vehicle Gate In Screens & Cycle Types
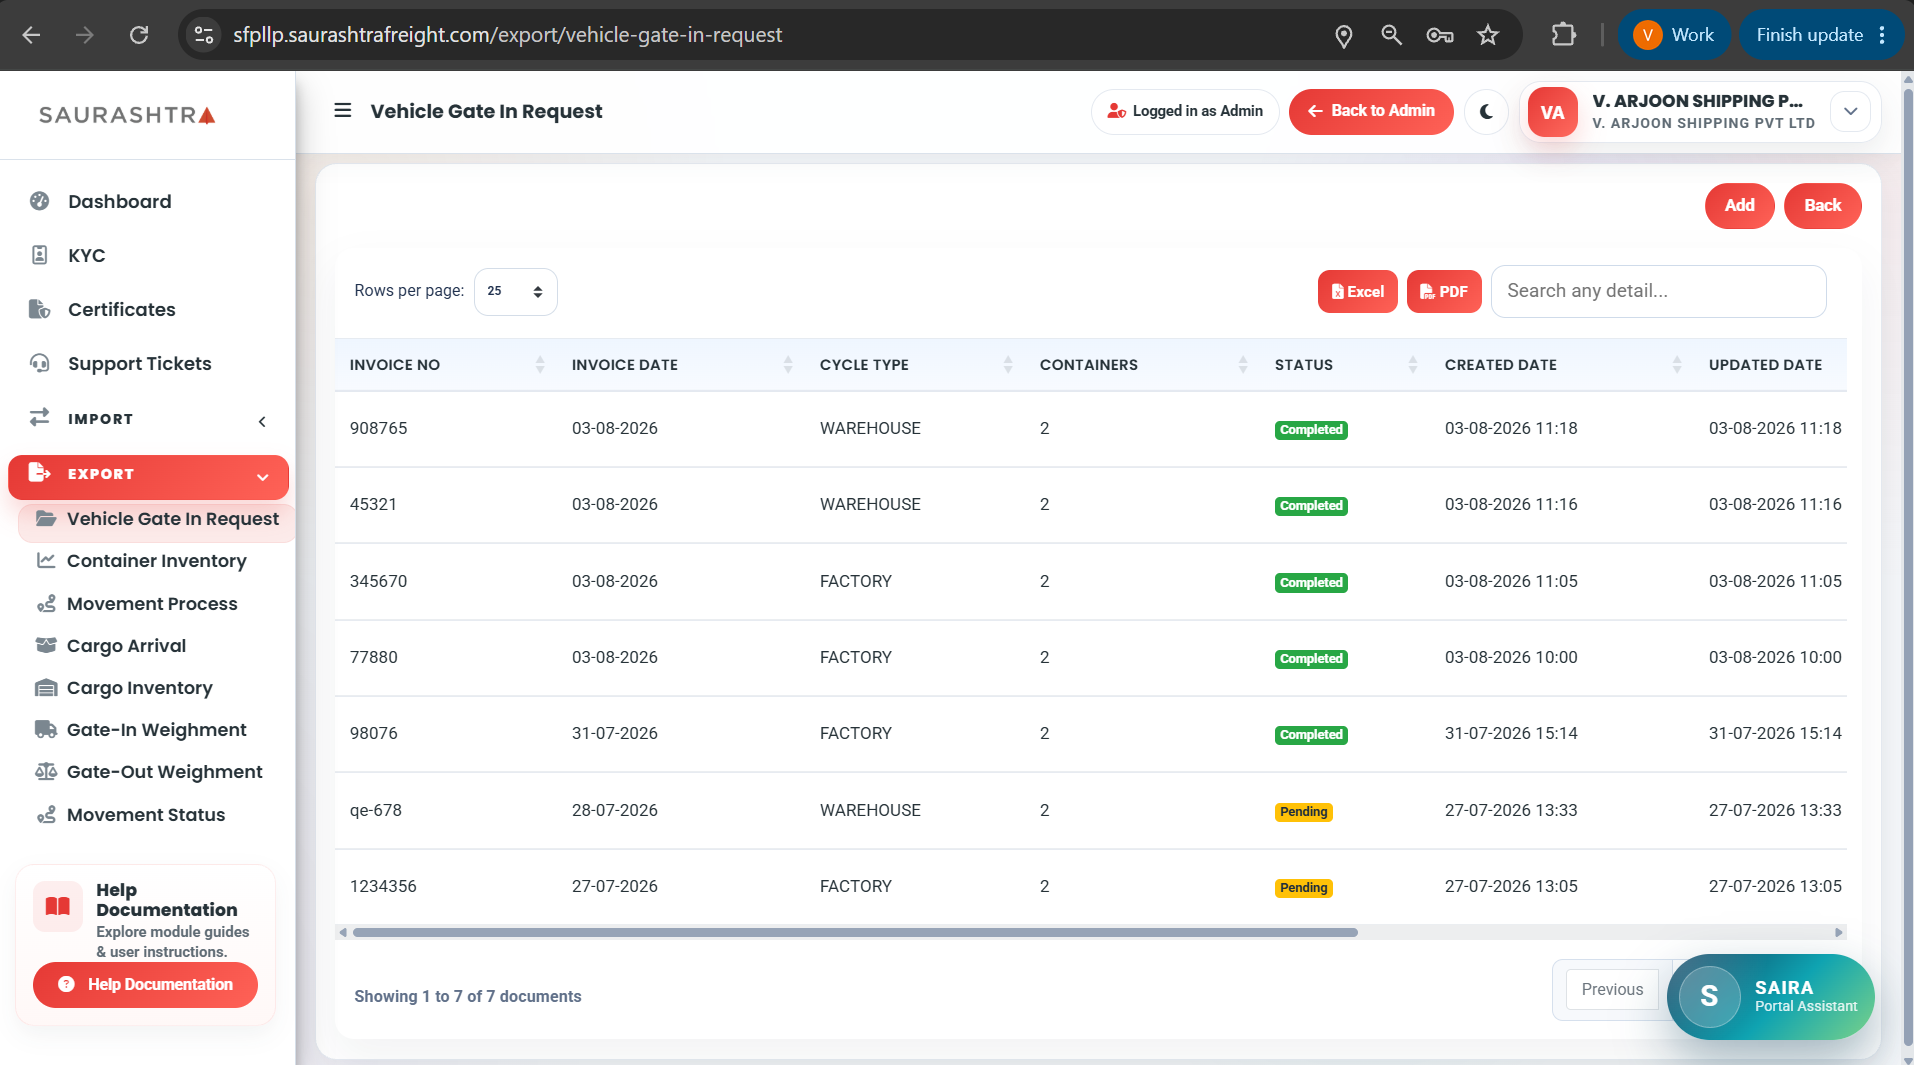
Screen 1: Request Listing
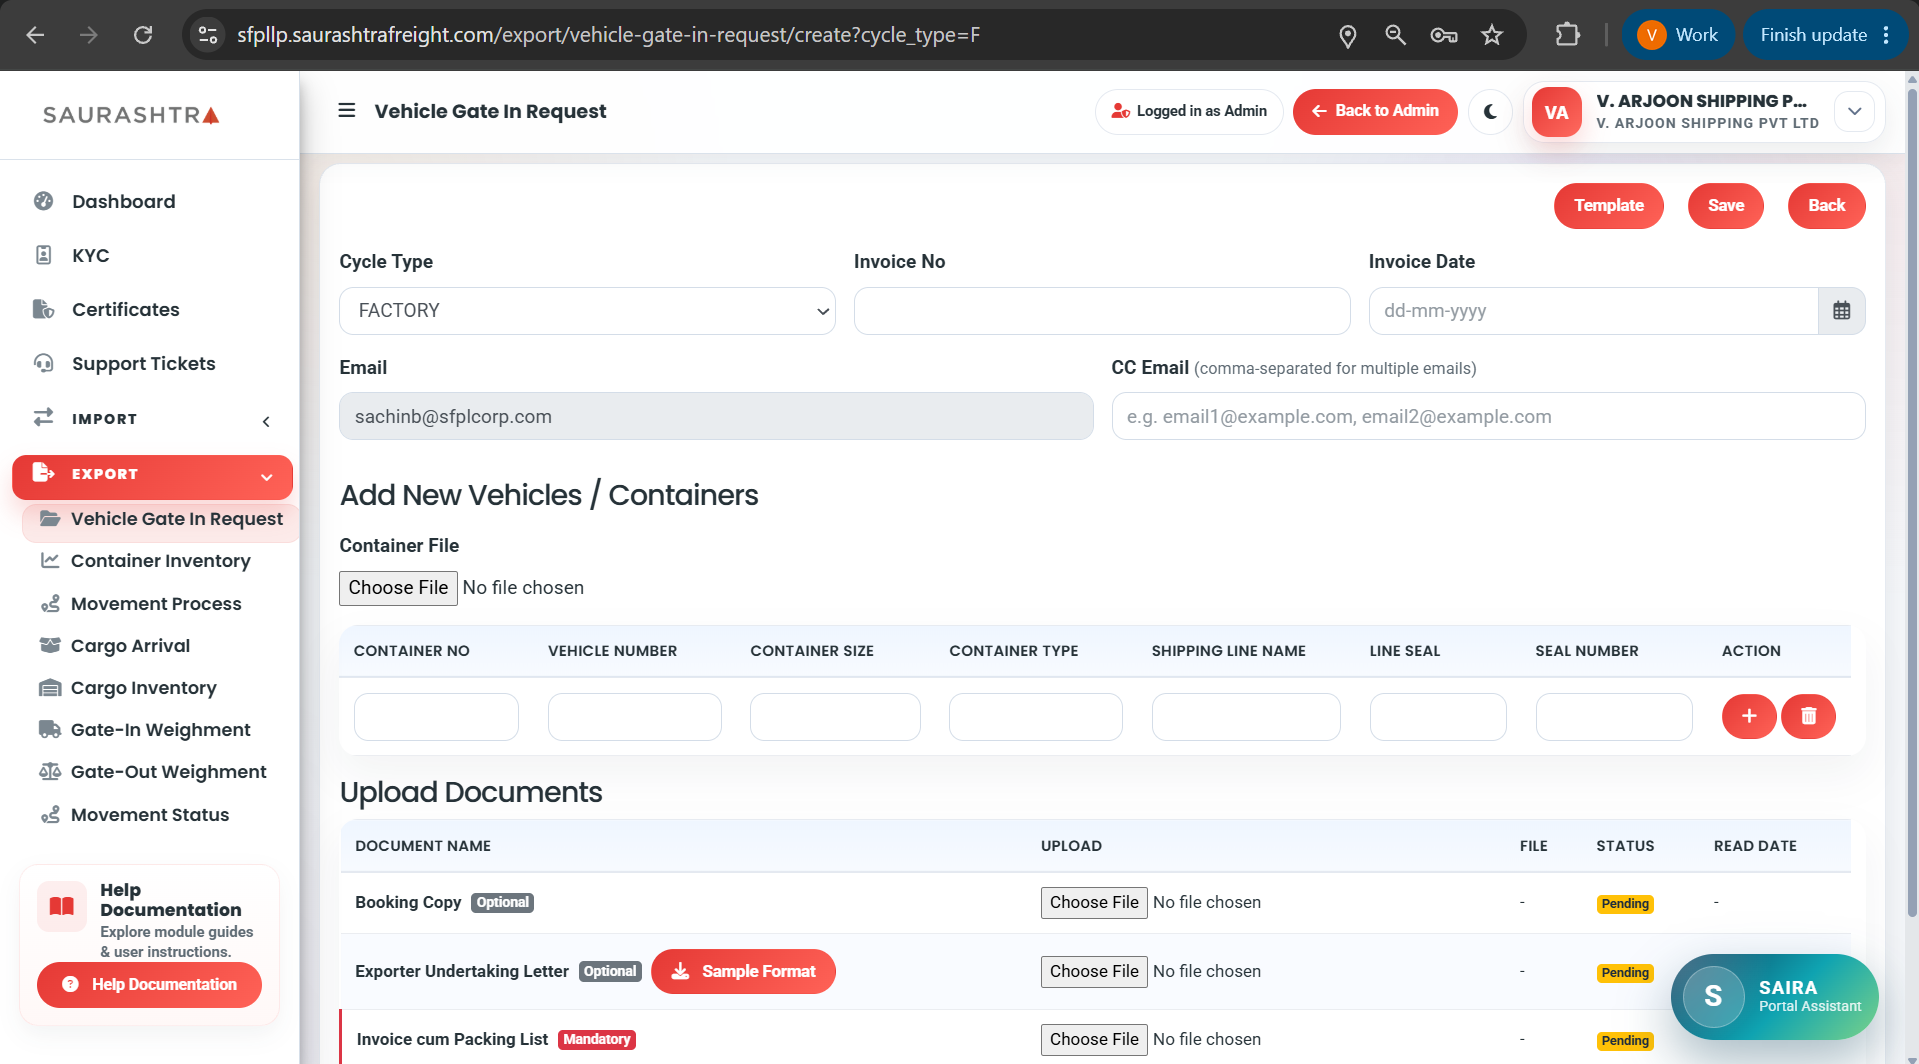
Screen 2: Factory Stuffing (Form)
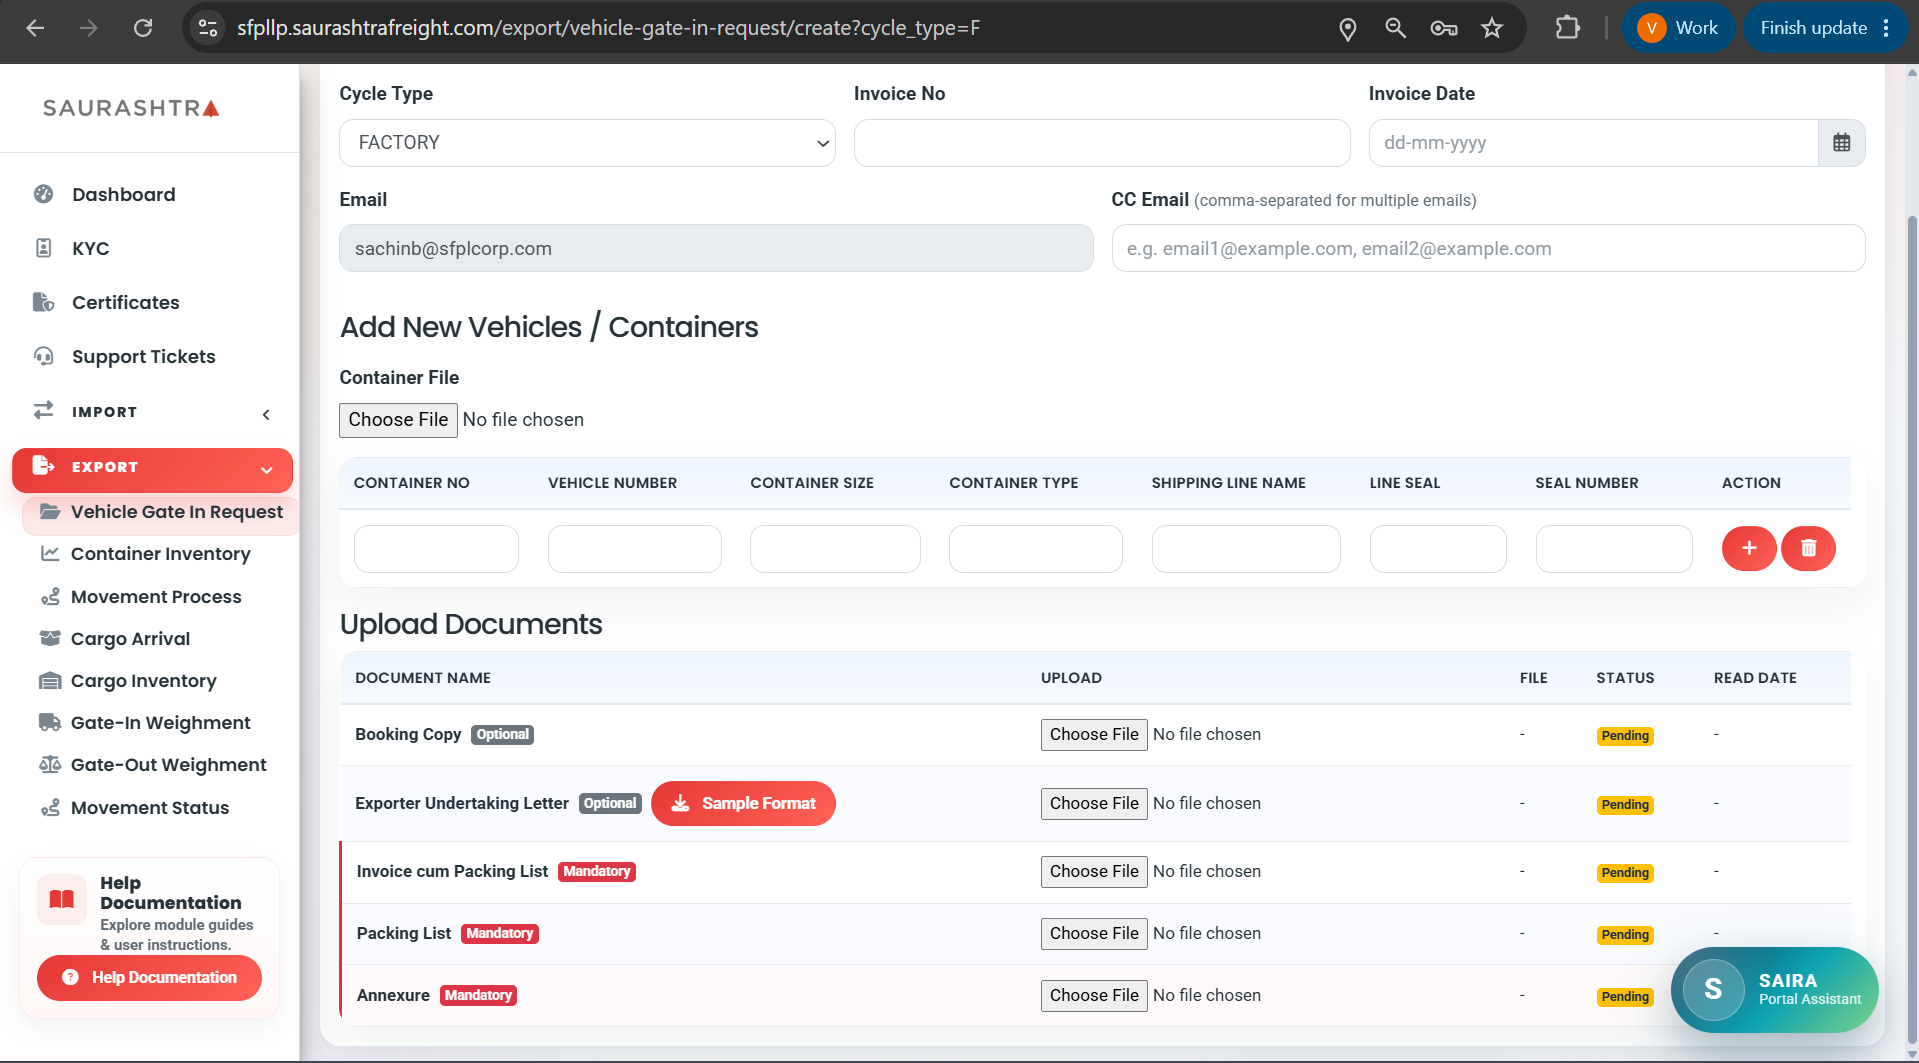
Screen 3: Factory Documents
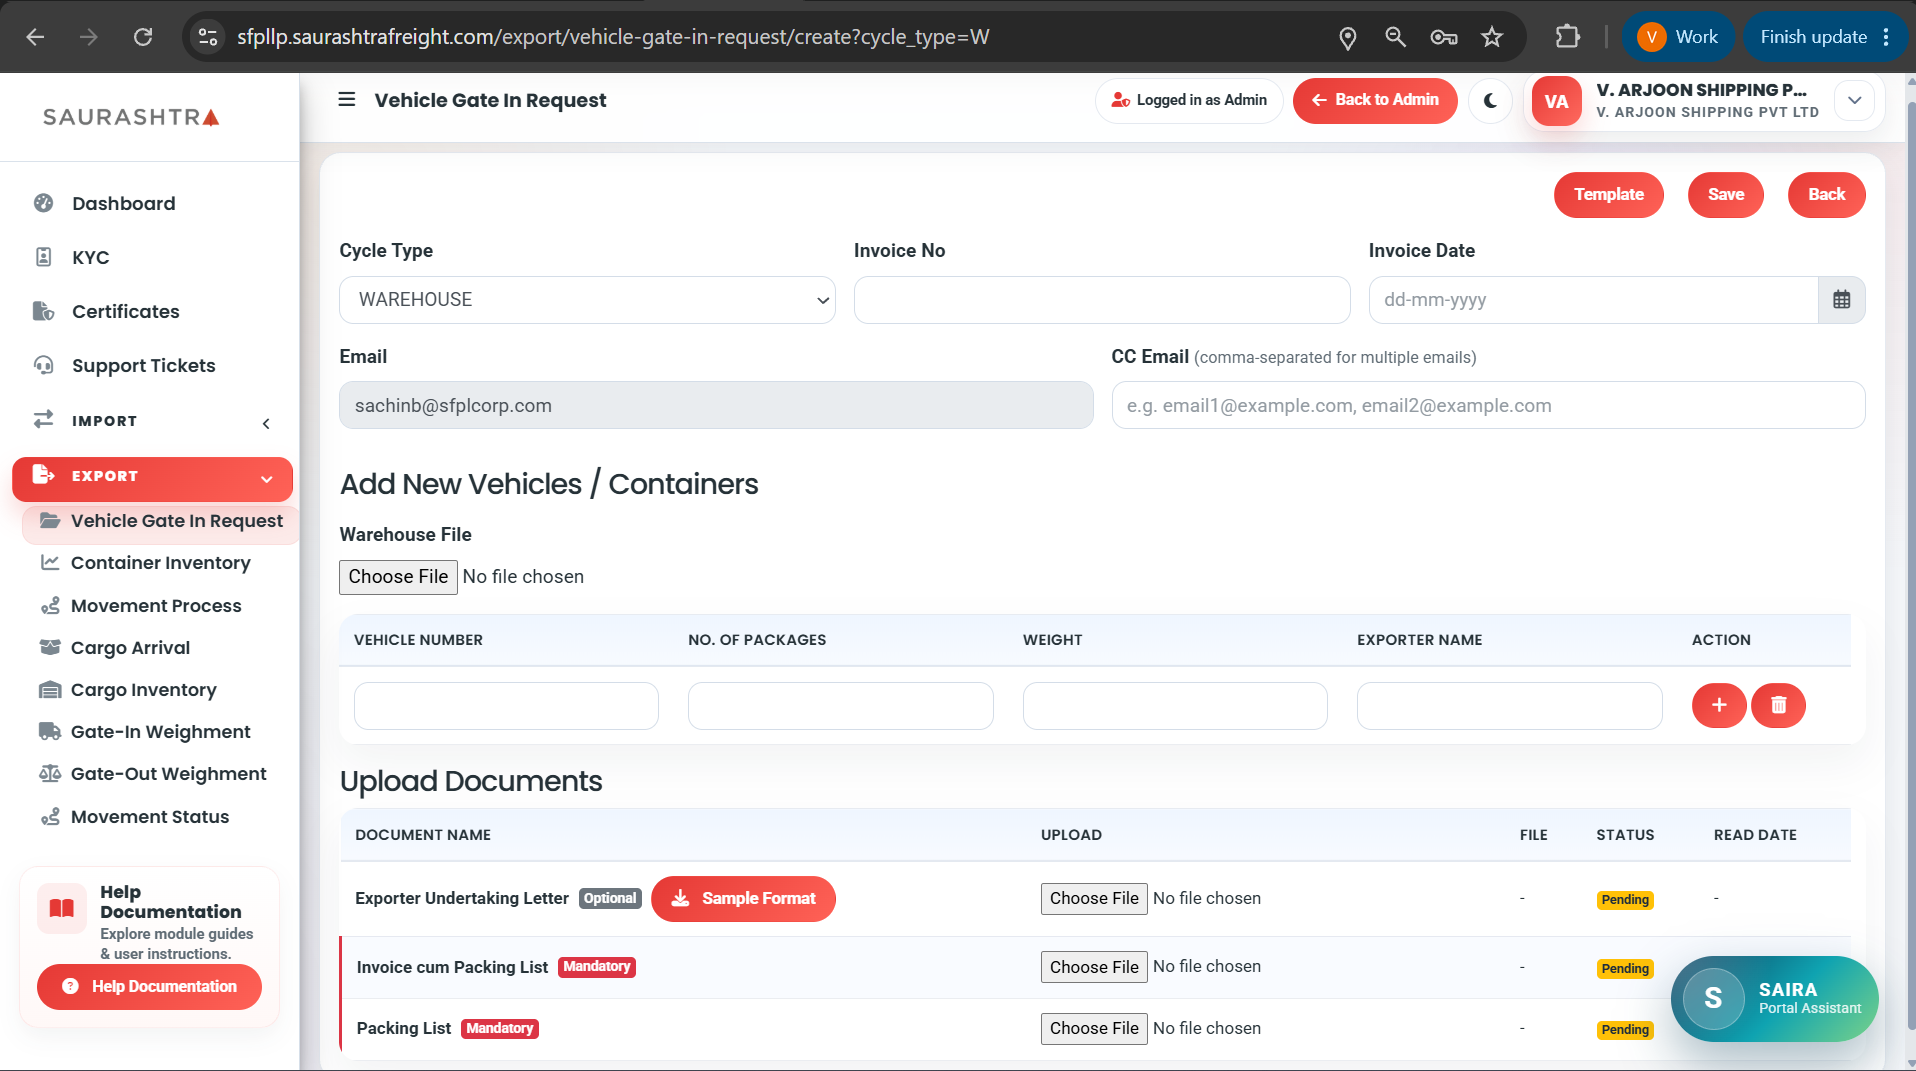
Screen 4: Warehouse Stuffing (Form)
Understanding Cycle Types
Factory Stuffing Cycle
For pre-stuffed loaded containers arriving directly from the exporter's factory. Requires container number, size (20/40/45ft), ISO code, custom seal number, gross weight, and tare weight.
Warehouse / CFS Stuffing Cycle
For loose cargo arriving at the CFS warehouse to be stuffed into containers on-site. Requires cargo description, package count, package type (Cartons/Pallets/Bags), total gross weight, volume (CBM), and Shipping Bill number.
How to Create a Vehicle Gate In Request
- Navigate — In the sidebar, expand EXPORT and click Vehicle Gate In Request.
- Click Add — Click the Add button on the listing page (Screen 1).
- Select Cycle Type — Choose either Factory or Warehouse from the Cycle Type dropdown menu.
- Fill Vehicle & Invoice Info — Enter the Invoice Number, Invoice Date, CC Email details.
- Add New Vehicles / Containers Data:
- For Factory Stuffing: Fill in Container No, Vehicle No, Container Size, Container Type, Shipping Line Name, Line Seal, Seal Number (Screen 2).
- For Warehouse Stuffing: Fill in Vehicle No, No of Packages, Weight, Exporter Name(Screen 4).
- Upload Mandatory Documents — Scroll down to the Document Upload section (Screen 3) and attach required PDF files (e.g. Exporter Undertaking Letter, Invoice cum Packing List, Packing List, Annexure).
- Download Excel Template (Optional) — Click the Template button to fill data in bulk via Excel spreadsheet and re-upload.
- Submit Request — Click Save. A unique Gate-In Request ID will be generated for vehicle tracking at the CFS gate.
Selecting the correct Cycle Type dynamically adjusts the required form fields and document checklist. Ensure all mandatory document attachments are uploaded before saving.
Container Inventory
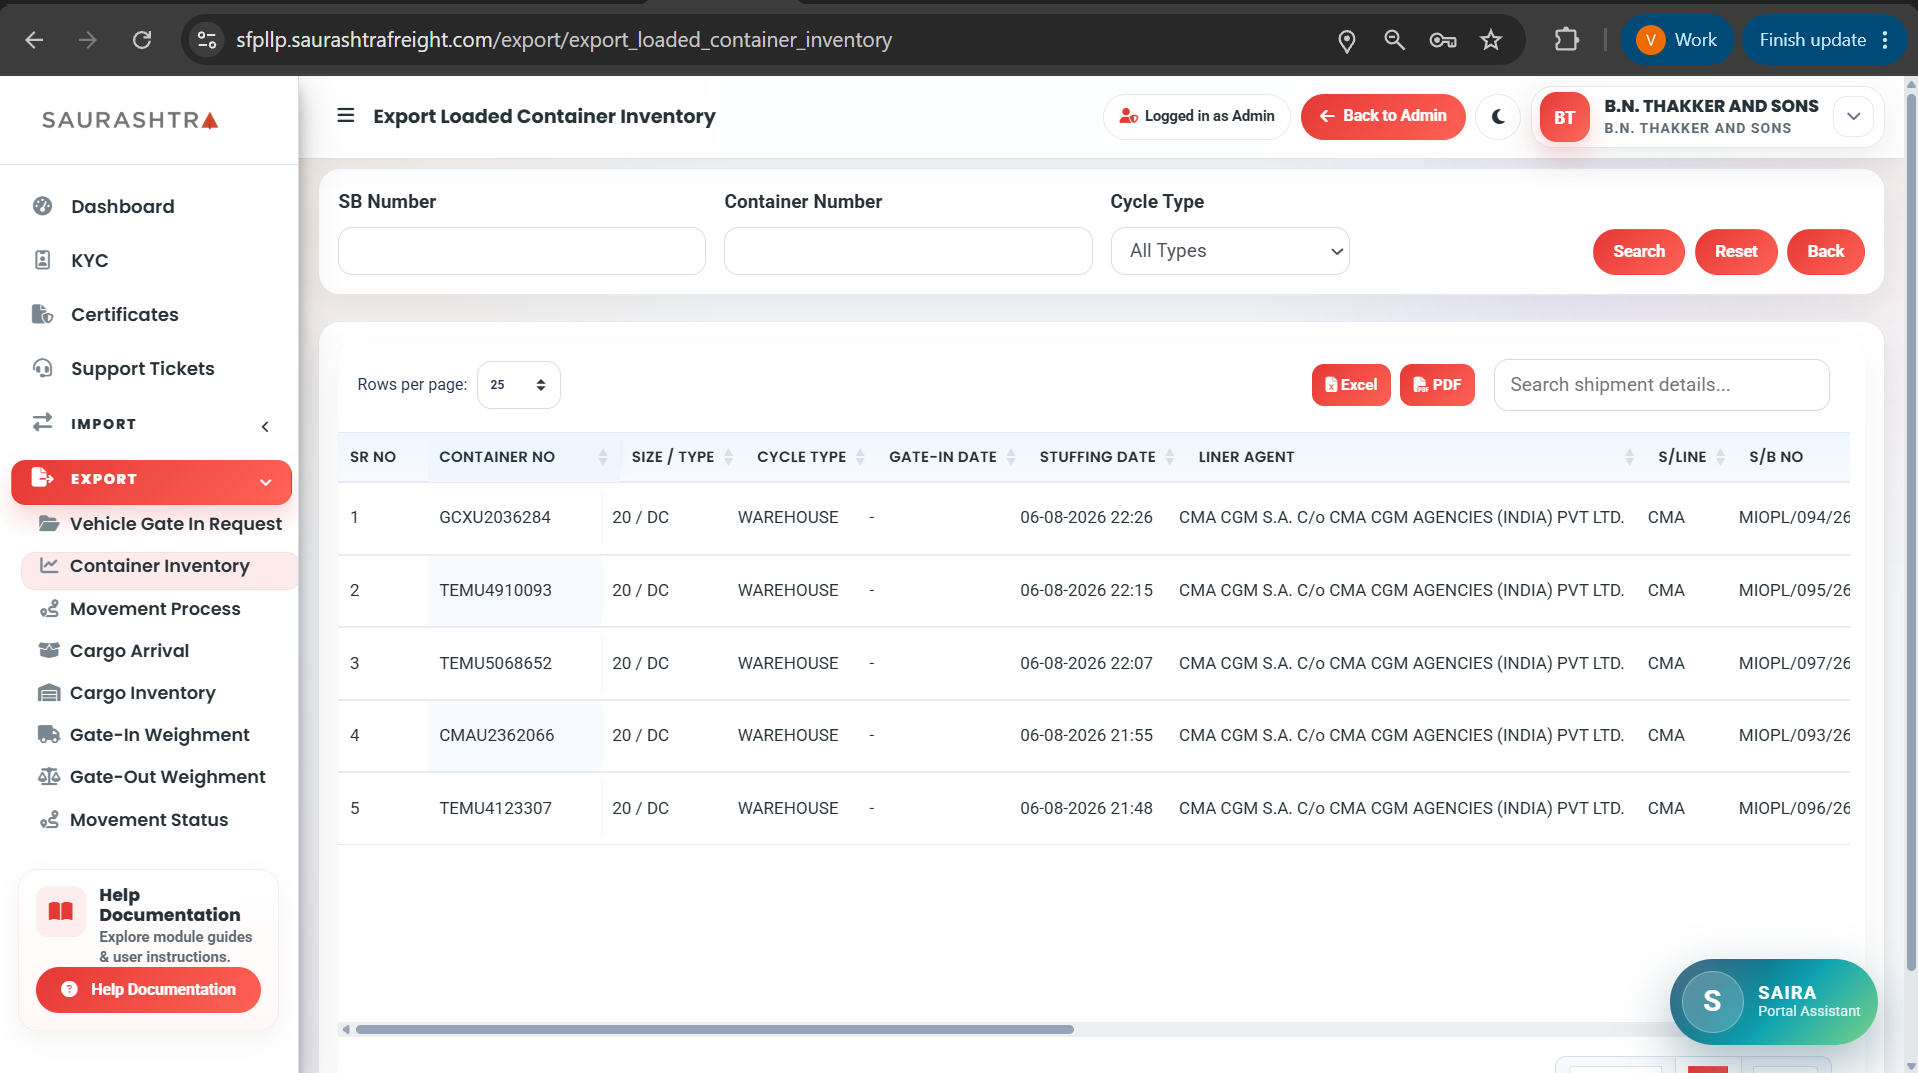
View the loaded container inventory for export operations. This module shows all containers currently in the yard with details such as container number, size, shipping line, and current status.
Click image to view full size
How to Use Container Inventory
- Navigate — Expand EXPORT in the sidebar and click Container Inventory.
- Browse Inventory — View the data table showing all loaded containers with details.
- Search & Filter — Use the search box and column filters to find specific containers.
- Export Data — Use the data table's built-in export buttons (Excel, PDF) to download inventory reports.
Movement Process
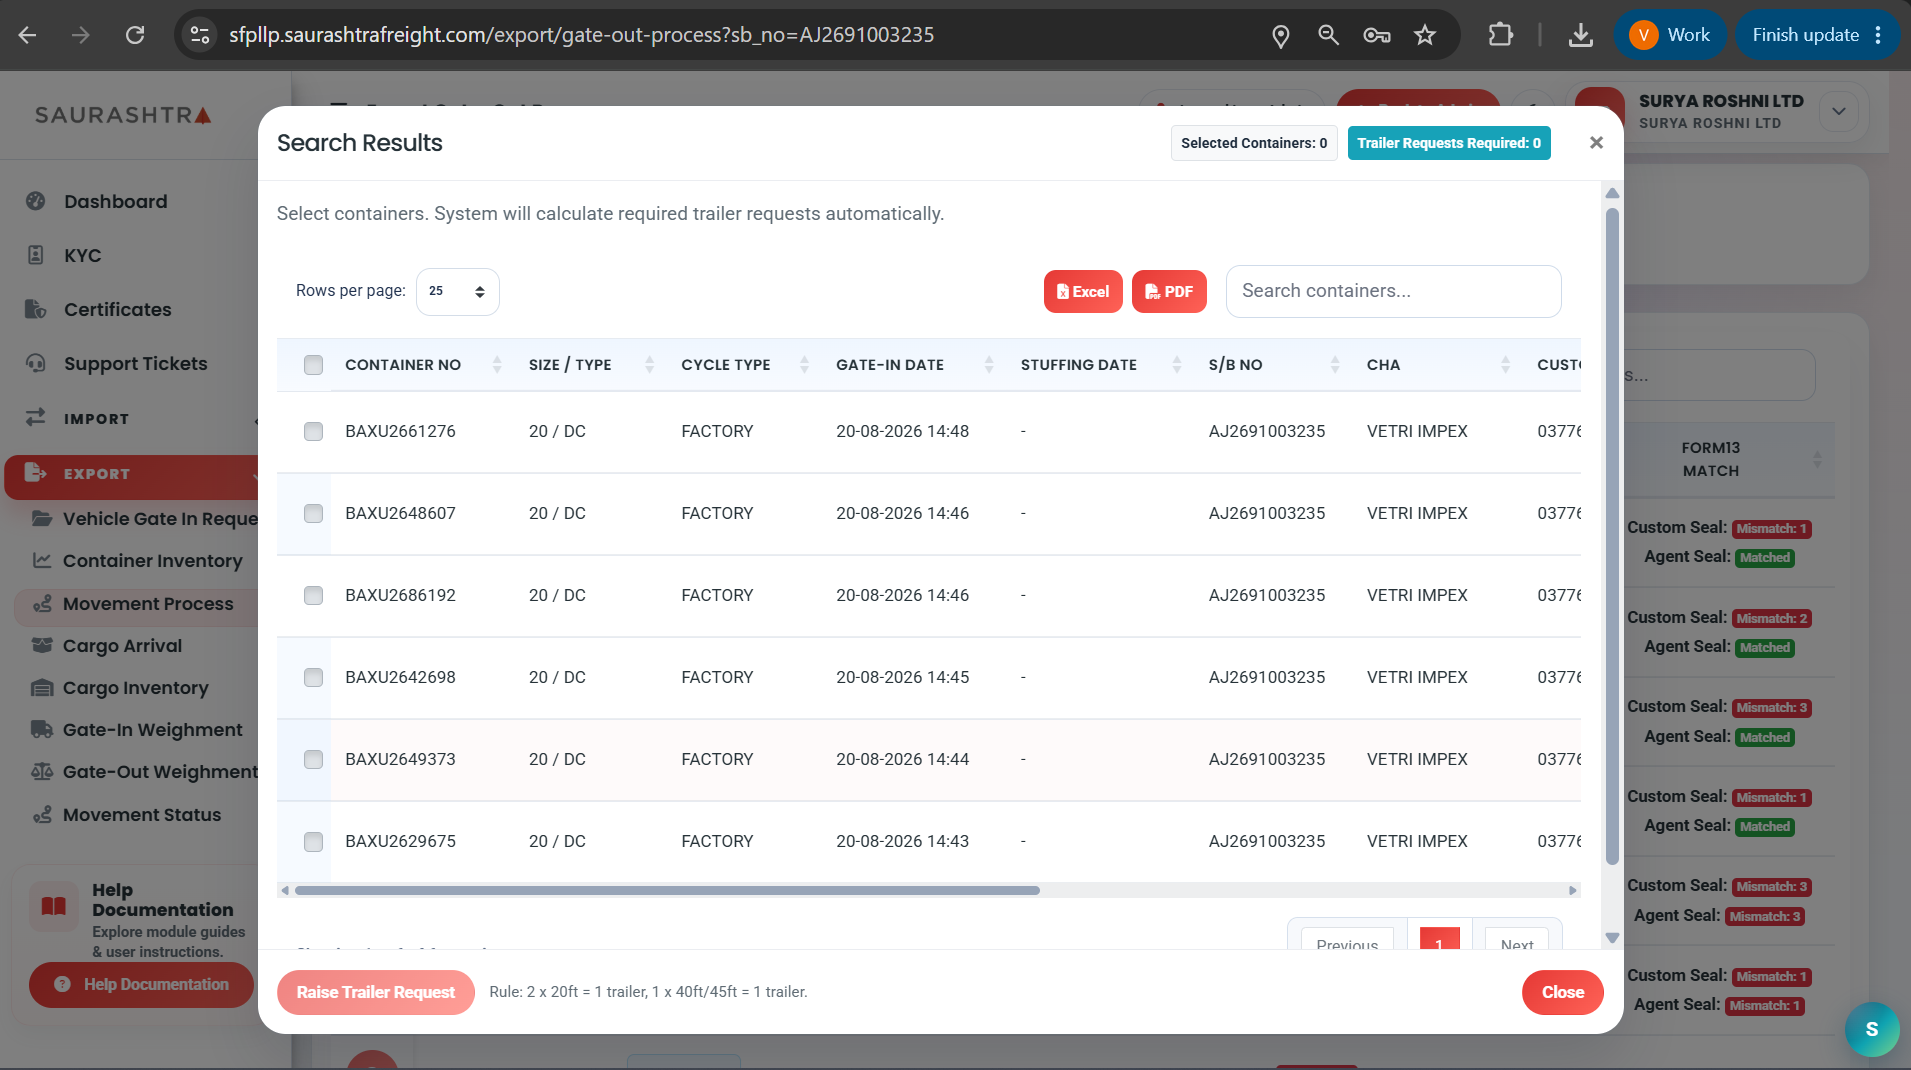
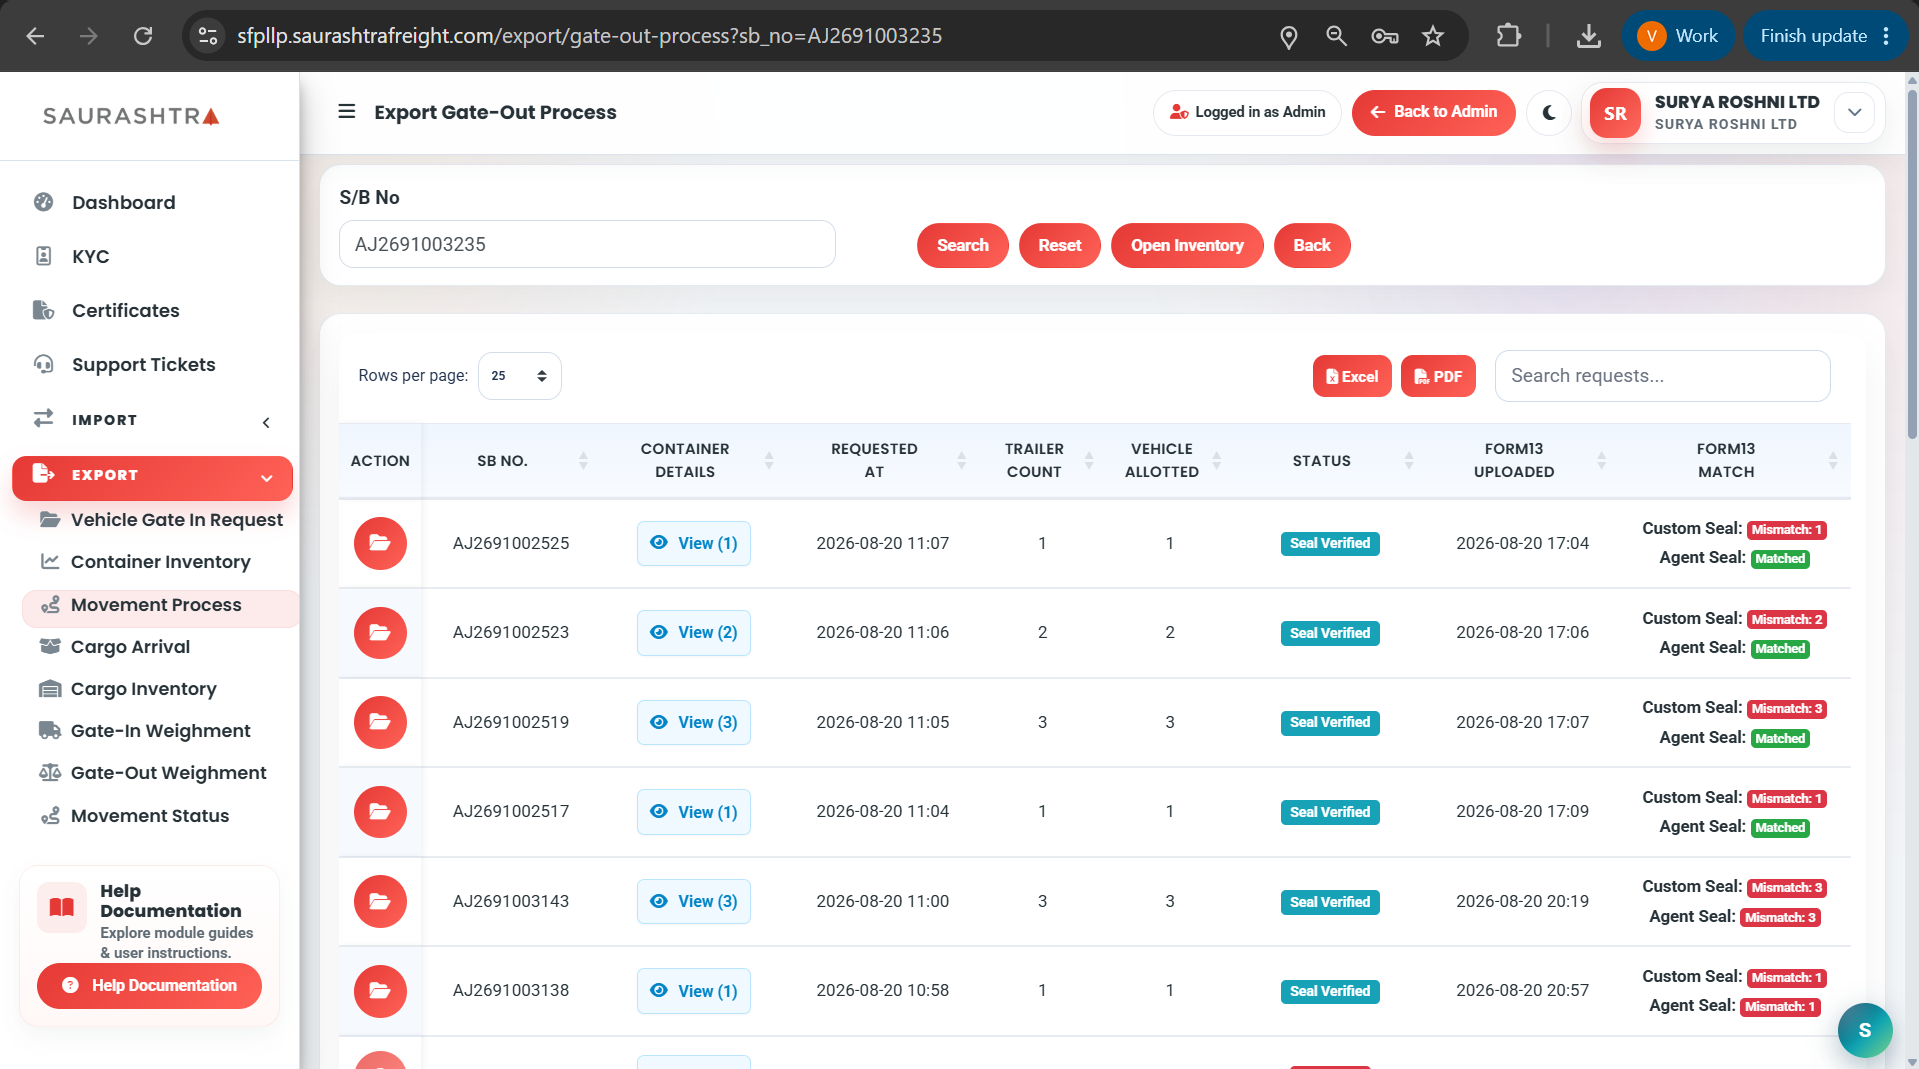
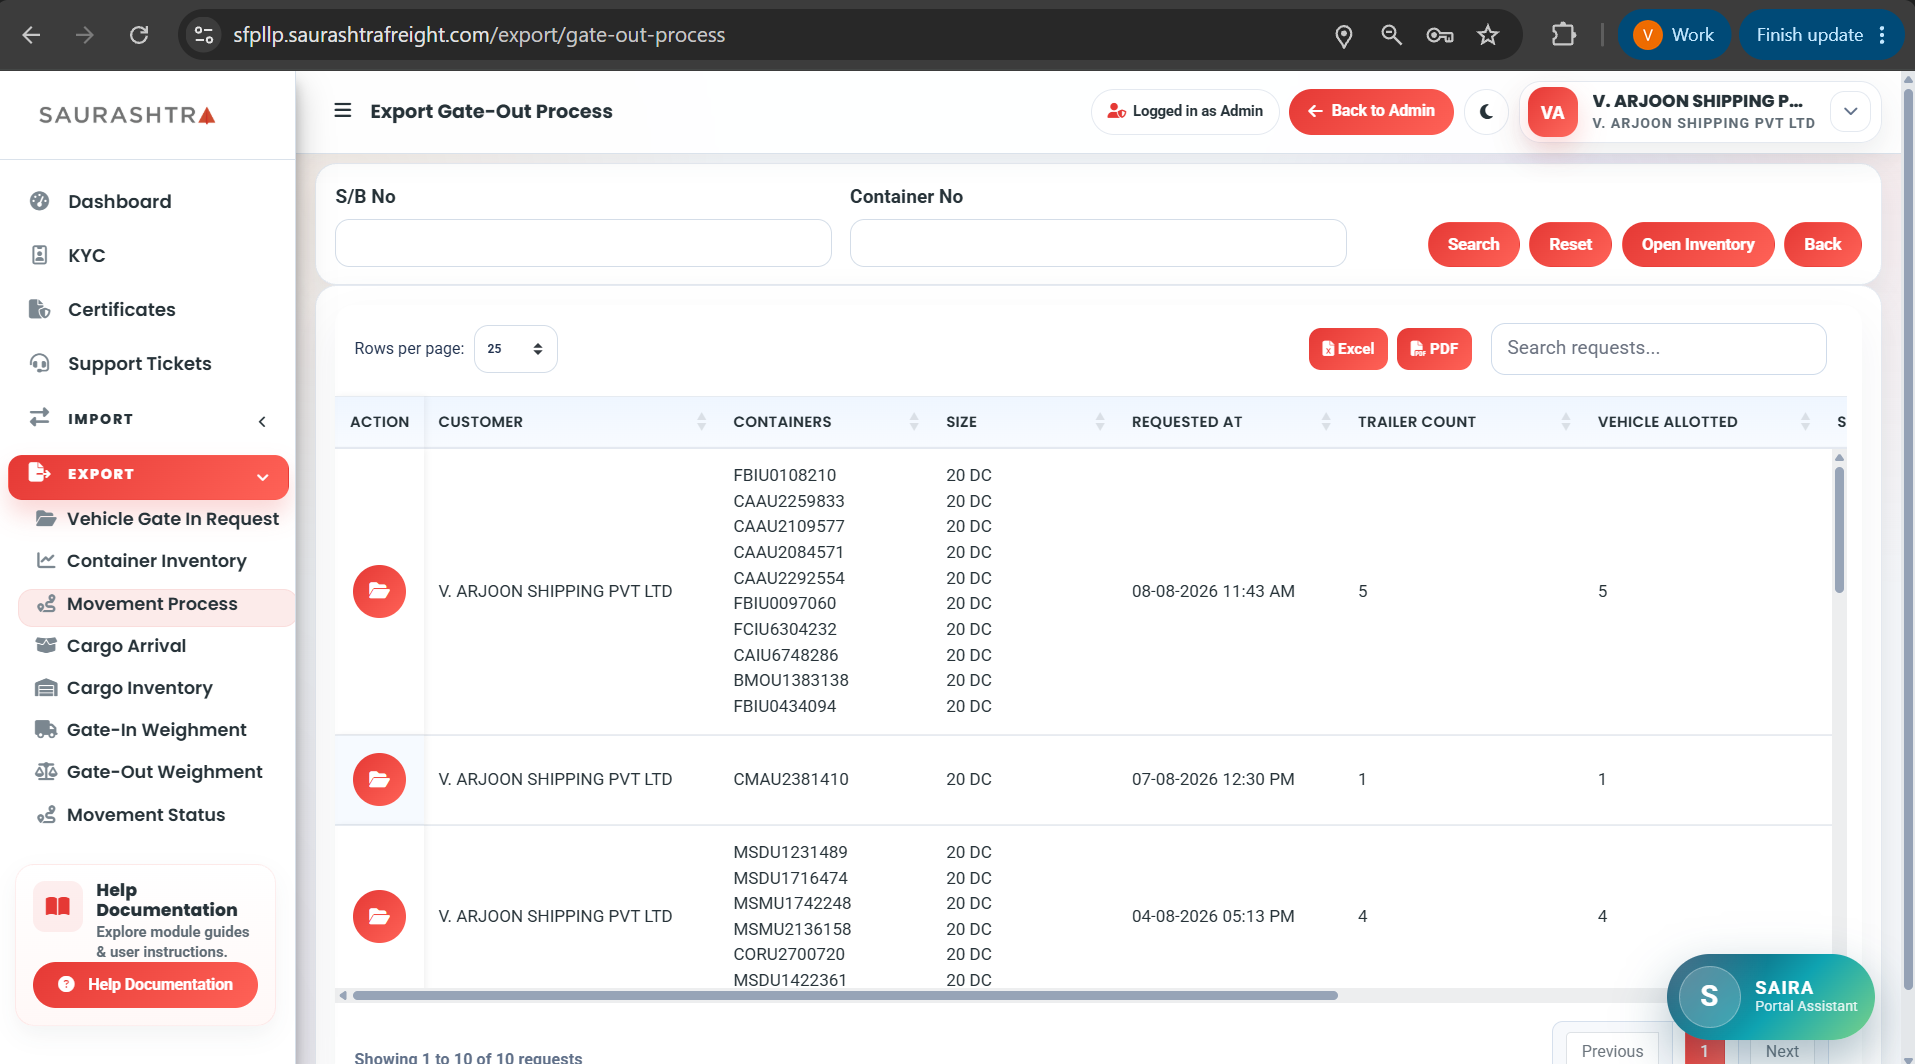
The Movement Process (Gate-Out Process) manages the complete export container gate-out lifecycle. Search by Shipping Bill number to find containers, raise trailer requests, upload Form 13 PDFs for automated extraction, map vehicles to containers with inline seal verification, and optionally change seal numbers.
Movement Process Screens & Workflow
Screen 1: S/B No Search
Screen 2: Search Results Modal
Screen 3: Request Listing
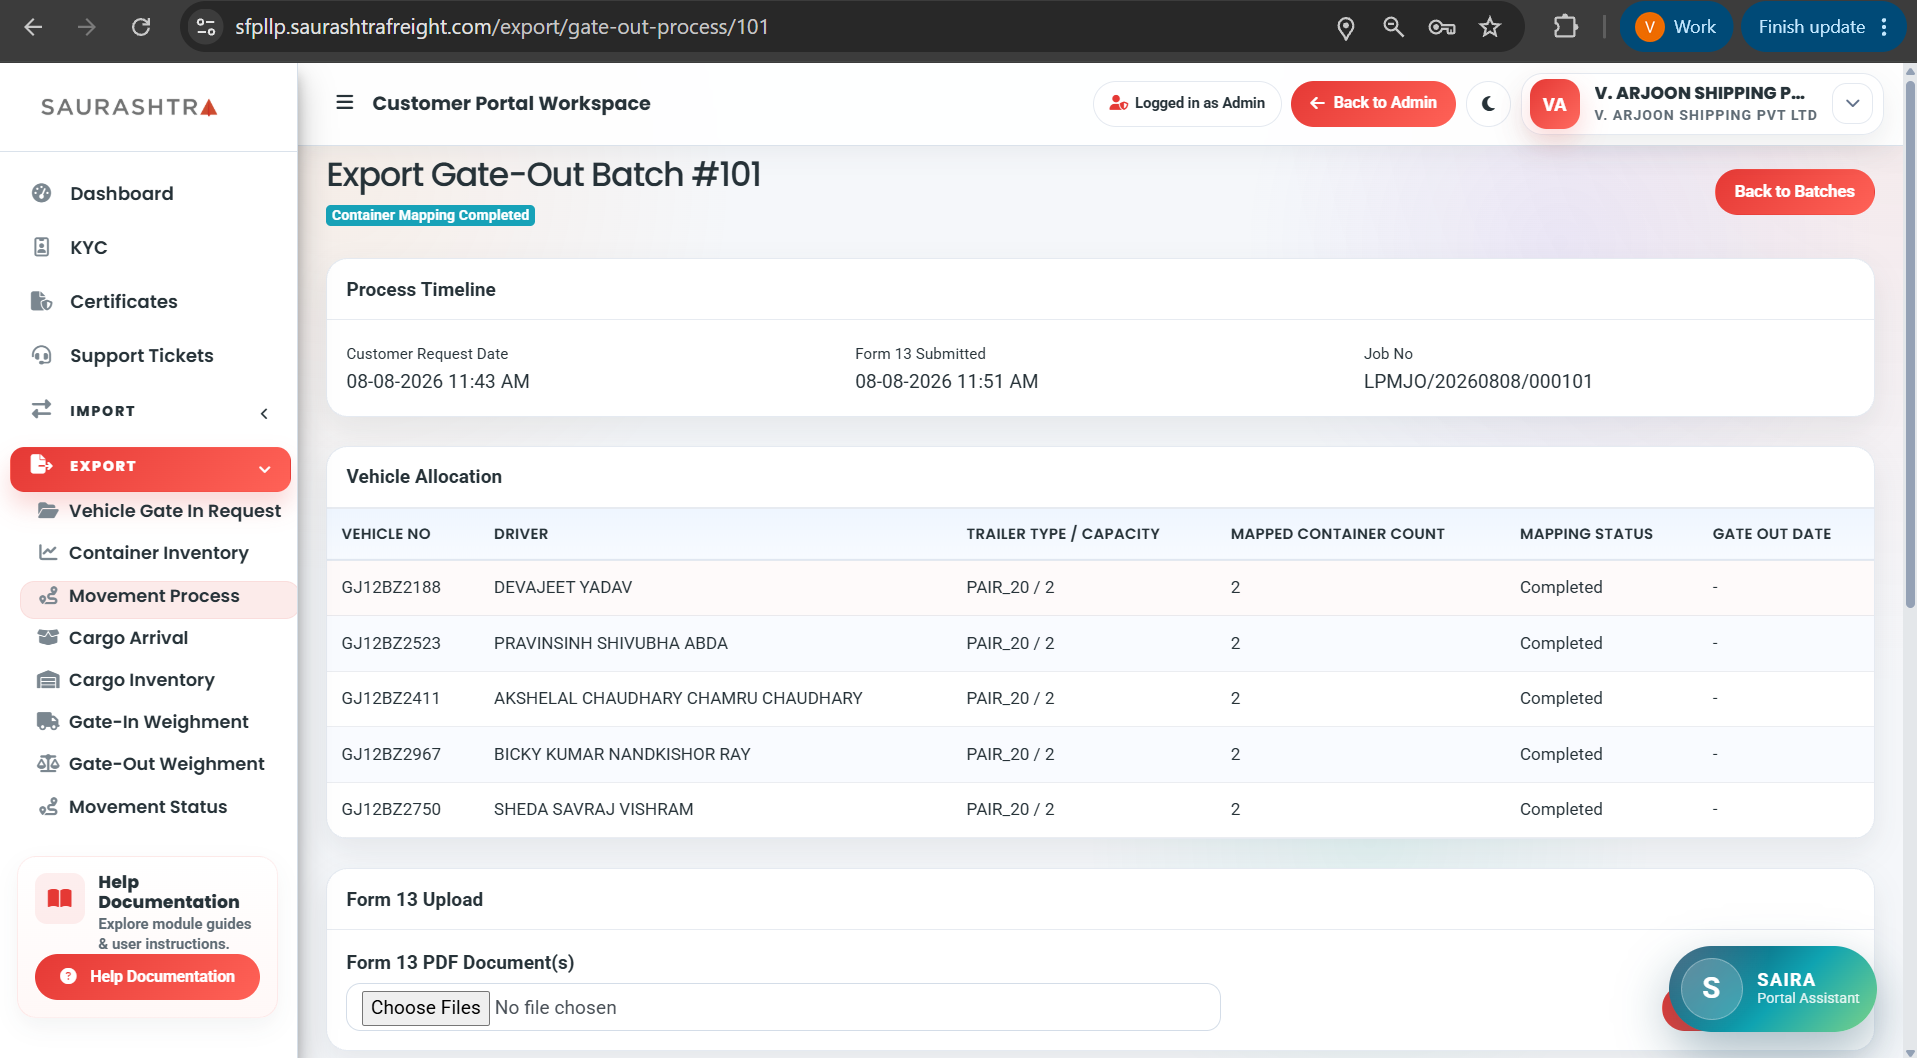
Screen 4: Form 13 & Vehicles
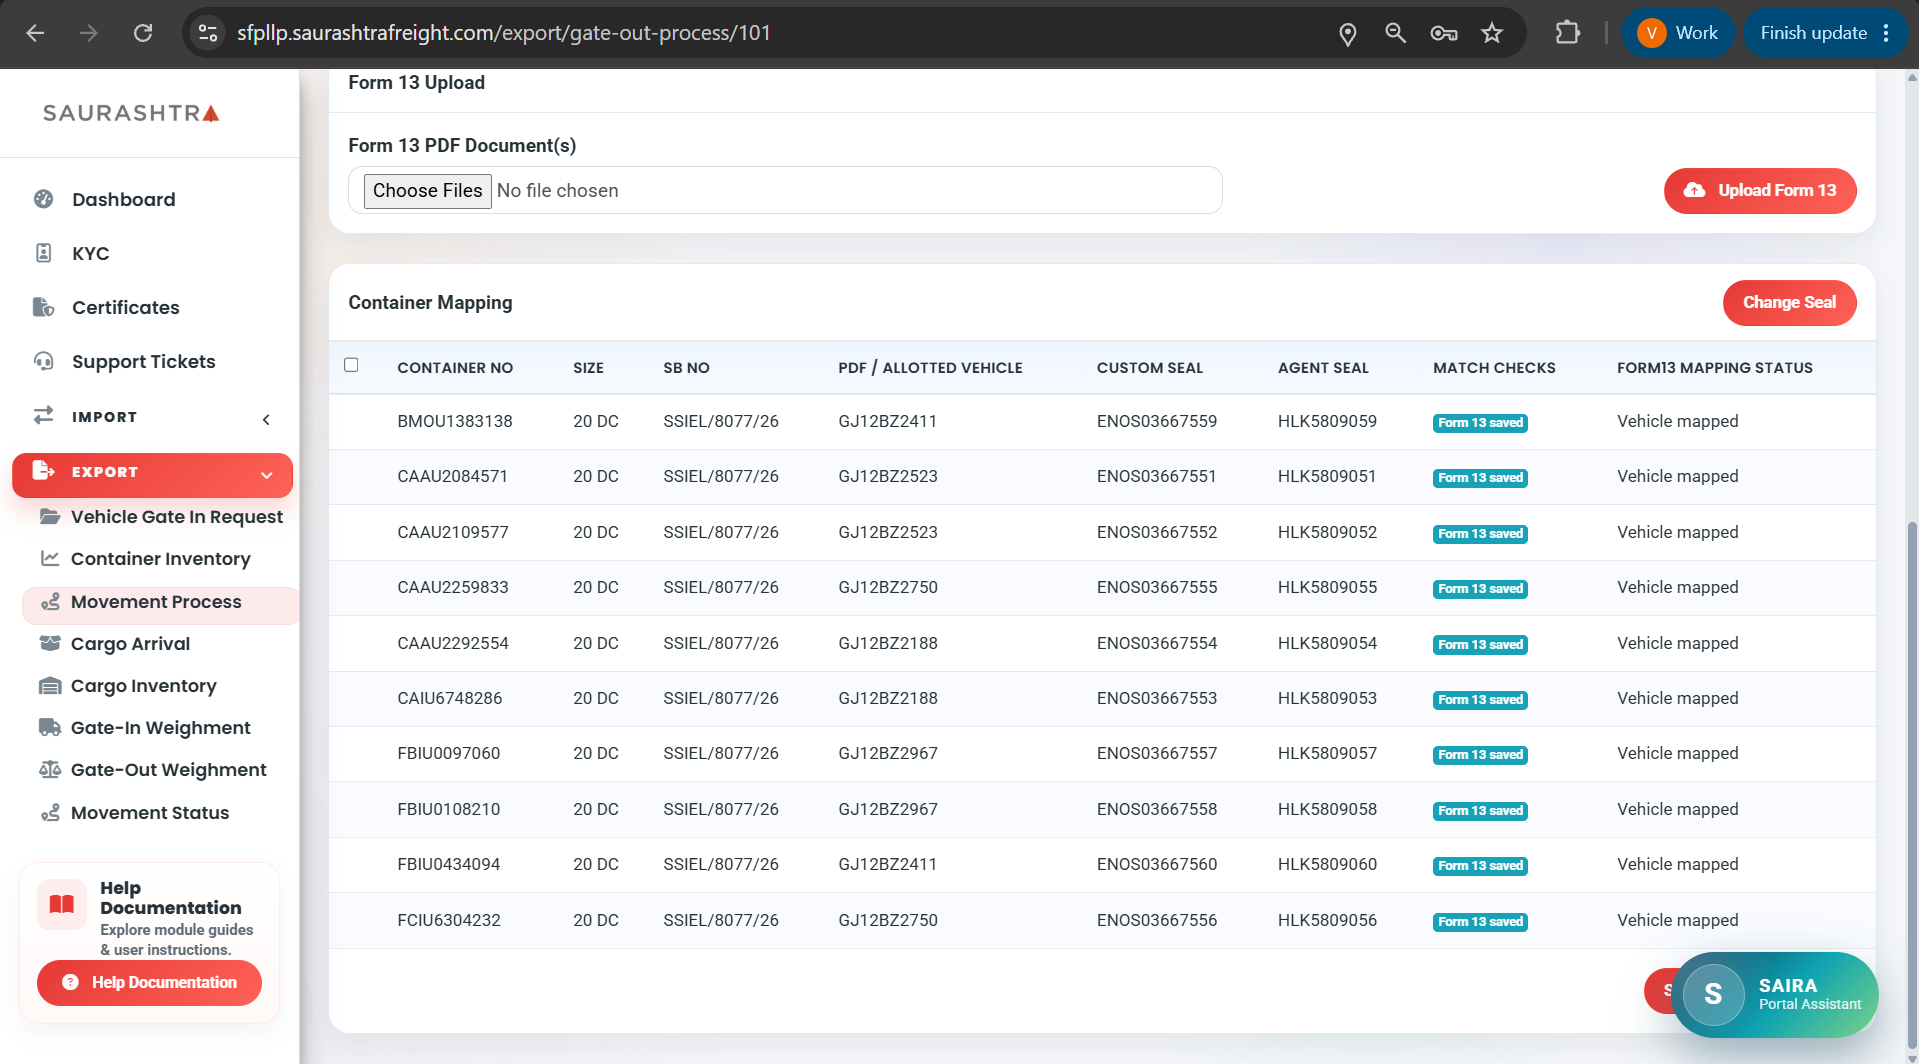
Screen 5: Container Mapping
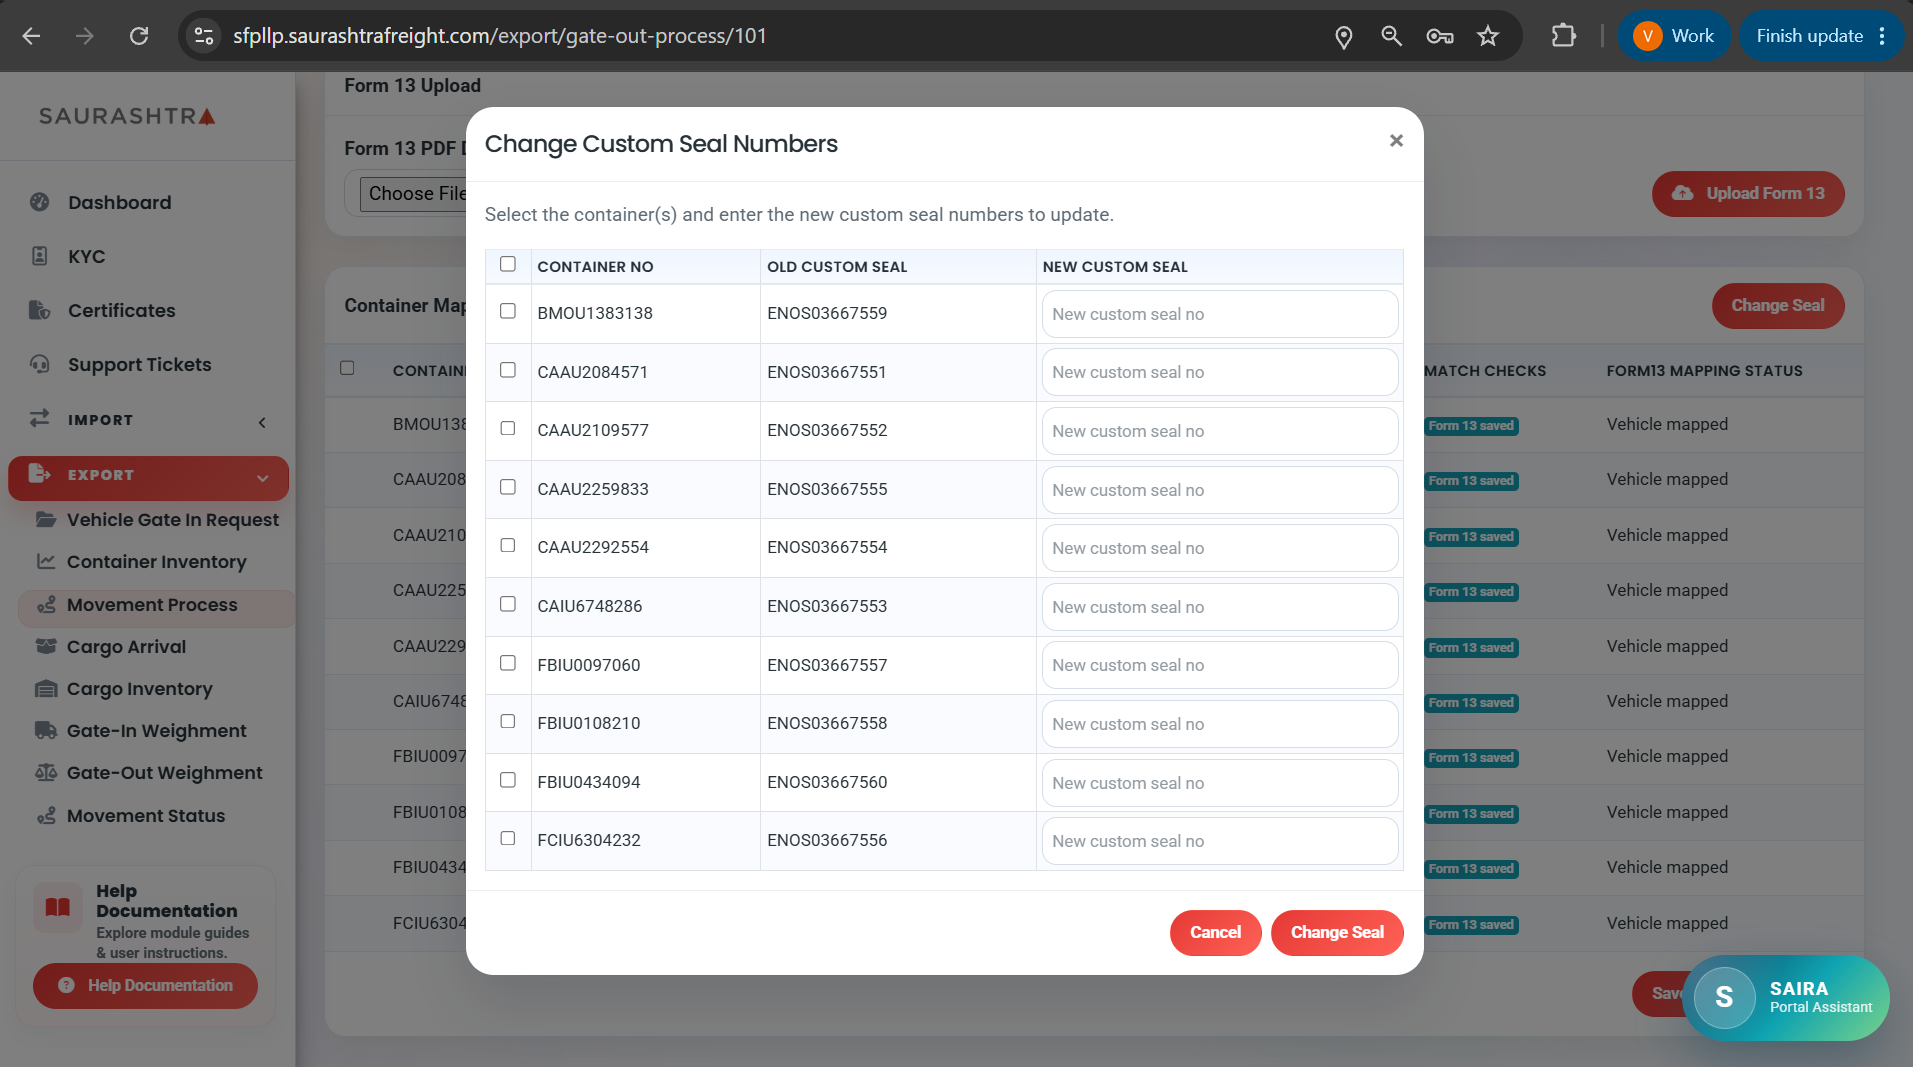
Screen 6: Change Seal Modal
Movement Process Workflow Steps
- Navigate — In the sidebar, expand EXPORT and click Movement Process.
- Search by Shipping Bill — Enter the S/B No in the top search field and click Search (Screen 1).
- Select Containers & Raise Trailer Request — The Search Results modal opens displaying matching containers (Screen 2). Select the containers you want to move with checkboxes and click Raise Trailer Request.
- View Request in Listing — Once submitted, the request appears in the Movement Process listing table (Screen 3). Click on a request folder to view its details.
- Upload Form 13 PDF — Upload the Form 13 document for the request (Screen 4). The system automatically extracts container numbers, container sizes, and vehicle numbers into a preview.
- Vehicle Assignment & Container Mapping — Select the containers to map to their assigned transport vehicles (Screen 4 & Screen 5).
- Save Vehicle Mappings — Click Save Vehicle Mappings (Screen 5). A confirmation modal appears showing the customer seal and agent seal from Form 13 for every selected container. Review the seals, then click Confirm and Save Mapping to approve and save the mappings.
- Change Seal Numbers (Optional) — If a seal modification is required before or after saving vehicle mappings, click Change Seal to open the Change Custom Seal Numbers Modal (Screen 6) and update the seal record.
Mandatory Container Mapping Validations:
When clicking Save Vehicle Mappings, the portal strictly enforces the following pre-validations:
When clicking Save Vehicle Mappings, the portal strictly enforces the following pre-validations:
- Container Number Match — Must match the Form 13 container record.
- Container Size Match — Must match the Form 13 specifications (20ft / 40ft / 45ft).
- Vehicle Number Match — Vehicle assigned in Pentagon/Portal must strictly match the vehicle assigned in Form 13 (normalized alphanumeric string comparison).
- Trailer Capacity Check — Ensures mapped container sizes do not exceed vehicle trailer capacity.
Cargo Arrival
Track and view cargo arrival data for your export shipments. This sub-module allows you to search for cargo arrivals, view details, and print arrival reports.
Cargo Arrival Screens
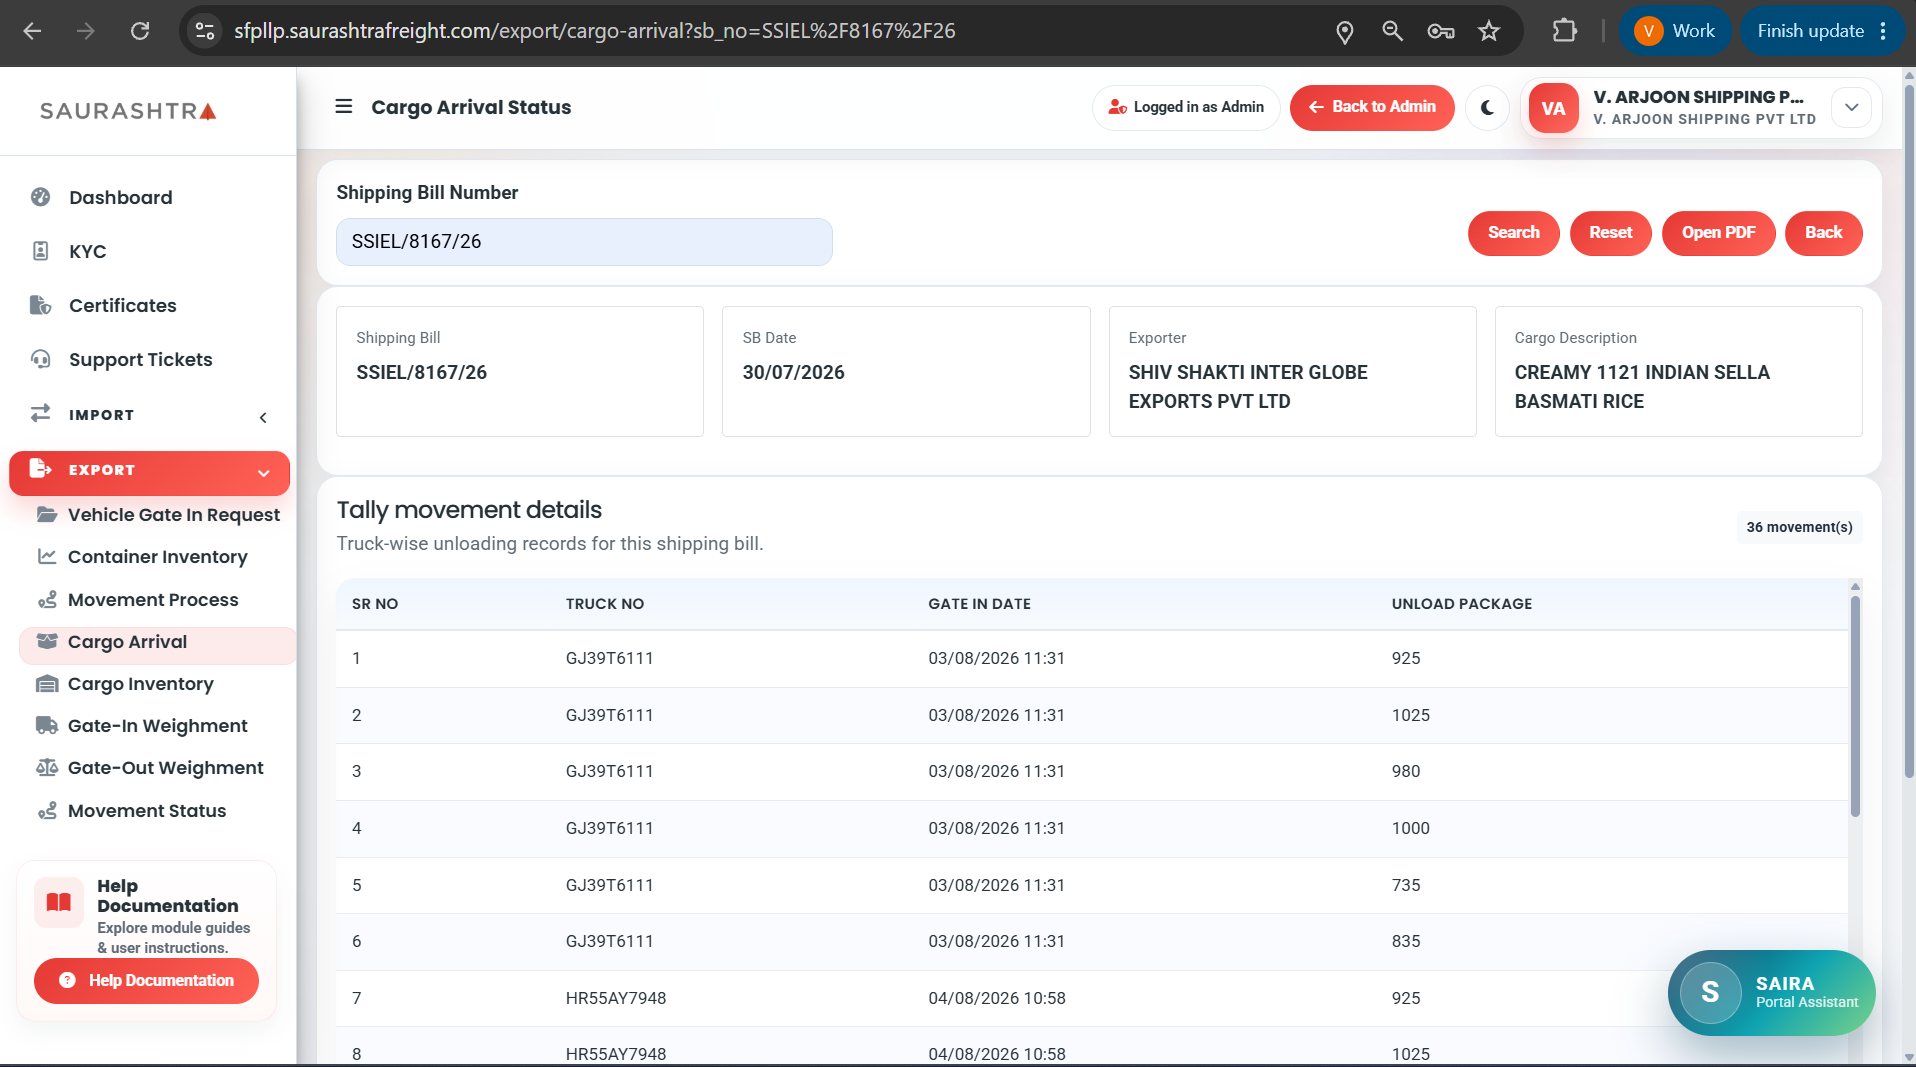
Step 1: Search & Listing
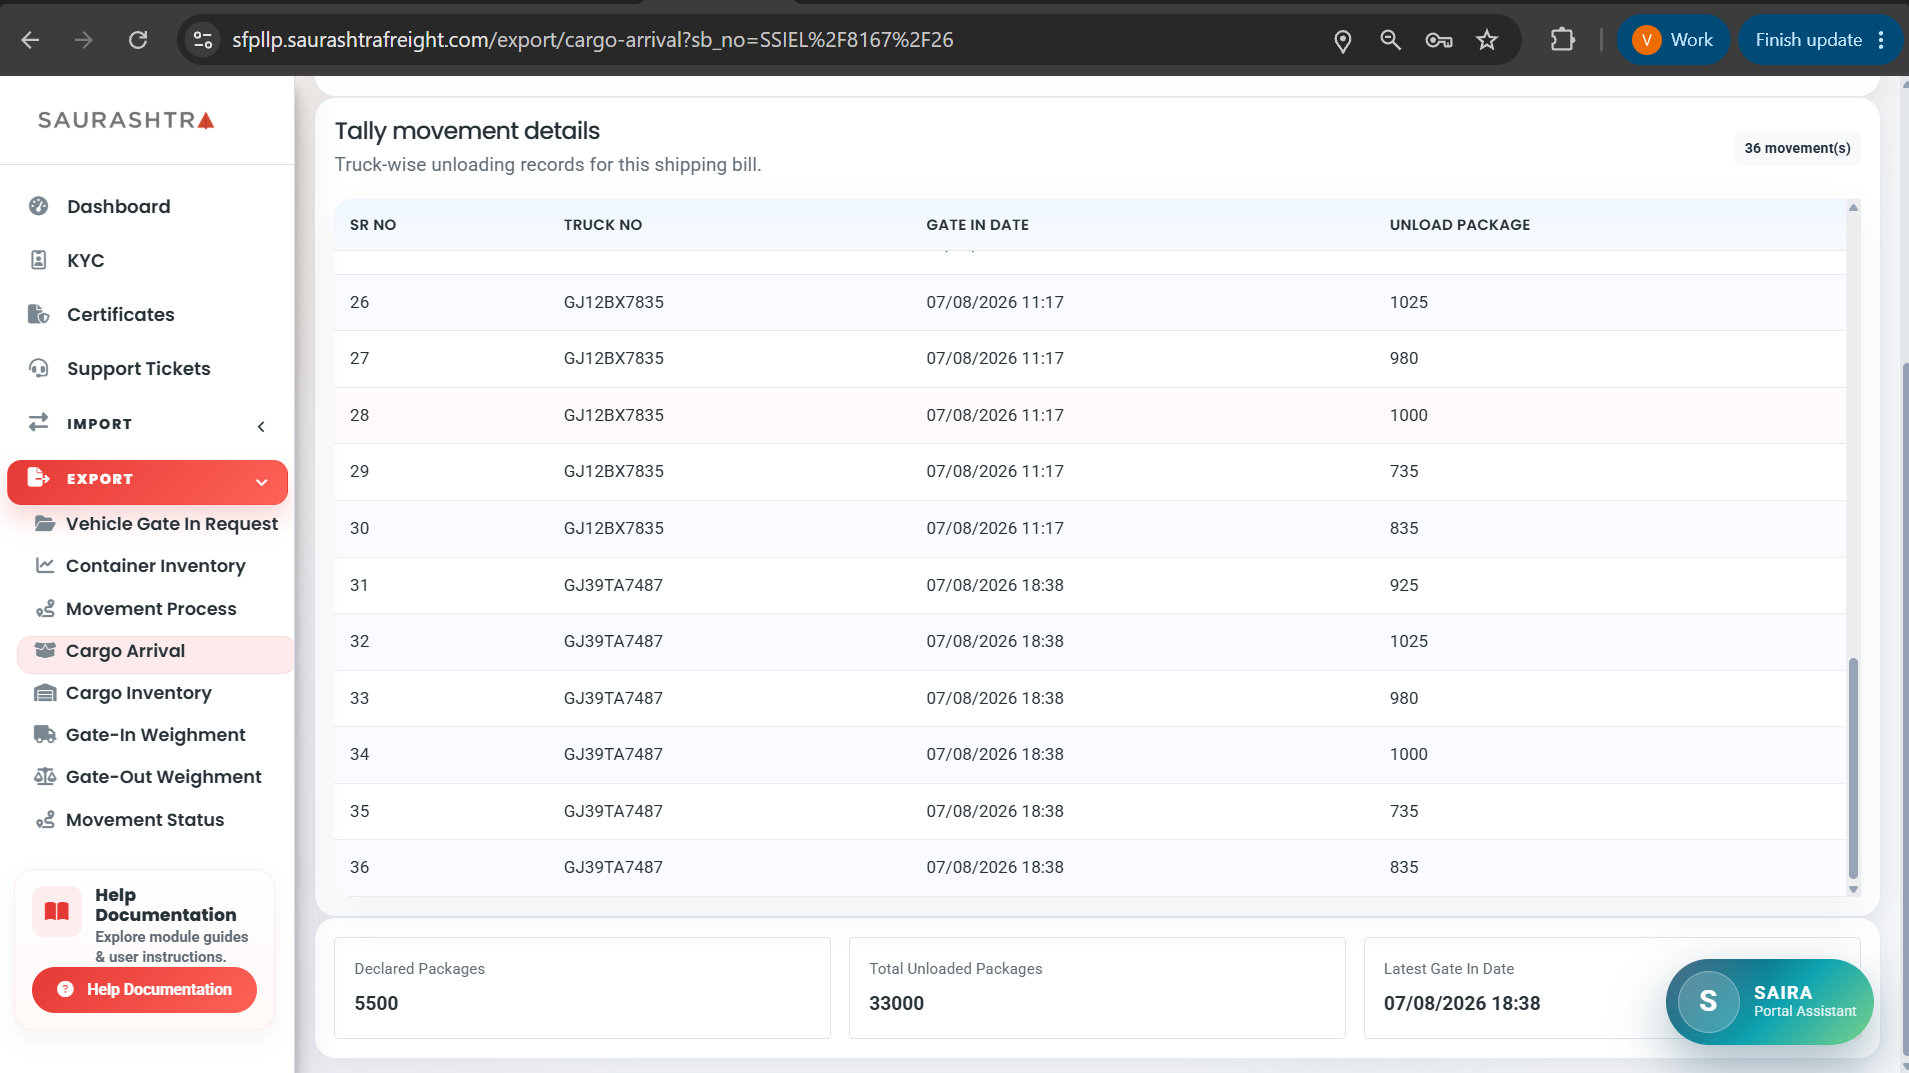
Step 2: Details & Print
How to Use Cargo Arrival
- Navigate — Expand EXPORT and click Cargo Arrival.
- Search Cargo — Use the search filters to find specific cargo arrivals by date or other criteria (Step 1).
- View Results — The data table displays cargo arrival records with details (Step 2).
- Print Report — Click the Open PDF button to generate a printable cargo arrival report.
Cargo Inventory
View current cargo balance and inventory for export operations. This module shows the real-time status of your cargo stored at the CFS facility.
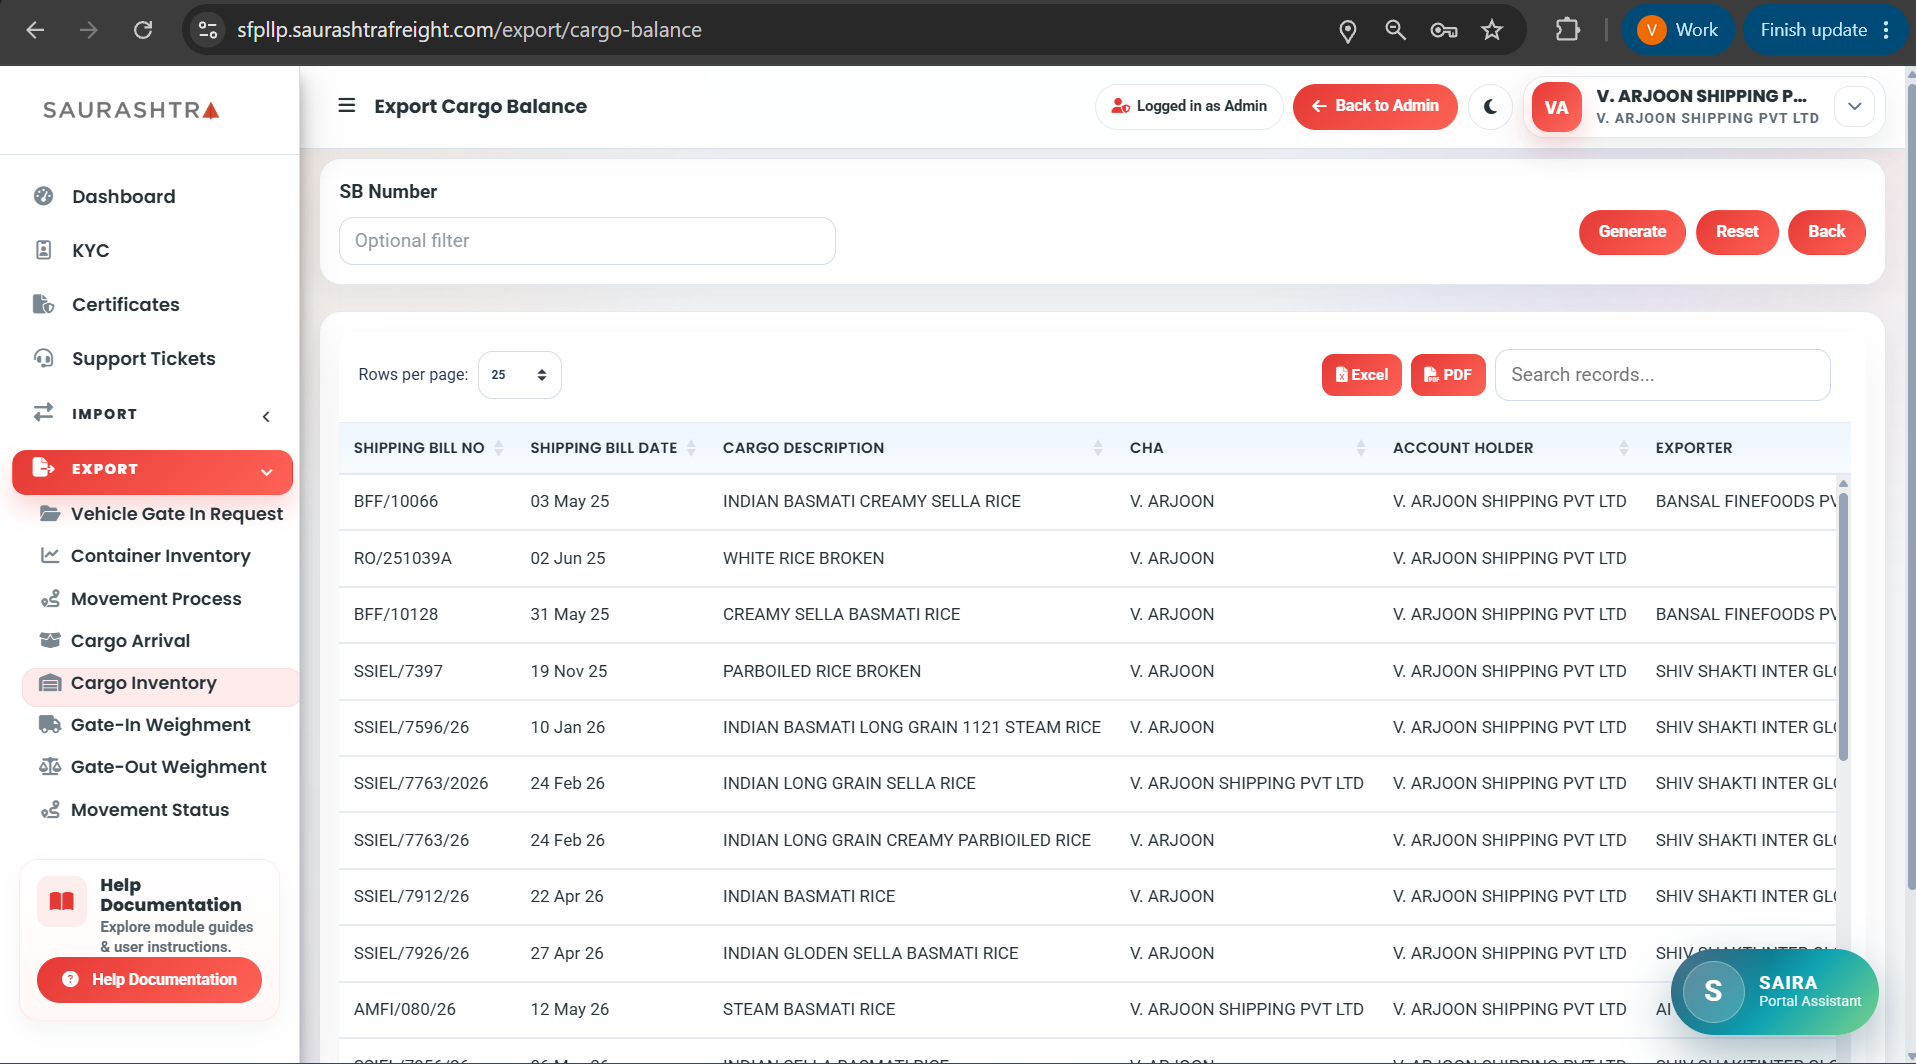
Click image to view full size
How to Use Cargo Inventory
- Navigate — Expand EXPORT and click Cargo Inventory.
- View Balance — The page shows your current cargo balance with package counts, weight, and volume details.
- Search — Use filters to narrow down results by shipping bill, container, or date range.
Gate-In Weighment
View weighment records for vehicles entering the CFS facility (gate-in). This module displays tare weight, gross weight, and net weight data.
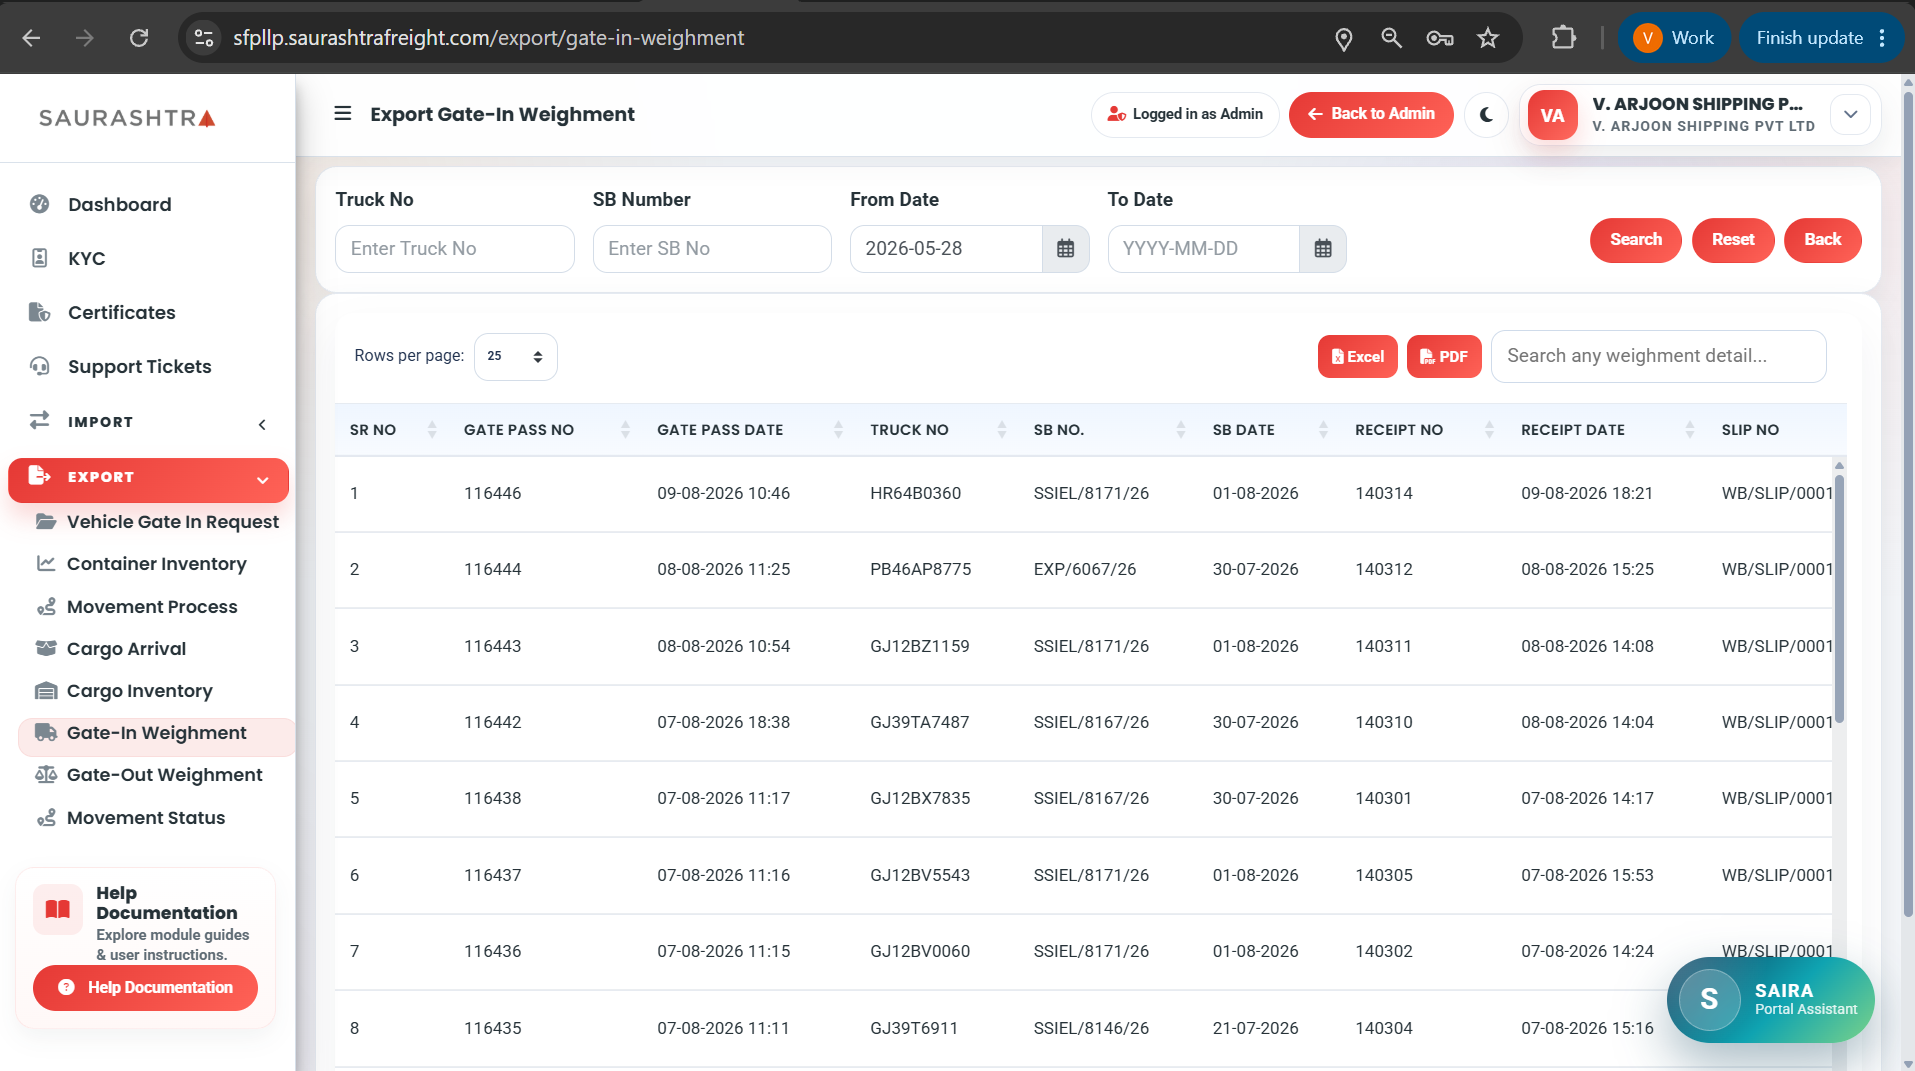
Click image to view full size
How to Use Gate-In Weighment
- Navigate — Expand EXPORT and click Gate-In Weighment.
- View Records — Browse the weighment data table with vehicle number, container number, weights, and timestamps.
Gate-Out Weighment
View weighment records for vehicles exiting the CFS facility (gate-out). Similar to Gate-In Weighment, this module shows tare weight, gross weight, and net weight, and allows receipt generation.
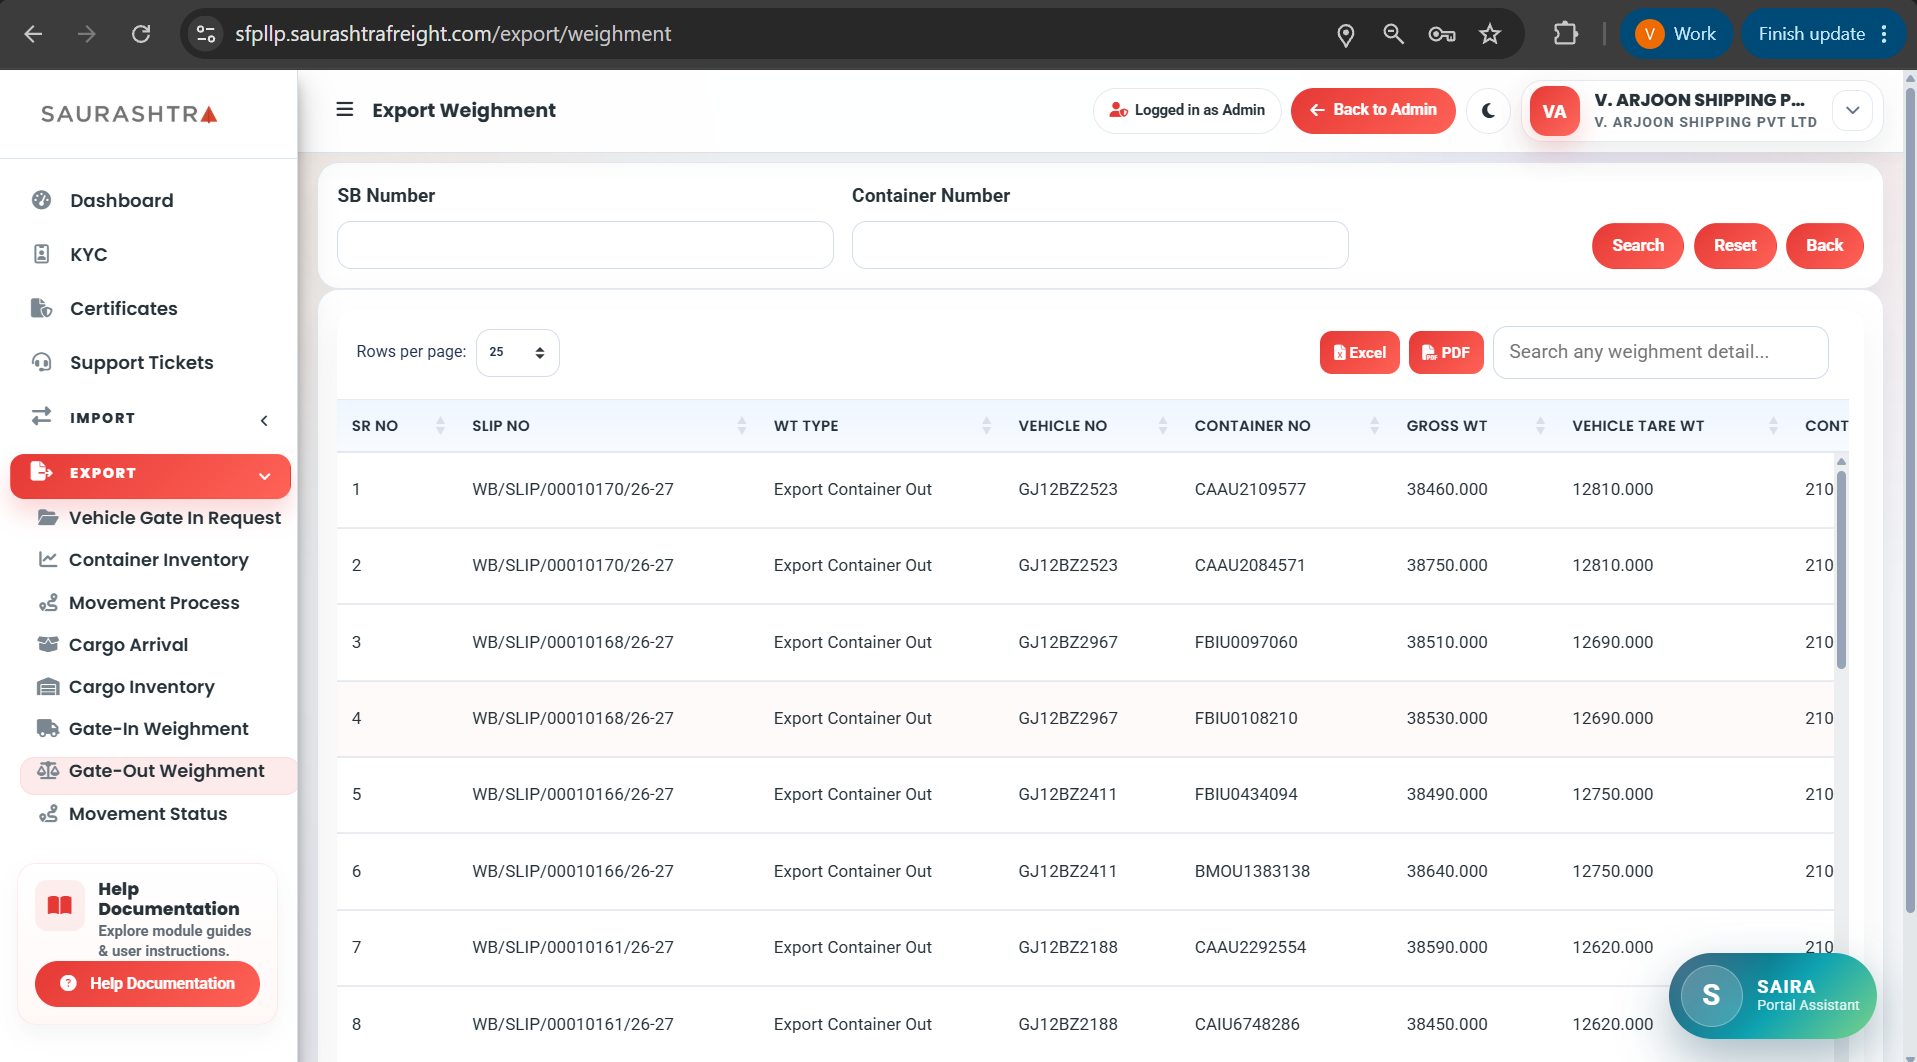
Click image to view full size
How to Use Gate-Out Weighment
- Navigate — Expand EXPORT and click Gate-Out Weighment.
- View Records — Browse the weighment data table with vehicle/container details and weight measurements.
- Print Receipt — Click Open PDF Receipt to generate a printable weighment receipt.
Movement Status
Track the movement status of your shipment containers across various stages of the export process. This module shows the current stage, timestamps, and overall progress of each container's journey.
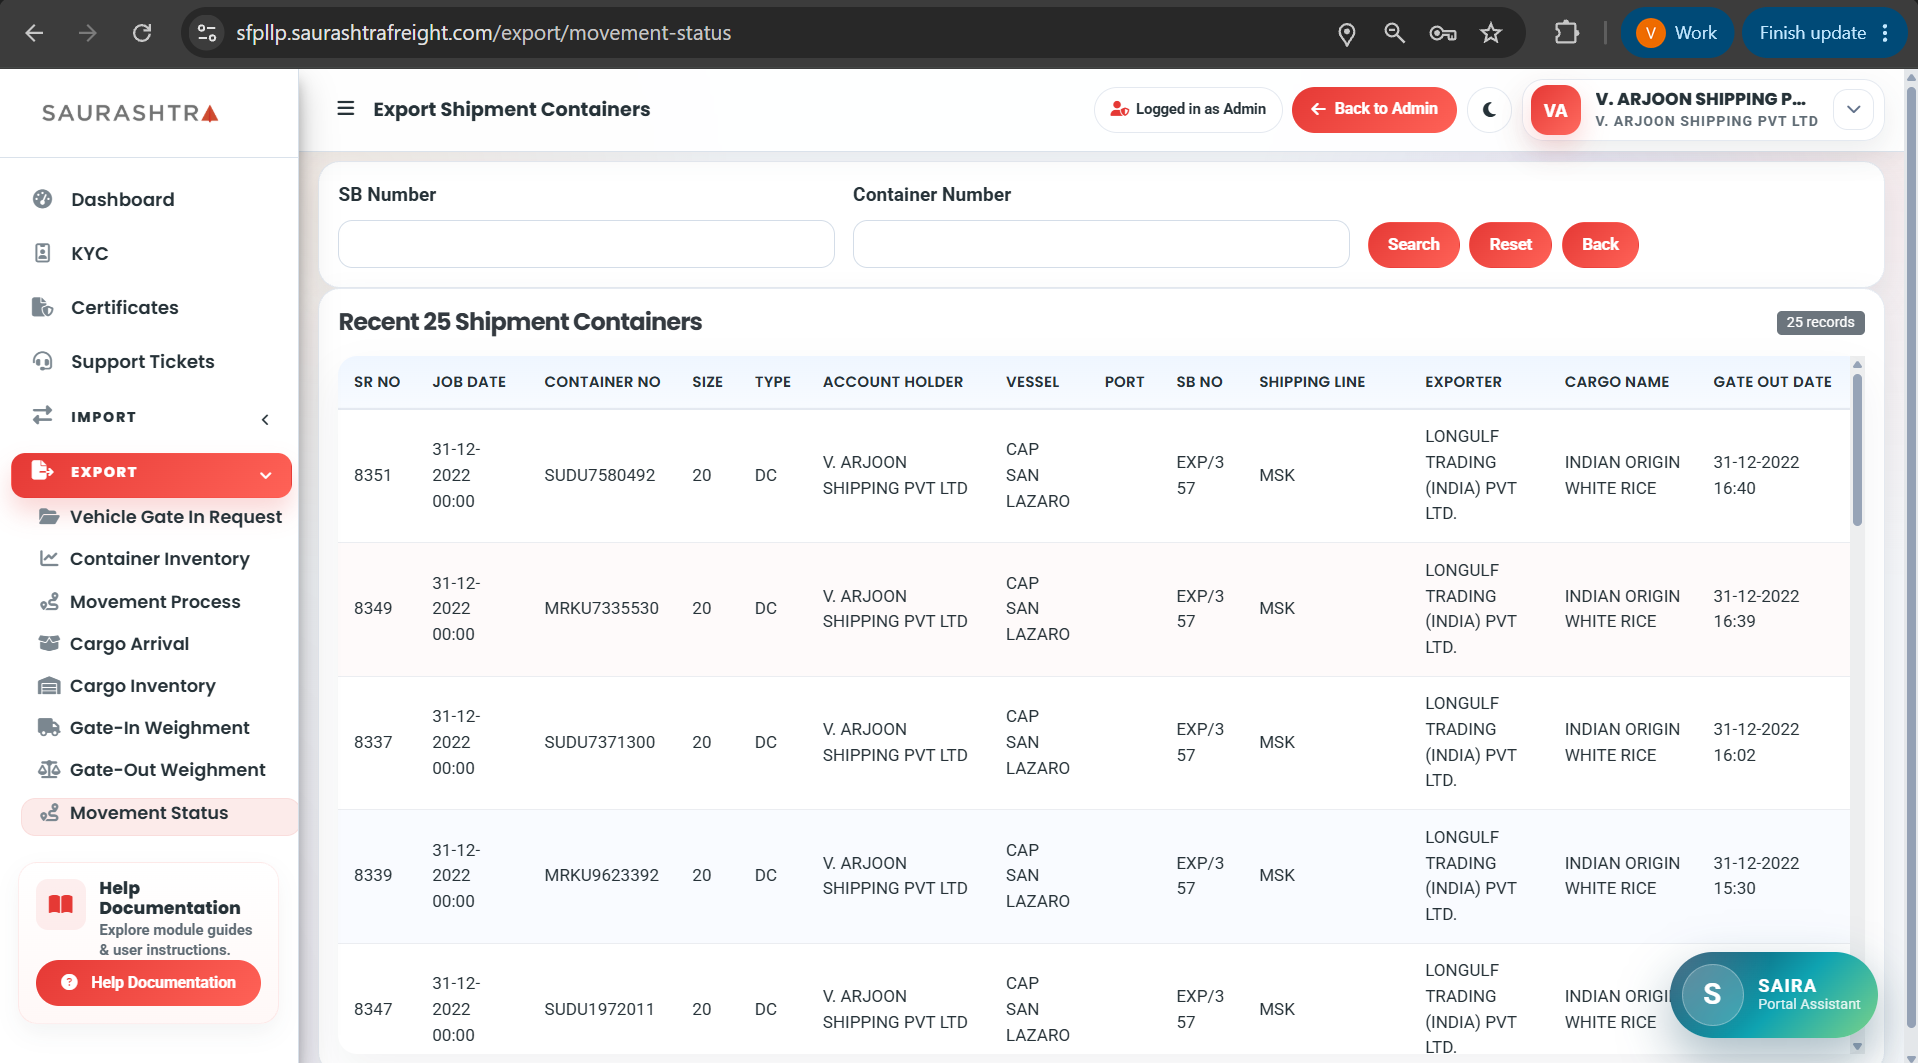
Click image to view full size
How to Use Movement Status
- Navigate — Expand EXPORT and click Movement Status.
- Search Shipments — Use the search filters to find specific shipment containers.
- View Status — Each container shows its current movement stage and historical timeline.
SAIRA — Portal Assistant
Authenticated
SAIRA is your AI-powered portal assistant available on the Customer Portal. It appears as a floating chat widget in the bottom-right corner and helps with container lookups, navigation, and real-time operational queries.
SAIRA Assistant Screens
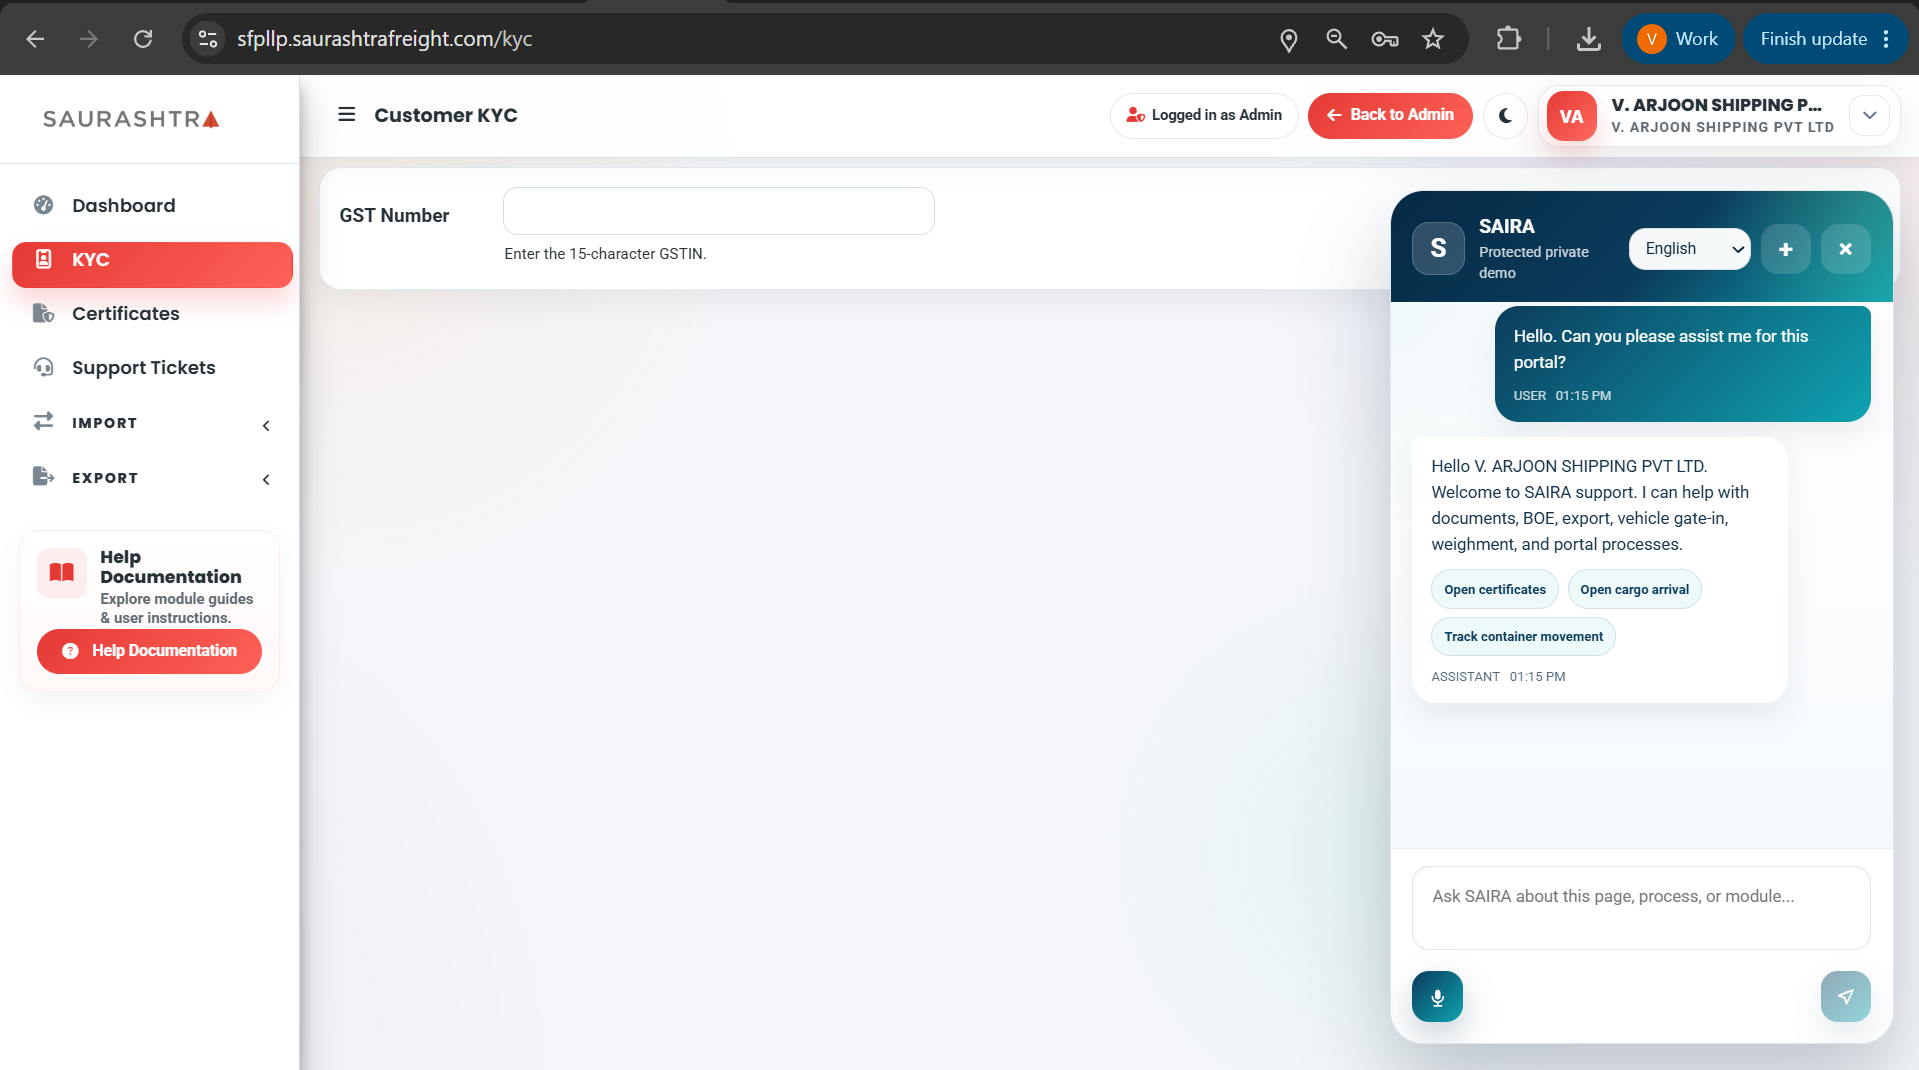
Screen 1: Floating Widget
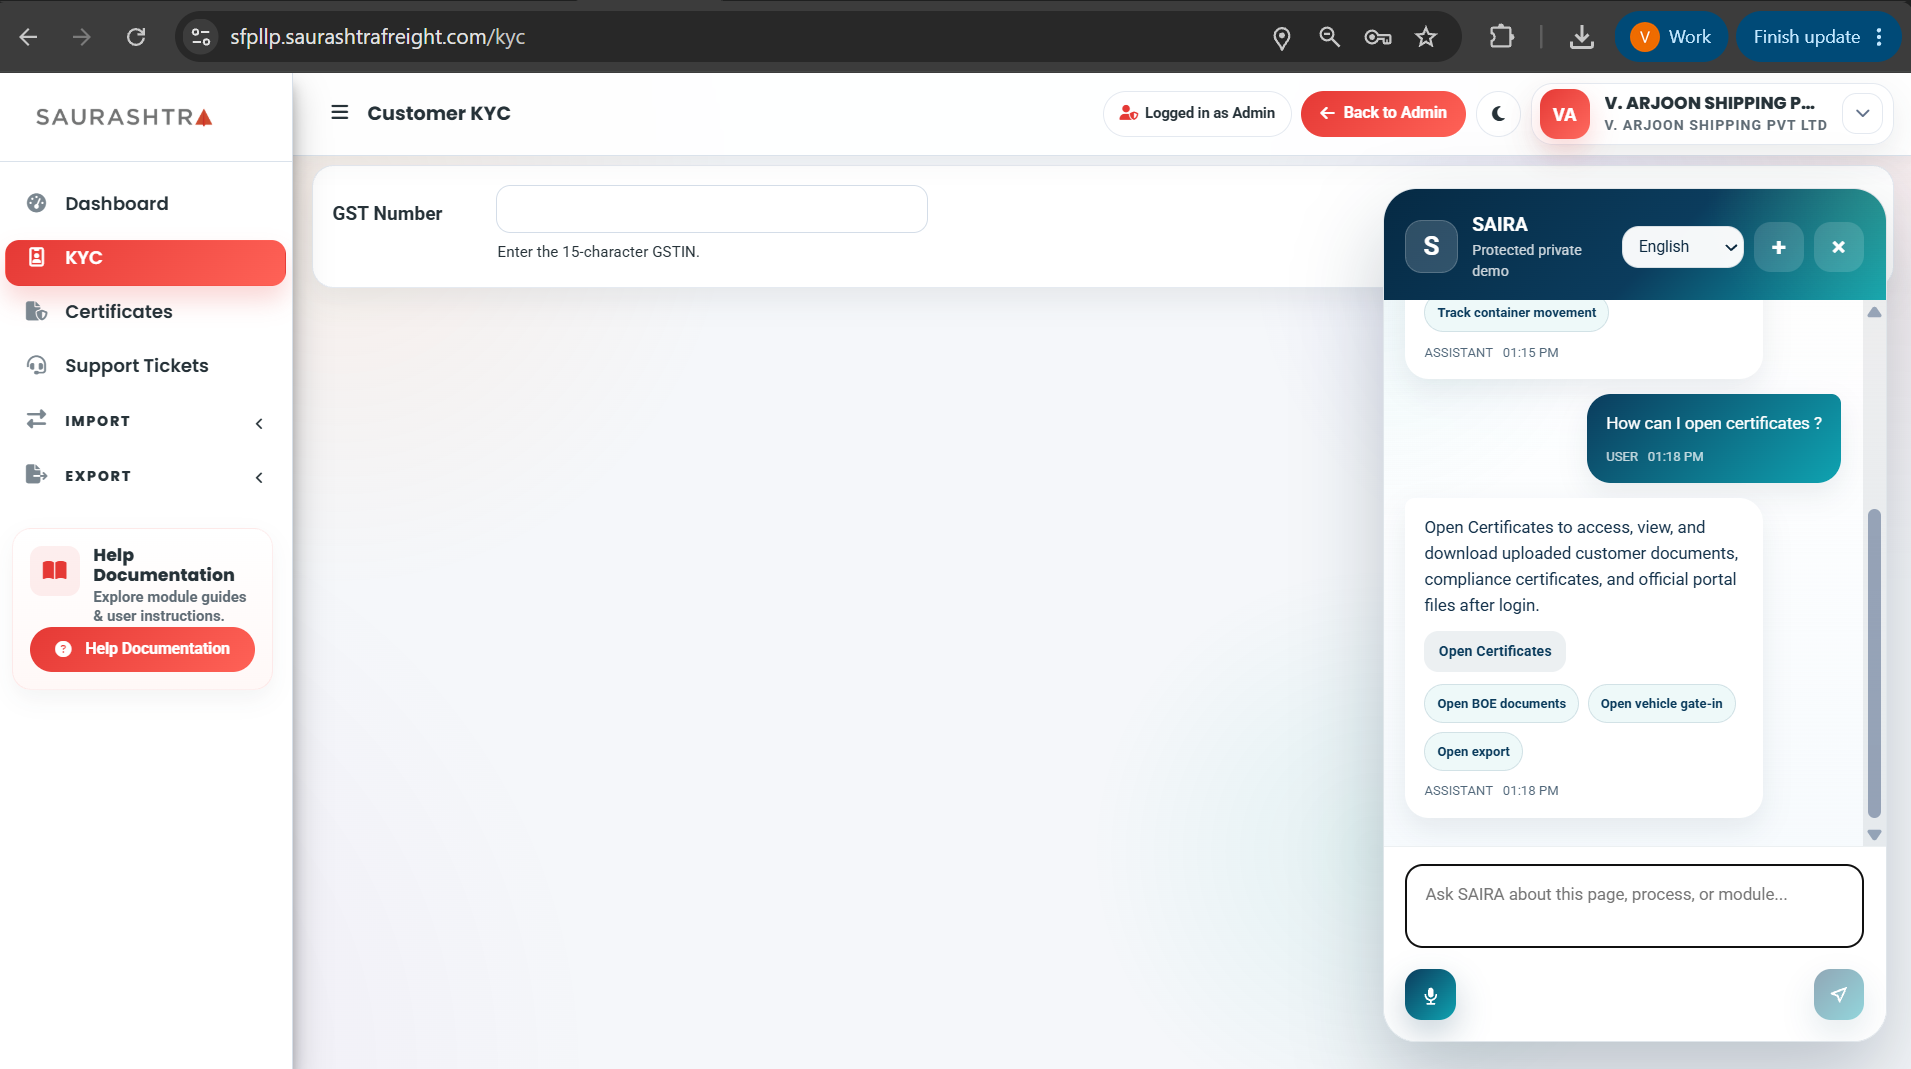
Screen 2: Interactive Chat Window
How to Use SAIRA
- Open SAIRA — Click the SAIRA floating widget in the bottom-right corner of the page (Screen 1).
- Start a Conversation — Type your question or container number in the message input field (Screen 2).
- Get Instant Assistance — SAIRA will respond with relevant information, tracking updates, or guided steps.
- Voice Input — Click the microphone icon to speak your query hands-free.
SAIRA availability is managed by portal feature toggles. Ensure SAIRA is enabled for your workspace.